The <mat-menu>, an Angular Directive, is used to create a menu and attach it with a control with material design styling and animation capabilities.
In this chapter, we will showcase the configuration required to draw a menu control using Angular Material.
Follow the following steps to update the Angular application we created in Angular 6 - Project Setup chapter −
Step | Description |
---|---|
1 | Create a project with a name materialApp as explained in the Angular 6 - Project Setup chapter. |
2 | Modify app.module.ts, app.component.ts, app.component.css and app.component.html as explained below. Keep rest of the files unchanged. |
3 | Compile and run the application to verify the result of the implemented logic. |
Following is the content of the modified module descriptor app.module.ts.
import { BrowserModule } from '@angular/platform-browser'; import { NgModule } from '@angular/core'; import { AppComponent } from './app.component'; import {BrowserAnimationsModule} from '@angular/platform-browser/animations'; import {MatMenuModule, MatButtonModule} from '@angular/material' import {FormsModule, ReactiveFormsModule} from '@angular/forms'; @NgModule({ declarations: [ AppComponent ], imports: [ BrowserModule, BrowserAnimationsModule, MatMenuModule, MatButtonModule, FormsModule, ReactiveFormsModule ], providers: [], bootstrap: [AppComponent] }) export class AppModule { }
Following is the content of the modified HTML host file app.component.html.
<button mat-button [matMenuTriggerFor] = "menu">File</button> <mat-menu #menu = "matMenu"> <button mat-menu-item>New</button> <button mat-menu-item>Open</button> <button mat-menu-item [matMenuTriggerFor] = "recent">Recent</button> </mat-menu> <mat-menu #recent = "matMenu"> <button mat-menu-item>File 1</button> <button mat-menu-item>File 2</button> </mat-menu>
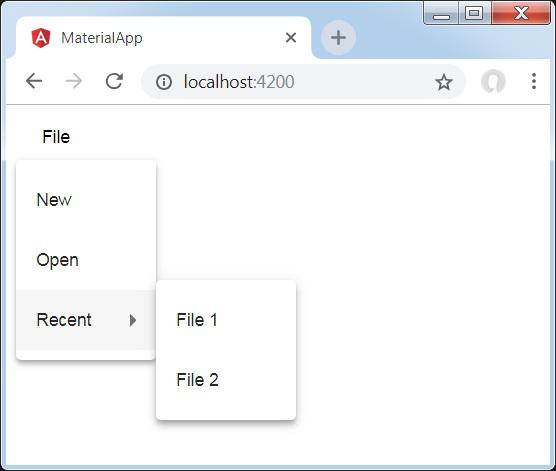
Verify the result.
As first, we've created two menus using mat-menu and bind them to buttons using matMenuTriggerFor.
matMenuTriggerFor is passed the menu identifier to attach the menus.