Windows10 Dev - Connected Experience
As we already know, in Windows 10 we can create an application which can be executed and run on multiple Windows 10 devices. Let us suppose that we have these different devices and we want to make it feel like that it is one application even though it is running on different devices.
In the Universal Windows Platform (UWP), you can run a single application on all Windows 10 devices, and you can give the user a feeling that it is one application. This is known as connecting experience.
Important features of connected experience −
Windows 10 is the first step to an era of more personal computing where your apps, services and content can move with you across devices, seamlessly and easily.
With connected experience, you can easily share your data and personal settings related to that application and it will be available on all devices.
In this chapter we will learn −
where these shared data or settings will be stored so that it can be available on your devices for that one application.
how the user is identified; that it is the same user which is using the same application on different devices.
Windows 10 takes a bold step forward. When you login to Windows 10 with either Microsoft account (MSA) or with your enterprise or (work) account, it is assumed that −
You have free access to OneDrive for MSA account, and you have access to Active Directory (AD) and Azure Active Directory (AAD), which is a cloud version with your enterprise account.
You have access to different applications and resources.
The Devices and applications are in roaming state and settings.
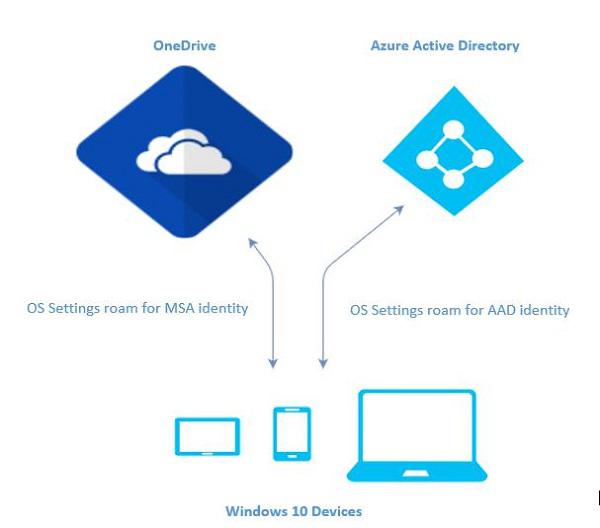
Roaming in Windows 10
When you logon to a PC, you set some preferences like lock screen or background color or personalize your different kinds of settings. If you have more than one computer or device, which are running on Windows 10, your preferences and settings on one device will be synchronized from cloud, when you login to other devices with the same account.
In Windows 10, when you have set or personalized your application settings, then these settings will roam with Roaming APIs available in UWP. When you run the same application again on other device, then it will first retrieve the settings and apply those settings to the application on that device.
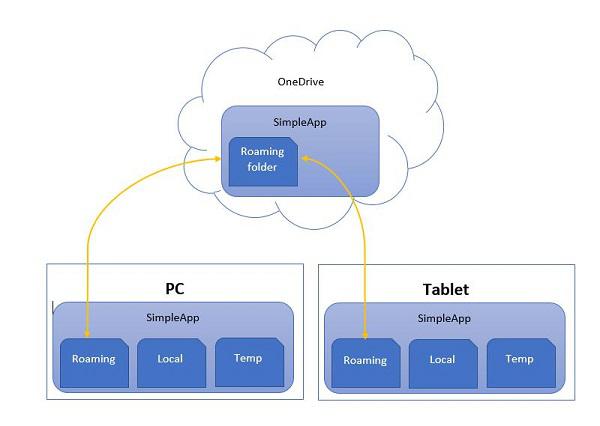
There is a limit of 100KB for uploading roaming data to the cloud. If this limit exceeds, then synchronization will stop and will just behave like a local folder.
The RoamingSettings APIs are exposed as dictionary in which an application can save data.
Windows.Storage.ApplicationDataContainer roamingSettings =
   Windows.Storage.ApplicationData.Current.RoamingSettings;

// Retrivve value from RoamingSettings
var colorName = roamingSettings.Values["PreferredBgColor"].ToString();

// Set values to RoamingSettings
roamingSettings.Values["PreferredBgColor"] = "Green";
When the data changes in RoamingSettings then it fires the DataChanged event, where you can refresh your settings.
Windows.Storage.ApplicationData.Current.DataChanged += RoamingDataChanged;

private void RoamingDataChanged(Windows.Storage.ApplicationData sender, object args) {
   // Something has changed in the roaming data or settings
}
Let us look at an example, in which we will set the background color of the application and these settings will roam with Roaming APIs available in UWP.
Given below is the XAML code in which different controls are added.
<Page
   x:Class = "RoamingSettingsDemo.Views.MainPage"
   xmlns = "http://schemas.microsoft.com/winfx/2006/xaml/presentation"
   xmlns:x = "http://schemas.microsoft.com/winfx/2006/xaml"
   xmlns:local = "using:RoamingSettingsDemo.Views"
   xmlns:d = "http://schemas.microsoft.com/expression/blend/2008"
   xmlns:mc = "http://schemas.openxmlformats.org/markup-compatibility/2006"
   mc:Ignorable = "d">

   <Grid x:Name = "MainGrid" Background = "{ThemeResource ApplicationPageBackgroundThemeBrush}">
      <Grid.RowDefinitions>
         <RowDefinition Height = "80" />
         <RowDefinition />
      </Grid.RowDefinitions>

      <StackPanel Orientation = "Horizontal" VerticalAlignment = "Top" Margin = "12,12,0,0">
         <TextBlock Style = "{StaticResource HeaderTextBlockStyle}"
            FontSize = "24" Text = "Connected Experience Demo" />
      </StackPanel>

      <Grid Grid.Row = "1" Margin = "0,80,0,0">
         <StackPanel Margin = "62,0,0,0">
            <TextBlock x:Name = "textBlock" HorizontalAlignment = "Left"
               TextWrapping = "Wrap" Text = "Choose your background color:"
               VerticalAlignment = "Top"/>

            <RadioButton x:Name = "BrownRadioButton" Content = "Brown"
               Checked = "radioButton_Checked" />

            <RadioButton x:Name = "GrayRadioButton" Content = "Gray"
               Checked = "radioButton_Checked"/>
         </StackPanel>
      </Grid>

   </Grid>

</Page>
C# implementation for RoamingSettings and different events is given below.
using System;
using System.Collections.Generic;
using System.IO;
using System.Linq;
using System.Runtime.InteropServices.WindowsRuntime;

using Windows.Foundation;
using Windows.Foundation.Collections;

using Windows.UI;
using Windows.UI.Xaml;
using Windows.UI.Xaml.Controls;
using Windows.UI.Xaml.Controls.Primitives;
using Windows.UI.Xaml.Data;
using Windows.UI.Xaml.Input;
using Windows.UI.Xaml.Media;
using Windows.UI.Xaml.Navigation;

// The RoamingSettingsDemo Page item template is documented at
   http://go.microsoft.com/fwlink/?LinkId=234238

namespace RoamingSettingsDemo.Views {

   /// <summary>
      /// An empty page that can be used on its own or navigated to within a Frame.
   /// </summary>

   public sealed partial class MainPage : Page {

      public MainPage() {
         this.InitializeComponent();
      }

      protected override void OnNavigatedTo(NavigationEventArgs e) {
         SetBackgroundFromSettings();
         Windows.Storage.ApplicationData.Current.DataChanged += RoamingDataChanged;
      }

      protected override void OnNavigatedFrom(NavigationEventArgs e) {
         Windows.Storage.ApplicationData.Current.DataChanged -= RoamingDataChanged;
      }

      private void RoamingDataChanged(Windows.Storage.ApplicationData sender, object args) {

         // Something has changed in the roaming data or settings
         var ignore = Dispatcher.RunAsync(Windows.UI.Core.CoreDispatcherPriority.Normal,
            () ⇒ SetBackgroundFromSettings());
      }

      private void SetBackgroundFromSettings() {

         // Get the roaming settings
         Windows.Storage.ApplicationDataContainer roamingSettings =
            Windows.Storage.ApplicationData.Current.RoamingSettings;

         if (roamingSettings.Values.ContainsKey("PreferBrownBgColor")) {
            var colorName = roamingSettings.Values["PreferBrownBgColor"].ToString();

            if (colorName == "Gray") {
               MainGrid.Background = new SolidColorBrush(Colors.Gray);
               GrayRadioButton.IsChecked = true;
            } else if (colorName == "Brown") {
               MainGrid.Background = new SolidColorBrush(Colors.Brown);
               BrownRadioButton.IsChecked = true;
            }
         }

      }

      private void radioButton_Checked(object sender, RoutedEventArgs e){
         if (GrayRadioButton.IsChecked.HasValue &&
            (GrayRadioButton.IsChecked.Value == true)) {
               Windows.Storage.ApplicationData.Current.RoamingSettings.
                  Values["PreferBrownBgCo lor"] = "Gray";
         } else {
            Windows.Storage.ApplicationData.Current.RoamingSettings.
               Values["PreferBrownBgCo lor"] = "Brown";
         }

         SetBackgroundFromSettings();
      }

   }
}
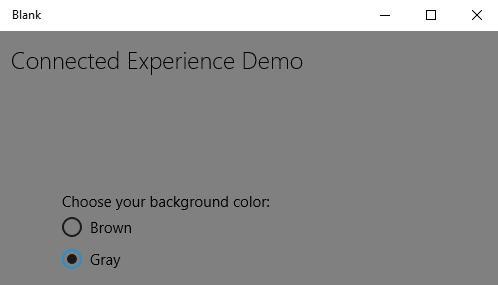
When the above code is compiled and executed, you will see the following window.
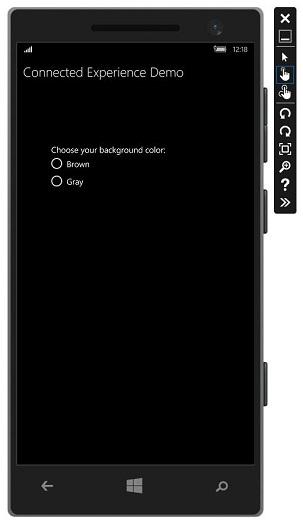
Let us choose gray color as the background color and close this app.
Now, when you run this app on this device or any other device, you will see that the background color has changed to gray. This shows that the app has successfully retrieved the information of background color change in RoamingSettings.
