UiPath - Quick Guide
Robotic Process Automation - Introduction
Robotic Process Automation (RPA) is a software program that imitates human actions while interacting with a computer application and accomplishing automation of repetitive, rule-based processes.
This chapter will give a brief historical evaluation and introduction to RPA. You will also understand when and why to choose RPA.
What is RPA?
Robotic Process Automation (RPA) is the technology that allows the automation of the task in exactly the way how a human does. A robot in robotic process automation does not mean that literally robots are going to replace human beings, but it means a computer program that imitates human actions.
In other words, we can say that RPA is a software program that imitates human actions while interacting with a computer application and accomplishing the automation of repetitive and rule-based processes. RPA can be used to automate the labor intensive tasks such as back office processes, data entry, data validation etc.
Historic Evaluation
Robotic process automation proves itself as a game changing technology. Yet a very common topic of debate among automation community is whether RPA is a new development or it should be seen simply as an extension of the technologies that came before it.
For better understanding, we need to study the following three key predecessors of RPA −
Screen Scraping Software
A screen scraping software is meant to scan large sets of static information or other visual representation of data to pull key terms, integers or other important analytics. In the context of RPA, we can say that the same functionality is used by RPA. Even RPA is integrating screen scraping capabilities into a larger suite of functions.
Workflow Automation and Management Tools
As the name suggests, such tools can help in order processing by capturing customer contact information, invoice total as well as item ordered. They even translate these details into our company database and notify the corresponding employee too. Such tools eliminate manual data entry. In the context of RPA, we can say that the same functionality is used by RPA. Even RPA is integrating its work automation tool capabilities into a larger suite of functions.
Artificial Intelligence
As we know that AI is the capability of computer systems to perform tasks that normally require human intervention and intelligence. AI machines can replace tedious and manual labor that is time consuming. In the context of RPA, we can say that the same functionality is used by RPA. Even RPA is integrating AI capabilities into a larger suite of functions.
All of the above three advancements in automation were significant in one or other sense but what makes RPA an impactful technology is its ability to combine, refine certain aspects of each of these technologies.
Why RPA?
In today's scenario of typical enterprises, RPA can be used to fill the gap between systems and process. A typical enterprise is having the following scenario −
The typical PROCESS in business scenario is rapidly changing due to competition, can be understood with the help of following diagram −

If we talk about TECHNOLOGY in the business scenario, a typical enterprise uses multiple and disconnected IT systems to run its operations. But due to lack of updating, these technical processes cannot help business at required extent. It can be understood with the help of following diagram −

If we talk about PEOPLE in business scenario, a typical enterprise hires human workforce to fill the gap between systems and processes.

A challenging issue in a business enterprise is change. Why challenging, because with any change in business process, enterprises either need to hire new employees or train its existing ones. Both solutions are costly as well as time consuming.
Another solution is RPA with which company can deploy virtual workers imitating human workers. Now if any change happens, only change in few software code lines would be required which is much cheaper and faster solution than hiring employees. It basically maps digital workforce and human workforce with PROCESS and TECHNOLOGY in a business enterprise.

Test automation v/s RPA
Fast release, less time consumption, less cost consumption, correctness and quality assurance are some of the apparent reasons to call RPA and test automation two similar processes.
Some useful parameters which gives the key differences between them are discussed below −
Goal − The main goal of test automation is to reduce test automation time through automation. On the other hand, RPA's goal is to reduce headcounts through automation.
Coding skills − Test automation requires coding skills to create test scripts. RPA is wizard-driven and does not require any coding skills.
Implementation − Test automation can automate a product only. On the other hand, RPA can automate products as well as service.
Users − As discussed test automation requires technical skills, hence it is limited to only technical people; however RPA can be used by non-technical persons too.
Application − Test automation can be run on quality assurance, production and UAT environments, but RPA can usually run only on production environments.
Example − The best example of test automation is automated test cases. On the other hand, the examples of RPA are data entry, forms, loan processing etc.
The above differences prove that RPA is an advanced approach that provides better assistance to test automation.
Pros & Cons of RPA
Like any other software or technology, RPA too has its advantages and limitations. Let us discuss what these are −
Pros
Some advantages of using RPA are as follows −
Reduces human efforts and thus the related human errors too.
Improves productivity by saving cost and time.
Offers real time visibility into bug discovery.
Suitable for the usage by non-technical persons too, as no programming skills are required to use it.
Easy to automate large number of processes.
Feature of tracking the defects for each test cases.
Needs less training to master RPA tool.
Cons
Some disadvantages of using RPA are as shown −
Myths about RPA
Some myths that exist around RPA are as discussed here −
RPA software requires coding skills
Many people think that coding skills are required to use RPA software. This is not true because a non-technical person can easily use it. He/she only need to understand the front-end.
Human supervision is not required at all
The myth that RPA software does not require human supervision at all, is not true. Humans are needed to program as well feeding the task to the bots.
It is the cup of tea of only big organizations
Many people think that RPA can be deployed and use by large companies only but this is also not true. Small to medium-sized organizations can deploy RPA to automate the business.
UiPathRobotic Process Automation - Working
This chapter will give a detailed view of working of Robotic Process Automation and its implementation.
How RPA Works?
RPA can execute necessary tasks, which are generally repetitive and rule-based, much better than humans. But here the question that how RPA works will arise. RPA bots transform back office by interacting with the user interface of a computer system just like humans.
It works with any existing application and carries structured processes automatically. RPA is code free and user friendly and hence does not require additional software development or IT specialists for its working. In simple words, we can say that RPA works using demonstrative steps.
RPA Implementation
For implementing RPA, a software-based technique, software robots or virtual assistants or bots are created that can perform the processes like accounting, finance, management, data entry etc.
The following approach which consists of RPA implementation methodology, should be followed for a successful RPA implementation −
- First, identify the automation opportunities.
- Then optimize the identified processes.
- Next, build a business case for RPA journey.
- Select a RPA vendor for implementation.
- Now, start initial RPA bots' development.
- Lastly, expand our RPA scope and continue building RPA bots.
Example
The following diagram shows an example executing the process of reading emails automatically by RPA −

Tools for RPA
There are various tools available for RPA; however, following are some most popular robotic process automation tools −
Blue Prism
It is a RPA software that provides an agile digital workforce to the organizations. It can be downloaded from https://www.blueprism.com/.
Automation Anywhere
Another important tool for RPA is Automation Anywhere which can be downloaded from https://www.automationanywhere.com/
UiPath
It is a RPA software. It helps organizations to automate processes efficiently. It can be downloaded from https://www.uipath.com/
OpenSpan
It is arobotic process automation tool based on .net framework. It helps to integrate desktop applications. After acquired by PEGA it is now known as Pega OpenSpan.
WorkFusion
It is another robotic process automation tool which provides AI-powered platform to automate operations. It can be downloaded from https://www.workfusion.com/
Which Tool to Choose?
As we have seen there are lots of tools for RPA but the big question is that which tool to choose. Followings are some parameters which must be considered before selecting RPA tool −
Technology
The most important parameter to check is the technology say Microsoft .NET, IBM Mainframe, Java etc., in which the tool is built. The tool has to be platform independent so that the automation solutions support any application.
Data
Data is another important parameter. We must choose the tool that makes easy to read and write business data into multiple systems.
Interface
RPA's user interface must be user friendly because a complex user interface will delay the process of implementation.
Interoperability
As discussed, toll must be platform independent and work across multiple applications.
Ease of management
Another important parameter is how easily and effectively robots can be managed. The tool must have high level of control and visibility.
Type of tasks
The type of tasks, whether rule-based or knowledge-based, that can be configured by RPA tool is another important parameter to be taken care while selecting the tool.
Security
Security is one more important parameter to consider. As we know that RPA is a piece of software, how much security controls can be implemented is a factor to be considered.
Applications of RPA
If the industry is using computer for repetitive and boring jobs like data entry, loan processing etc., then it can use RPA. Followings are some of the applications of RPA in various industries −
| Industry |
Usage |
| Banking |
- Customer support
- Loan processing
- Fraud claims
- Cards activation
|
| Human Resource (HR) |
- Joining formalities
- Payroll process
- Short listing of candidates
|
| Healthcare |
- Patient registration
- Billing
- Report generation
|
| Insurance |
- Premium calculation
- Processing claims
- Clearance of claims
- Responding partner queries
|
| Utility |
- Customer service
- Debt recovery
- Billing
|
| Legal |
- Converting documents digitally
- Customer support
|
| Business process outsourcing |
- ERP automation
- Invoice processing
- Automation of logistic data
|
| Government |
- License renewal
- Change of address
|
| Infrastructure |
- Account setup
- Customer support
- Application processing
|
| Manufacturing |
- Generation of bills and sales calculation
|
UiPath - Basics
The previous chapters gave us an idea about what RPA is all about. We have also seen some basic concepts about RPA implementation. This chapter will explain key basics of UiPath and the related concepts.
Introduction
Many enterprises are adopting digital methods for their operation because they understood that future lies in routine operation being fully automated. Speed of execution and accuracy are the two biggest advantages of digitization. On the other side, right tool and skilled manpower are the two biggest challenges of digitization. That is why industry was looking for a fast and reliable solution which they got in the form of RPA tool named UiPath.
What is UiPath?
UiPath is a Robotic process automation tool used for Windows desktop automation. It is founded in the year 2005 by the Romanian entrepreneurs Daniel Dines and Marius Tirca. It is used to automate boring repetitive tasks. It also eliminates the human intervention. With drag and drop functionality for all activities, it is the simplest RPA tool.
Why UiPath?
There are lots of tools for robotic process automation, however UiPath is the most popular among them. Following are some of the features of UiPath that makes it attractive for RPA −
Complete Solution
UiPath offers a complete solution with the help of three components namely UiPath Studio, UiPath Orchestrator and UiPath Robots.
Intuitive
Working with UiPath and creating robots is very instinctive because it uses drag and drop and flowchart activities. It is very easy to learn too.
Extensive Activity Library
UiPath is having an extensive activity library consisting of hundreds of pre-built, drag & drop actions.
Security
UiPath also offers high level security because we can store and encrypt the credentials on the centralized server.
Recording
UiPath provides the facility of recording as well. It has special recorders for desktop apps, Citrix environment and terminal emulators which makes creating automation much faster and precise.

Universal Search
It is having universal search feature which allows us to perform single search for all automation resources like libraries, activities, projects and workflows.
Powerful Debugging
UiPath offers its user a very powerful debugging which is very intuitive and flexible.
Collaboration
UiPath promotes collaboration too, as we can store, protect and share scripts in MS Team Foundation and SVN. We can also re-use the workflow.
Third-party Integration
UiPath also provide third party integration facility. We can plug in various cognitive and OCR technologies from ABBYY, IBM Watson, Google, Microsoft text analysis at the API level.
Server-Based Licensing
Uipath allows server-based licensing which makes licensing process centralized and easy to use.
Products of UiPath
UiPath platform is available with following three product suites −
UiPath Studio
With the help of UiPath studio, we can design our automation processes in a visual manner. It allows us to use recorders, drag and drop widgets to model our robotic processes.
UiPath Robot
The job of UiPath robots is to take over once you are done with the designing of processes in studio and executing all the processes with perfect accuracy.
UiPath Orchestrator
It is a browser based server application that helps us to deploy, schedule, monitor, manage robot and processes. It is a centralized platform and hence responsible for managing the robots.
UiPath - Installation
This chapter will guide you through the installation process of UiPath on your local computer.
Requirements for Installing UiPath Studio
Before installing UiPath, we must have to fulfill following requirements −
Windows Computer − We require a modern Windows (2007 and above) computer. Note that UiPath does not have MAC version.
Knowledge of MS-office and Internet − If you are going to use UiPath, then you must have knowledge of Spreadsheets, MS Word etc. along with the knowledge of Internet and software applications.
Basics of Robotic Process Automation (RPA) − It would be beneficial if the user has the basic knowledge of RPA.
Steps to install UiPath Studio
You will have to follow the steps given below to install UiPath Studio on your local system.
Step 1 − First to install UiPath, follow the link https://www.uipath.com/developers/community-edition-download.

Step 2 − Next, we need to fill the credentials in the form.

Step 3 − Now, click the button for requesting community edition.

Step 4 − Next, you will get a link in your email id. Click that for downloading UiPath. It will download an exe file on your computer.
Step 5 − Now in order to install run the exe file named UiPathStudio.exe, you got in step 4.
Step 6 − UiPath will start its installation on your computer.

Starting UiPath Studio
Once the installation steps, discussed in previous section, are completed, we can see the following screen −

Now to start, we need to click an option. Here we are using free community edition so click on Start Free option.
After clicking, we will get the following screen −

It will verify our credentials such as email id and device ID. It will auto detect your device id. You only need to fill your email id and click Activate button at the bottom on right side.
After clicking the Activate button, UiPath will start and you can see the following start page −

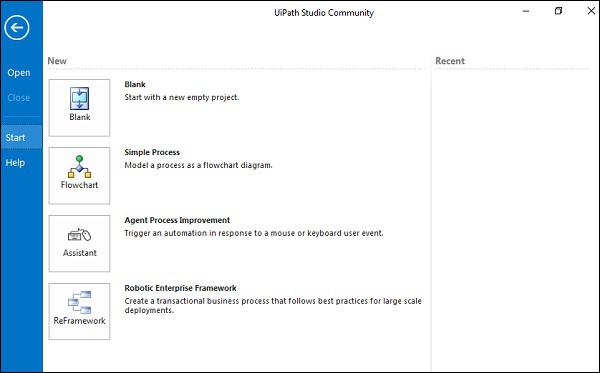
Types of Projects
UiPath studio gives us the choice of four different kinds of projects which are as follows −
Blank Project
As the name suggest, it is just like blank paper and we can build your project from scratch. We need to define everything from scratch. The screen shot of a blank project is as follows −

Simple Process Project
This kind of project will give us a template of a flowchart which consists of diagram of sequence of activities. The screenshot of simple process projects is as follows −

Agent Process Improvement Project
As the name suggests, such kind of project assists the user by automating the task. It is basically used to assess any user working on the system. The screen shot of Agent Process Improvement projects is as follows −

Robotic Enterprise Frameworks Project
Such kind of project is used to create a transactional business process that follows the best practice for large deployments. In other words, if you want to use states in your project, then use Robotic Enterprise Frameworks. The screen shot of robotic enterprise framework project is as shown −

Important Concepts in UiPath Studio
We have the following two important concepts in UiPath studio −
Activities
The smallest action in UiPath is called activity. For example, clicking the mouse is an activity.
Sequence
It refers to the series of activities doing a meaningful task. For example, logging into email is a sequence in UiPath.
Understanding User Interface Components
In this chapter, let us discuss user interface in UiPath and its components. We shall also see how these components work and their functionalities.
Components of UiPath User Interface
UiPath studio has graphical user interface (GUI) containing multiple panels that provides easy access to the functionalities. Let us understand the working of different components of UiPath studio interface in detail.
The Ribbon
The very first panel in UiPath studio is the Ribbon. It is at the top of UiPath studio's GUI interface. It can be minimized as well as expanded as per user's choice.
Tabs
The Ribbon panel has the following four tabs −
Start tab
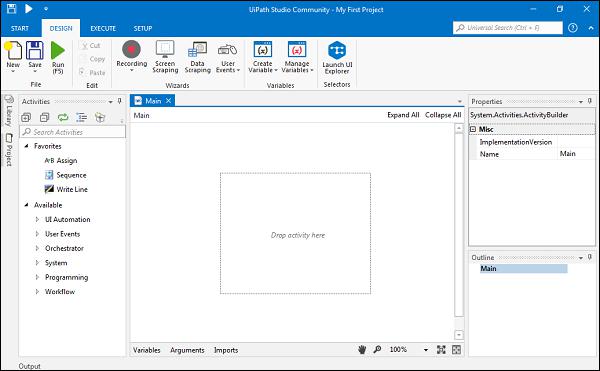
With the help of the start tab, we can create a new project or open an existing project. It will save the project in default location C:\Users\Username\Documents\UiPath\Projectname. Following screen shot will give an insight of Start tab of ribbon panel.

Design Tab
As the name suggests, it gives us option for creating or launching sequences, flowcharts or state machine diagrams. We can manage variables and access wizards under this tab. The following screen shot will give an insight of the Design tab −

Execute Tab
With the help of this tab we can stop or run projects, we can start debug process also. It gives us the option to slow down the steps as well as log opening. The following screen shot will give an insight of the Execute tab −

Setup Tab
This tab gives us the option to publish a project or create a shortcut of project. We can also schedule a task and install extension with this tab. The following screen shot gives an insight of the Execute tab.

The Quick Access Toolbar
Another panel in UiPath studio interface is the quick access toolbar. It is located by default on the title bar and above the ribbon. One of the features of quick access toolbar is that we can easily move it below the ribbon by clicking the option Show Below the Ribbon. We can call it time saving toolbar because it provides the shortcuts for the most used commands and even we can easily add new ones to it by right-clicking a desired button and selecting the option named Add to Quick Access Toolbar. Following screen shot will give you insight of The Quick Access Toolbar −

You can notice in the above screen shot that we have added shortcuts of some button to Quick Access Toolbar.
The Universal Search Bar
Another important and useful panel in UiPath studio interface is the Universal Search Bar. It is located at the top in right side just below Minimize, Restore and Close buttons. It basically allows us to look for anything that is contained in libraries, activities, project and designer panel.
The following screen shot gives an insight of The Quick Access Toolbar.

You can observe that we did a search for “gaurav” and it gives the result that Project 1 result found because we put “Gaurav” as the name of the project.
The Designer Panel
If you want to display and make changes to your current project, The Designer Panel is the one that enables you to do so. Besides, it also provides a quick access to variables, arguments and imports at bottom.
We can also navigate within a diagram by double clicking the activity in The Designer Panel. It also displays the path in its header.
The following screen shot will give you an insight of The Quick Access Toolbar −

Understanding User Interface Components Part2
This chapter is a continuation of the previous one and will talk about further user interface components of UiPath in detail.
The Activities Panel
This panel is on the left side of UiPath studio and has all the small tasks or activities. These tasks or activities can be easily added to the current project by drag and drop. It also provides a search box for quick access. Expand all and collapse all options gives user flexibility to show and hide all the activities at once.
With the help of Show Activities list, we can even show or hide Favorite, Recent, Available and Compatibility folders of activity. Similar to other panels on the interface it also has the options of Float, Dock, Auto Hide and Dock as document.
The following screen shot will give an insight of The Quick Access Toolbar −

In the above screen shot you can notice the activity panel.
The Library Panel
The library panel permits us to reuse automation. We have some Samples as well as Snippets in library panel which can be reused. It also provides a search box for finding the items faster.
Expand all and Collapse all options gives user flexibility to show and hide at once. Like other panels on the interface it also has the options of Float, Dock, Auto Hide and Dock as document. When we start UiPath, the library pane is collapsed and we need to click on it to get all the options.
The following screen shots give an insight of it −

Now after clicking Library icon we will get the complete library panel as follows −

The Project Panel
The project panel permits us to view the contents of the current project. We can also explore the files in current project folder with the help of one click on file explorer option in project panel. It has quick navigation link to the team tab so that we can connect to the source control.
Like other panels on the interface it also has the options of Float, Dock, Auto Hide and Dock as document. When we start UiPath, the Project pane is collapsed and we need to click on it to get all the options.
The following screen shot gives an insight of the Project panel −

Now after clicking Library icon we will get the complete library panel as follows −

The Properties Panel
The properties panel is at the right side of UiPath studio. It enables us to view and change the properties of a selected activity or task. In other words, we can say that handling of configuration like setting the output of a particular activity or task is done in the properties panel.
Similar to other panels on the interface it also has the options of Float, Dock, Auto Hide and Dock as document.
The following screen shot will give an insight of the Property panel −

The Outline Panel
The Outline Panel is just below the properties panel in right side of UiPath studio. As the name suggests, it provides the project hierarchy along with all the variables and nodes. We can also highlight any activity or task in this panel by selecting that activity or task in the Designer panel. We can also select any specific activity or task in this panel itself.
The following diagram will give an insight of the outline panel −

The Output Panel
The Output Panel is at left side in the bottom of UiPath studio. It provides us the following features and functionalities −
It displays the output of the Log Messages or Write Line activities/tasks.
Exceptions, if any, for the packages will be displayed in the Output panel.
With the help of buttons in this panel header we can show or hide messages having different log levels.
We can see more information from the displayed message by double-clicking it.
It enables us to copy the information also.
Other main functionality of this panel is to show the logs, on debugging, for when an activity or task starts executing and until it ends.
Logs and other data can be erased from this panel by using Clear All button. It can display 2000 lines at a time.
The following screen shot will give an insight about the Output Panel −

The Locals Panel
We can see The Locals Panel only while debugging. It shows all the variables that are in the scope of the currently running activity or task. We can also track the usage of variables during execution and can see their values while they change as well.
The following screen shot will give insight about The Locals Panel −

The Context Menu
Basically, the Context Menu enables us to perform various operation on our workflow despite it is a sequence or a flowchart. To make Context Menu appear, we need to right click an activity or task inside our workflow.
The following screen shot shows various fields in The Context Menu −

Descriptions of Context Menu Fields
Context menu contains various fields that are explained as below −
View Parent − Displays the parent of the selected activity or task. The condition is that the activity must be a child activity.
Cut − Cuts the selected activity and puts it onto the clipboard just like MS-Word.
Copy − Copies the selected activity and put it onto the clipboard as like MS-Word.
Paste − Inserts the content of the clipboard at the current location.
Delete − Deletes the target activity or task.
Annotations − Allows to insert, add, edit, delete, hide and show annotations to the activities in the workflow.
Copy as image − Makes a screenshot of the content displayed in the Designer panel.
Save as image − Makes a screenshot of the content displayed in the Designer panel along with giving a prompt to the user for saving it.
Create variable − Creates a variable in the Variable panel.
Remove Sequence − Removes the selected sequence activity.
Surround with Try and Catch − Inserts the selected activity or task in a Try Catch block.
Extract as Workflow − Creates a new workflow which contains the selected activity or task along with the intention of breaking down a large project into smaller one.
Open Workflow − Opens the workflow which has been created after selecting the option Extract as workflow.
Enable Activity (Ctrl+E) − Enables the previously disabled activity.
Disable Activity (Ctrl + D) − Disables a selected activity and places that activity inside a comment out activity.
Toggle Breakpoint − Marks the selected activity or task as a breakpoint for debugging.
Help − Provides help to the user from UiPath studio.
Keyboard Shortcuts and Customization
UiPath studio has keyboard shortcuts for various activities to save a user's time. In this chapter, you will learn various keyboard shortcuts in UiPath Studio and their customization techniques in detail.
Keyboard Shortcuts
Keyboard shortcuts refer to a task for invoking one or more commands by using a series of one or several keys such as CTRL+S to save a word document. Such tasks can also be done through menu, pointing devices or via a command line interface etc., but using keyboard shortcuts saves a lot of time.
File Management
Ctrl+Shift+N − This keyboard shortcut will create a new blank process.
Ctrl+O − If you want to open a workflow, either .xaml or project.json, that is created previously, use Ctrl+O keyboard shortcut.
Ctrl+L − With the help of this keyboard shortcut, we can open the folder where the Log files are stored.
Ctrl+S − It is a very familiar keyboard shortcut. It will save the currently open workflow.
Ctrl+Shift+S − Saves all the workflows that are currently open.
Comments
Ctrl+D − With the help of this keyboard shortcut ,you can ignore the activity that you recently selected by pacing it into a Comment Out container.
Ctrl + E − It will remove the activity that was placed in comment out container.
Debugging
F7 − This function key runs the currently open workflow in debug mode.
F8 − This function key checks the currently open workflow for validation errors.
F9 − With the help of this function key, we can mark the selected activity or task with a breakpoint.
Shift + F9 − Opposite to F9, it removes all the breakpoints in the currently open workflow.
F11 − At the time of debugging, this function key enables us to step into a block of activities. Additionally, it will execute the first activity also.
Shift + F11 − At the time of debugging, this shortcut enables us to step over the execution of a block of activities in the currently selected workflow.
Recording
Alt+Ctrl+W − This shortcut key opens the Web recording toolbar ('W' in this shortcut key stands for Web).
Alt+Ctrl+B − This shortcut key opens the Basic recording toolbar ('B' in this shortcut key stands for Basic).
Alt+Ctrl+C − This shortcut key opens the Citrix recording toolbar ('C' in this shortcut key stands for Citrix).
Alt+Ctrl+D − This shortcut key opens the Desktop recording toolbar ('D' in this shortcut key stands for Desktop).
F2 − This function key is used to add delay while recording.
F3 − This function key is used to specify a custom recording region.
F4 − With the help of this function key we can choose the UI framework, can be Default, AA and UIA, to record.
Workflow Execution
Selected Activity
Ctrl + T − This shortcut key places the activity or task inside the TRY section of TRY-CATCH activity (Here 'T' stands for Try).
Ctrl + T − This shortcut key places the activity or task inside the section of TRY-CATCH activity (Here 'T' stands for Try).
Ctrl + N − With the help of this shortcut key, we can create a new sequence diagram in the current project.
Ctrl + C − It is a very familiar keyboard shortcut. It will copy the selected activity or task (one or many) to the clipboard.
Ctrl + V − It is another very familiar keyboard shortcut. It will paste the copied activity or task (one or many) inside the selected item.
Customization of Keyboard Shortcuts
The keyboard shortcuts, discussed above, are by default shortcuts keys of UiPath studio. It is quite an amazing feature of UiPath studio that we can customize these shortcut keys or we can create our own keyboard shortcuts.
Important points to remember for keyboard shortcuts customization
It is very easy to customize keyboard shortcut keys. However, we must consider the following points −
Location of supported keyboard shortcuts − First of all, we must have to know the location of all supported keyboard shortcuts. UiPath studio stores all of them in an .xml file. You can find that file at the location C:\users\username\AppData\UiPath\Uipath\keyboardmappings.xml. You can edit this file in Notepad.
What to edit − There are two important things to edit for customizing keyboard shortcuts −
The values between <Key> </Key> represents the main keyboard buttons to press and hence it must be changed as per your customization needs.
The values between <Modifiers> </Modifiers> represent the modifiers (Control, Alt, Windows) which can be changed as per your customization needs.
Steps for Keyboard Shortcuts Customization
In order to customize keyboard shortcuts, we need to follow these steps −
Step1 − First, we need to close the UiPath studio if it is open.
Step2 − Now, open the keyboardmappings.xml file containing the supported keyboard shortcuts with a text editor like Notepad or Notepad++.
Step3 − Find the keyword shortcuts you want to modify and change the values for keyboard buttons between <Key> </Key> and for modifiers between <Modifiers> </Modifiers>.
Step4 − At last we need to save and close the keyboardmappings.xml file.
Example
In this example we are customizing the keyboard shortcut Alt+Ctrl+W used for web recording toolbar.
We need to look for the keyboard shortcut for web recording toolbar as shown in the screenshot.

Now, we will change the option 'W' between <Key> </Key> to say 'Z'. Then we will change the modifiers from Alt, Control between <Modifiers> </Modifiers> to Shift, Alt.

This will modify the keyboard shortcut Alt+Ctrl+W for web recording toolbar to Shift+Alt+Z.
Automation Projects and Their Debugging
In the previous chapter, we have seen how to use and customize keyboard shortcuts for UiPath environment. This chapter explains how to work with automation projects in UIPath and their debugging methods.
Introduction
UiPath studio provides a complete software solution with the help of which we can automate repetitive and boring back office tasks. It makes our work fast and easy by converting those tedious tasks into UI automation.
Working with Automation Projects in UiPath Studio
Let us discuss about steps that should be followed for making automation projects in UiPath studio along with an example for the same.
As discussed earlier about types of projects in UiPath studio, we can choose any of the project types based on our requirements. When you choose a project type, it would be saved at the default directory location C:\Users\Username\Documents\UiPath with the folder name you provided for that project. This folder consists of the following files −
Main.xml file
This file will hold the main workflow. It is created automatically when we choose a project.
Other .xaml files
While working with a project, it would create many more .xaml files, all of them will be saved in this folder. But all these files must be connected to Main.xaml file because the only file that will be executed is Main.xaml.
.screenshots folder
If we are working with UI automation, then the folder would contain one more folder having screenshots.
Project.json file
All the information about our automation project would be in project.json file.
Steps for Creating an Automation project
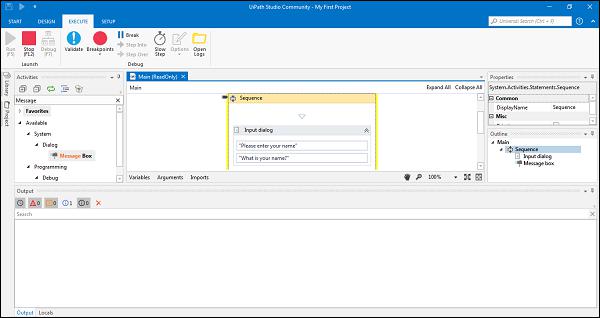
Let us understand the creation of an automation project in UiPath studio with the help of a simple example. In this example, the automation project will ask for the name of user and then greet the user with the name. The steps are as follows −
Step 1 − First, we need to open UiPath studio. Then click on the “Start” tab.
Step 2 − Now, choose “Blank Project” from Blank, Simple process, Agent process improvement and Robotic Enterprise Framework. New project windows will be displayed as follows −

Step 3 − Now, provide the name of the project for example “My First Project” and click on the create button. It will display the UiPath studio interface with workflow for your project as follows −
You can see it with the name “My First project” at the top.
Step 4 − Now, we need to provide activity. You can drag and drop sequence activity from Activity panel to the Designer Panel as shown −
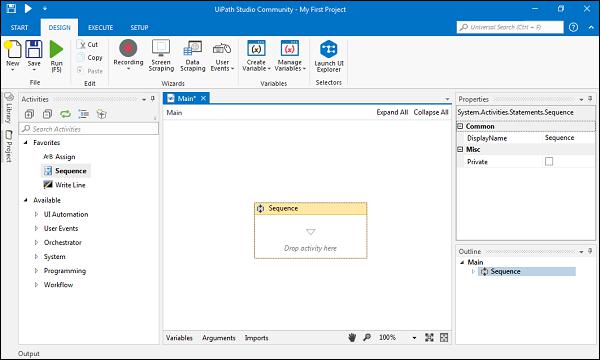
Step 5 − For this particular example, we want our project to ask the name; hence we need to provide Input Dialog to the Sequence activity. Input Dialog can be searched from Activity panel and drag into the Sequence activity as follows −
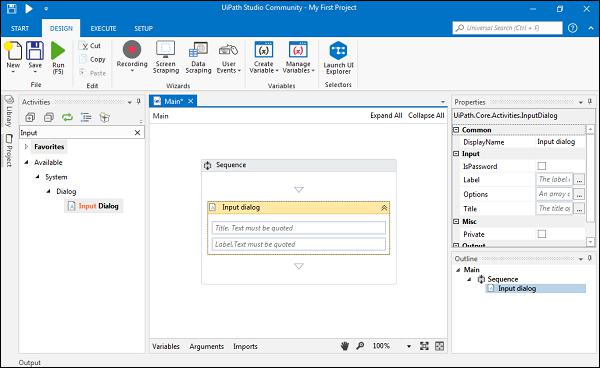
Step 6 − Input dialog has two fields: Title and Label. For Title, we can write “Please enter your name?” and we can write label as “What is your name?” Please note that we must have to enter the text in UiPath studio in double quotes (“ ”).

Step 7 − As we said that this automation project will greet the user after asking his/her name. For this we need a message box activity to be added in sequence activity as follows −
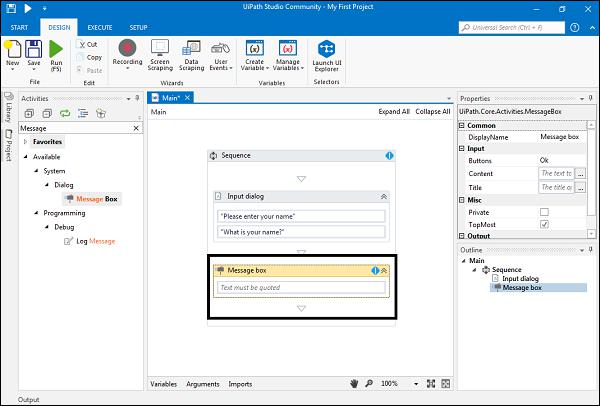
Step 8 − Now, write the message that will be prompted when a user will enter his/her name. For example, we are writing the message “Welcome to howcodex.com!” It must also be in double quotes.

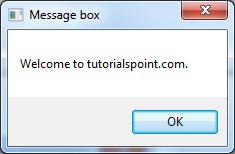
Step 9 − Now, run this program by clicking Run button or pressing F5. It will show a dialog box as follows −
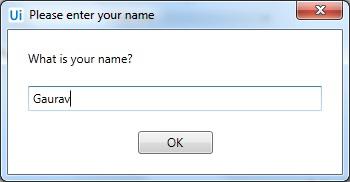
Now write your name and press OK button, it will greet you as follows −
What is Automation Debugging?
Debugging is one of the fundamental elements of automation and programming which may be defined as the process of identifying and removing errors from a given project. UiPath studio has a debug component that helps us to find and locate problems easily in complex workflows. In other words, we can say that UiPath studio debugging component is a powerful functionality that makes us sure that our project is error-free by providing us the information about our project with step-by-step highlighting. We can find all the functions of Debugging under Execute tab.
Functions of Debugging
UiPath Studio provides us the following functions for debugging −
Validate − As we know that validity means the action of checking the accuracy of something. We can check validity of our UiPath automation project, before debugging, by clicking the Validate tab under Execute tab.
Breakpoint − If you want to check the state of your project at a given point then you can use the Breakpoint tab under Execute tab. It basically enables us to pause the execution of a project. Once you trigger a breakpoint, you can stop it by clicking Stop. Go to next step of debugging by clicking Step over or continue the debugging process by clicking Continue Debug.
Break − As the name suggests this action will pause the debugging process at any given moment. You can use it when debugging is in progress.
Step into − As name suggests, this functionality enables us to closely analyze our activities while debugging step-by-step. You can use it when debugging is paused.
Step over − As name suggests this functionality enables us to highlight activity container and debugs the next activity. You can use it when debugging is paused.
Slow Step − As name suggests this functionality enables us to take a closer look at any activity during debugging. Whenever you click on this action, the speed gets changed by one step. This is similar to Step Into but without having to pause the debugging process. You can use it before or during the debugging process.
Options − The options in debugging allows us to have UI elements highlighted during debugging as well as the activities logged in output panel as they are debugged.
We have following under Option tab −
Highlight elements − If you check and enable this option then UI elements will be highlighted during debugging.
Highlight activities − If you check and enable this option then UI activities will be highlighted during debugging.
Log activities − If you check and enable this option then debugged activities will be displayed as Trace logs in the Output panel.
Open Logs − This option opens the folder where logs are locally stored. The location of the folder would be C:\Users\Username\AppData\Local\UiPath\Logs.
Steps for Performing Automation Debugging
We can follow some steps to perform debugging of an automated project −
Step 1 − Open the project you want to debug.
Step 2 − It is recommended to do the validation before debugging. Click on the Validate tab under Execute tab. The following screenshot shows the validation of our automated project of greeting a user by name, implemented as an example recently in this chapter −
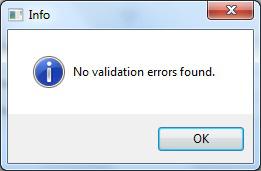
It displays the above message because there was no validation error. Now we can start debugging.
Step 3. Now, click on the Debug button or F7 key under Execute tab to start debugging your project. The following screenshot gives an insight of debugging of our project −
You can notice that it is highlighting the particular activity being debugged. You can also choose from various functions of debugging as discussed above.
UiPath Studio - Workflow Design
It is essential for Robotic process automation (RPA) products to give their users an amazing experience. One way to do this is to make visual workflow automation straightforward and intuitive. UiPath is providing automated workflow design which can be used without programming knowledge.
Layout Diagrams
We can integrate activities into workflow design while developing a workflow file using Layout diagram. UiPath basically provides us the following three layout diagrams with the help of which we can integrate activities into workflow design −
Flowchart
A flowchart is a graphical representation of a process in which each step is represented by different symbols connected with arrows
Flowchart is one of the best among the three layout diagrams of UiPath workflow because it is flexible and tend to lay out a workflow in two-dimensional manner. They can showcase decision points within a process very efficiently owing to their visual appeal.
Sequence
Mostly used layout diagram in UiPath workflow design is sequence. A sequence is a simple linear representation that generally flows from top to bottom, and tells the order in which commands are to be executed.
Sequences are best in simple scenarios when activities pursue each other. The most important thing about sequence is that they are very simple and easy to understand. Recall that We have performed the project of greeting by name in the previous chapter by using sequence as activity.
State Machine
State machine is a complex structure that stores the status of something at a given point of time. It can be finite or infinite in nature. State machine are represented by using state diagrams or in other words they are flowcharts with conditional arrows called transitions. Structures like state machines are best suited for a standard high-level process diagram of transactional business process templates.
Type of Decision
Decision, the action or process of deciding something, is another very important part of workflow design. It is the decision that enables the Robot to react differently in various conditions in data processing and application interaction. Visual structure and readability of a workflow are very important and type of decision chosen would have a big impact on the same.
The followings are types of decisions we can implement in a workflow −
If Activity
This is the most simple type of decision which can be understood whether you have knowledge of programming or not. Related with real life situations, the if activity has one statement and two conditions namely Then and Else. The “Then” condition would be executed if the statement is true; otherwise the Else condition would be executed.
In UiPath workflow you can search 'if' activity from activity panel and add it by drag & drop. Basically the 'if' activity splits a sequence vertically and best suited for short linear branches. Following screen shot will give an insight about 'if' activity −

Switch Activity
As the name suggests, the switch activity based on the value of a specified expression enables us to select one choice among the given many multiple choices. We can use switch activity with the 'if' operator to streamline and compact an 'if' cascade with various conditions and activities per branch.
It is also useful to categorize data according to a custom number of cases. For example, we can use switch case to store data into multiple excel sheets.
You can search for switch activity from activity panel and drag & drop to the workflow design. The following screenshot will give you an insight of it −

The Switch activity, by default, uses an integer argument; we can also change it to Boolean, Object, String etc. from the Properties panel under TypeArgument list as shown in following screenshot −

Flow Decision
Flow decision or simply decision is an activity that executes one of the two branches, by default named TRUE or FALSE. The execution will depend upon whether the specified condition is met or not. We can change the names of the branches in the Properties panel.
Flow decision is basically equivalent to the If activity and can only be used in a Flowchart. We can search flow decision from activity panel and use it in flowchart by drag & drop. The following screenshot gives an insight about flow decision.
You can notice, in black highlighted square, from the screenshot that flow decision is under the activity panel and have two branches namely TRUE and FALSE whose title can be changed from the properties panel.

Flow Switch
Flow switch is an activity that splits the control flow into three or more branches. Among them, only one will be executed and the execution will depend upon whether the specified condition is met or not. We can connect more than 12 cases by starting more connections from the same switch node and the connected activities are automatically numbered where the first one would be the default case.
We can change the names of cases from property panel. The following screenshot gives an insight about flow switch activity −

Naming Conventions
While working in UiPath, we must have to assign names to workflow files, activities, arguments and variables. The names we provide must be meaningful so that their usage can be accurately describe the project and the tasks involved.
To give meaningful names, UiPath provides us the following naming convention which is recommended to follows −
Variables names must be in upper CamelCase. Example: FirstName, LastName etc.
Arguments should also be in upper CamelCase along with the prefix showing the type of argument. Example: in_FileName, out_FileName, io_DivideByZero etc.
The names of the activities must reflect the action taken. For example, click the Delete button.
The workflow name should have the verb that describes the working of the workflow. Example: TakeScreenshot, ProcessTranslation.
Proper naming of activities, variables as well arguments reduce the effort to read and understand the project.
UiPath Studio - Variables and Arguments
In this chapter, let us understand how to deal and work with variables and arguments in UiPath, and the concepts involved.
Managing Variables in UiPath Studio
Variable may be defined as the symbolic name associated with a value that may change. In UiPath studio variables are of different types and are used to store multiples type of data ranging from generic value, text, number, data table, time & date.
One important use of variables is that we can control the number of times the body of a loop is executed because the value of variables can change.
The Variable Panel
As the name suggests, the variable panel is used to create variables and enables us to make changes to them. The following screenshot will give an insight about the variable panel −

In the above screenshot, you can notice that there are four fields namely Name, Variable Type, Scope and Default in the variable panel.
The four fields are explained as given below −
Name
It is a mandatory field. We must have to give a name to the variable. Suppose if you are not giving any name, then UiPath studio will generate one automatically. It is recommended that we follow naming conventions, as discussed in the previous chapter, while naming a variable.
Variable Type
It is also a mandatory field which enables us to choose the type of variable. We can choose among the options: Boolean, Int32, String, Object, Generic Value, Array of [T] and Browse of Types from the Property panel itself. If you do not choose any type, UiPath studio will consider it as a string.
Scope
It is also a mandatory field which shows the area in which the variable is available. For example, if you choose the activity type Sequence then the scope of the variable would be Sequence and so on.
Default
It is an optional field which shows the default value of a variable. For example, the default value for a variable of type Int32 is 0.
Types of Variables
The following are the types of variables that we can use in UiPath Studio.
Text variables − As the name suggests, such type of variables can store only strings. For example, if you want to store information like name, lastname, usernames etc., then text or string variables is the option you have to choose.
Boolean variables − These are also called True or False variables. It has only two possible values: true or false.
Integer variables − As name suggests, such kind of variables can store only integer or Int32 values i.e. integer information. They are also called Number variables.
Array variables − If you want to store multiple values of the same type then the array variable would be suitable. You can store as many types of arrays as there are types of variables in UiPath.
Date and Time variable − As the name suggests, this kind of variable enables us to store information about any date and time.
Data Table variables − These types of variables store big piece of information. It acts as a database or spreadsheet with rows and columns. For example, if you want to extract information from a website and want to store it in a spreadsheet, then you can choose data table variable.
How to Create Variables?
Once you choose at least one activity in the designer panel of UiPath studio, you can create a variable with the help of the following two methods −
By using Variable Panel − Another way to create a variable is Variable Panel. First, we need to click on variable panel from the designer tab. Then variable panel would be displayed. Now, click create variable line to create a new variable. The variable panel has already been discussed in detail in the previous section.
How to Remove Variables?
We can also delete the variables we have created in the previous section, using any of the following two methods −
Method 1
Go to variable panel and right click the variable you want to delete. After clicking the “Delete” option, you can delete the selected variable.
Method 2
Go to variable panel and select the variable you want to delete. Now press delete button from keyboard and the selected variable will be deleted.
Managing arguments in UiPath Studio
Arguments, resembling variables, are used to pass data from one workflow to another. They can store data dynamically and pass it on. One difference between variable and argument is that variables pass data to other activities while arguments pass data to other workflows.
In UiPath studio, arguments are of different types hence we can create different types of arguments like Generic value, text, number, data table, object, Boolean. An important point about arguments is that they have specific directions that tell the application where the information stored is supposed to go. The directions can be In, Out, In/Out, Property.
The Argument Panel
As the name suggests, the argument panel is used to create arguments and enables us to make changes to them. The following screenshot gives an insight about the argument panel −

In the above screenshot, you can notice that there are four fields namely Name, Direction, Argument Type and Default in the variable panel. The following is the explanation about them −
Name − It is a mandatory field. We must have to give a name to the argument. Suppose if you are not giving any name then UiPath studio will generate one automatically. It is recommended that follow naming conventions, discussed in previous chapter, while naming an argument.
Direction − It is also a mandatory field which enables us to select a direction for our argument. We can choose from following four kind of directions −
In − This direction means that the argument can only be used within the given workflow.
Out − This direction means that the argument can be used to pass data outside the given workflow.
In/Out − This direction means that the argument can be used within and outside the given workflow.
Property − This direction is not in use currently.
Argument Type − It is also a mandatory field which enables us to choose the type of argument. We can choose among the options Boolean, Int32, String, Object, Generic Value, Array of [T] and Browse of Types from the Property panel itself. If you do not choose any type, then UiPath studio will consider it as a string.
Default − It is an optional field which shows the default value of an argument.
How to Use an Argument?
Let us take an example to understand how we can use arguments.
Example
In this example, we will create two separate sequences: one for assigning a value to an argument and the other for invoking it and displaying the value in a message box.
We need to follow the following steps to implement this −
Step 1 − Drag & drop a sequence in the UiPath studio designer panel.
Step 2 − Click Arguments panel and create new argument say InputValue of String type having Out direction.
Step 3 − Now, drag & drop an Assign activity to the designer panel.
Step 4 − We want to give the value to Assign activity same as the value of InputValue argument. For this purpose, go to the Properties Panel of Assign activity and write InputValue in the To field.
Step 5 − Next, write any message say "Example of using an argument!!" in the Value field under Properties panel of Assign activity.
Till now, this implementation will look like as follows −

Step 6 − Next, under the Design tab from New drop down menu choose new Sequence for designer panel.
Step 7 − For this create a new variable named strOutputValue by clicking on the variable panel.
Step 8 − Now, drag & drop an Invoke Workflow File activity to the Designer panel.
Step 9 − Next, browse for previously created sequence by clicking on the Browse (…) button on Invoke Workflow File activity.
Step 10 − We want to import the arguments in this activity. Hence click the Import Arguments button. It will open Invoke Workflow's Arguments window. Now in its Value filed add strOutputValue variable and click OK button.
In this way the value from it will be stored in the current project through strOutputValue variable. It can be seen in the following screenshots:


Step 11 − Next, add Message Box activity under Invoke Workflow File activity to the Designer panel and write a message “Thanks” in its text field.
Step 12 − Press Run(F5) button and it will give following output −

UiPath Studio - Recording
Recording, an important functionality of UiPath studio, enables us to capture user's action on the screen and translate them into sequences. It saves lot of time when you want to automate business process.
In this chapter, let us discuss recording using UiPath in detail.
Recording using UiPath Studio
You can find Recording option under Design Tab of UiPath Studio. An important point about recording is that some of the actions are non-recordable. Following table will show automatically recordable as well as non-recordable actions −
| Automatically Recordable Actions |
Non-recordable Actions |
| Left click on buttons |
Keyboard shortcuts |
| Left click on check boxes |
Right click on GUI elements |
| Left click on drop-down lists & other GUI elements. |
Mouse hover |
| Text typing |
Use of modifier keys |
Types of Recording
UiPath studio provides us the facility to choose from following four types of recording −
- Basic recording
- Desktop recording
- Web recording
- Citrix recording
Following screenshot shows how we can use recording feature of UiPath studio −

Basic Recording
Basic recording is suitable for single activity. It basically generates a full selector for each activity. It does not generate containers hence the automation is slower in comparison to the other type that generates containers.

Desktop Recording
As the name suggests, it is suitable for all types of Desktop apps and multiple actions. It generates container and hence it is faster than Basic recording.

Web Recording
As name suggests, it is suitable for all types of recording in web apps and browsers. It also generates containers and hence faster than Basic recording too.

Citrix Recording
This kind of recording is used to record virtualized environments like VNC, virtual machines etc. It basically requires explicit positioning and allows only image, text and keyboard automation.

Automatic Recording
UiPath studio provides us the facility of automatic recording of the actions. It saves lots of time and can easily customized ad parameterized. Followings are the activities that are generated automatically for the recordable actions −
Click − As the name suggests, it is automatically generated when we click on a button while performing Basic or Desktop recording and a link while performing Web recording. UiPath studio provides us the option to add a time delay before or after the action.
Type Into − As the name suggests, it is automatically generated when we type in a text field or any editable UI element. UiPath studio provides us the option to add a time delay before or after the action or between key strokes.
Check − As the name suggests, it is automatically generated when you click a radio button or check box. UiPath studio provides us the option to add a time delay before or after the action and select or unselect the check box.
Select Item − As the name suggests, it is automatically generated when you select an item from drop-down list or combo box. UiPath studio provides us the option to add a time delay before or after the action and change the selected item.
Example of Basic Automatic Recording
We can perform Basic automatic recording with the help of following steps −
Step1 − Open any application say MS Word or Notepad.
Step2 − Create a new Sequence in UiPath Studio Designer panel.
Step3 − Choose Basic Recording from Recording tab under Design ribbon tab. It will display Basic Recording toolbar.
Step4 − Now from Basic Recording toolbar click Record button.
Step5 − Go to your opened application Ms Word or Notepad, click there and a pop-up window would be displayed as follows −

Step 6 − Type and press enter. The string will be displayed in your application.
Step 7 − For exiting and saving the recording, press two times Esc key.
The above screenshot shows the sequence in which automation will be executed.
Step 8 − Now press F5 to execute in UiPath studio. The automation will be executed.

Example of Desktop Automatic Recording
We can perform Desktop automatic recording with the help o*f above steps used for Basic Automatic Recording. The only change, in Step3, is that we need to Choose Desktop Recordingfrom Recording tab under Design ribbon tab Desktop Recording toolbar. Following is the screenshot after implementing Desktop recording. It is generating a container Attach Window.

Example of Web Automatic Recording
We can perform Web automatic recording with the help of following steps −
Step 1 − First, open any internet browsing application say Google Chrome, Internet explorer or Mozilla.
Step 2 − Next, create a new Sequence in UiPath Studio Designer panel.
Step 3 − Now, Choose Web Recording from Recording tab under Design ribbon tab. It will display Web Recording toolbar.
Step 4 − Now from Web Recording toolbar click Record button.
Step 5 − Go to your open browser, click on the URL bar, a pop-up window would be displayed as follows −
Step 6 − Type the URL and press enter. The string will be displayed in the browser URL bar.
Step 7 − For exiting and saving the recording, press two times Esc key.

The above screenshot shows the sequence in which automation will be executed. It will also generate a container as like in the Desktop Automatic Recording.
Step 8 − Now press F5 to execute in UiPath studio. The automation will be executed.
Manual Recording
As we know that there are some actions that cannot be handled by automatic recording. They are called single actions or manual recordings. We can find these manual recording under the Action toolbar of all types of recordings, Basic, Desktop, Web and Citrix.
Types of Manual Recordings
The followings are the types of manual recordings −
Start and Stop an App or Browser
These manual recording or single actions enables us to open as well as close an app or browser. You can find these options in Desktop and web recording toolbar respectively.
Click
With the help of such kind of single actions we can record
- Clicks on the desktop or a running application
- Selecting an option from a drop-down list or combo box
- Selecting a check box or a radio button
Type
These kind of manual recordings or single actions require input from keyboard. It includes key presses or keyboard shortcuts.
Copy
As the name suggests, this single action enables us to copy a selected text from an open application or a web browser. The copied text can be used later in our project. Option of screen scraping, under copy menu, enables us to extract images or text from browser.
Mouse Elements
As the name suggests, it enables us to imitate mouse movements such as right-clicking or double clicking.
Windows Elements
Such kind of single actions enables us to close the window or shift the focus to a different window.
Text
Text manual recording enable us to −
- Hover over text to make tooltips visible for scraping
- Right click to make the context menu visible
- Copy and paste text
Image
Image manual recording enable us to −
- Wait for a specified image to disappear
- Finding a specific image in an app or website
- Right click an image
- Hover over an image
Data Scraping and Screen Scraping
In this chapter, let us learn in detail about data scraping and screen scraping in Uipath.
What is Data Scraping?
Data scraping is a technique with the help of which structured data can be extracted from web or any application and saved to a database or spreadsheet or .CSV file. UiPath studio also provides the facility of data scraping with the help of scraping wizard. We can find the scraping wizard under Design tab.
Following is the screenshot for the same −

Steps for using Data Scraping Wizard with Example
For using UiPath data scraping wizard you can follow the following steps −
Step 1 − First, open the web page or application from which you want to extract the data. We are extracting data from our Google contacts as an example.
Step 2 − Then click the Data Scraping button under Design Tab. You will get the following message box −

Step 3 − Click the 'Next' button and it will give you the option to select the first and last fields in the web page you want to extract the data. In this example, you will be able to select from the Google Contacts page.
Step 4 − Once you finished selecting the First element, it will prompt a dialog box for selecting second element as follows −

Step 5 − Now once you click Next and select the second element, it will prompt another dialog box with the help of which we can customize column headers and chose whether or not to extract URLs.

You can rename the name of the Text column as per your requirement. We have renamed column1 it to 'Name'.
Step 6 − Next, UiPath studio will give us the Extract Wizard to preview the data. It would be our choice to Extract Correlated data or Finish the extraction here. If you Extract Correlated data, then it will again take you to the web page from which you want to extract the data.

Step 7 − Once you finished the extraction it will ask the question” is data spanning multiple pages?” If you are extracting the data from multiple pages then click on Yes, otherwise No. We have clicked No because data extraction here is happening from single page only.

Step 8 − At last it will create the activity sequence in the Designer tab as follows −

What is Screen Scraping?
UiPath studio provides us methods to extract data from a specified UI element or document. These methods are called screen scraping or output methods. We can find the screen scraping wizard under Design tab.

Screen Scraping Methods
UiPath studio screen scrapping wizard has three methods for scraping data from a specified UI element. The method will be automatically chosen by UiPath studio and displayed at the top of the Screen Scraping window.
Now the question arises that if the method is selected automatically, can I change it as per my requirement? Yes, it can be changed from Option panel where Scraping Method is written and then press the Refresh button.
After clicking the Refresh button, UiPath studio will save the information in the Designer panel. On the other side, if you want to copy the information to the Clipboard then you can click the Finish button.
Screen scraping, as seen in the case of Desktop recording, generates a container containing activities and partial selectors for each activates. You can refer the following screenshot −

All the three methods come with different features and the following is the explanation of all three screen scraping methods along with their features −
Native − If you choose Native screen scraping method then you will get the following features.
No Formatting − As the name suggests, this option does not extract formatting information from the text.
Get Words Info − This option will extract the screen coordinates of each word.
Custom Separators − This option/field enables us to specify the characters used as separators. If you put this field empty, then all the known text separators will be used.
Full Text − If you choose Full Text screen scraping method then you will get the following features −


Steps for using Screen Scraping Wizard with Example
For using UiPath screen scraping wizard, you can follow the given steps −
Step 1 − First, open the Ui element, may be a PDF file or Word file or any other, from which you want to extract the data. Here, we are implementing it on PDF file.
Step 2 − Now, click the Screen Scraping option under Design tab.
Step 3 − Next, click the Ui element from which you want to extract information, in our example we are clicking on the PDF document.
Step 4 − Now, you will get the following screen −

UiPath studio will give the screen scraping method by default, but you can change it as per your requirement. We have discussed about it earlier also.
Step 5 − Then at last, you can either click Refresh button or Finish button. We clicked Finish button and it will be saved in the Designer panel.
As discussed, Screen scraping generates a container containing activities and partial selectors for each activates.
We can see the output in the following screenshot −

UiPath - Detailed Examples
In this chapter, let us understand the concepts that we have studied till now with the help of detailed examples.
Excel Automation
The first example explains Excel automation. In this example, you will learn to −
- Open Excel file
- Read cells or ranges
- Showing the Output.
To do Excel automation using UiPath studio, we need to follow the steps given below −
Step 1 − First, open UiPath studio and start a new blank project.
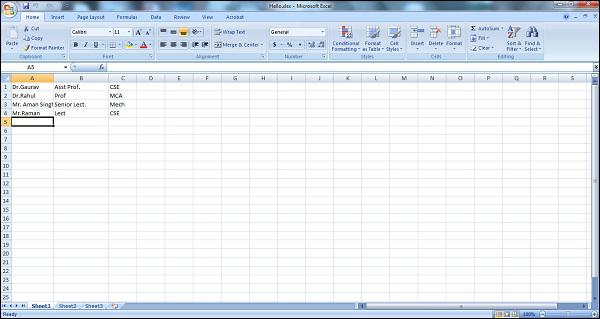
Step 2 − Now, put the Excel file from which you want to read the data in the folder of your current project. We are reading the data from following Excel file
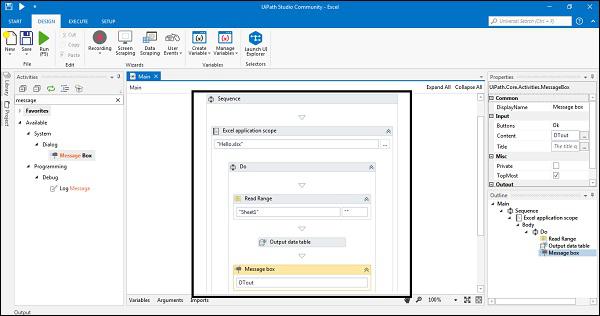
Step 3 − Drag & drop a sequence in the Designer Panel.
Step 4 − Drag & drop “Excel Application scope” activity below the sequence in Designer panel. Note that it can be searched from activity panel.
Step 5 − Now, we need to provide the path of the Excel file. Click the Browse (…) button. It will open the location of your current project where you saved the excel file. Select that excel file and path will be shown in “Excel Application scope”.
Step 6 − As we need to read the file, drag & drop Read range activity under “Excel Application scope” in the Designer panel. It can be searched from activity panel.
Step 7 − In the properties of Read range activity, provide the name of Output Data Table as variable (Right click in the Data Table text box and then Click Create variable. For example, we gave it as DT1.
Step 8 − Now, we also want to see its output, we need to drag & drop Output data table activity under the Read range activity.
Step 9 − In the properties of Output data table activity provide the name of Output Text as variable (as done in step 7). For example, we give it as DTout. Along with that it also requires input, which would be DT1 as provided in read range activity.
Step 10 − Now, after getting the output we want UiPath to display it. For this we have to drag & drop Message box under Output data table. In the text box of Message box write DTout. The final project will look like follows −
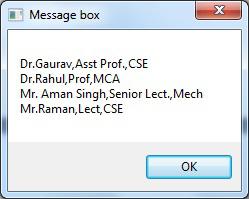
Step 11 − Run the project. It will read the Excel file and give the output in a message box as follows −
That was a simple example of Excel automation in which we read the data from Excel file.
Please note that before implementing this example make sure that the EXCEL activities are installed. It can be searched from the activity panel. If it shows empty, then you can install it via manage packages under activity panel.
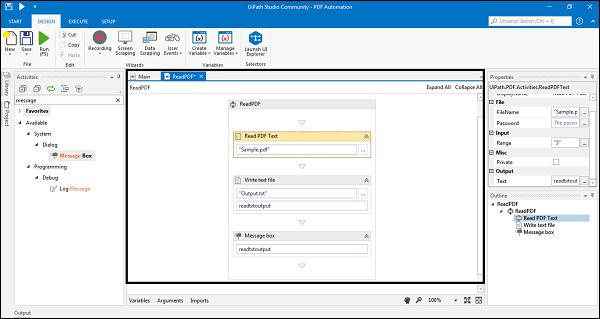
PDF Data Extraction & Automation
In this example, we are going to deal with the extraction of information from mostly used file format i.e. PDF. PDF may contain simple text or text in the form of images. With the help of following steps we can extract data from PDF file and save them into text file or show as a message on screen −
Step 1 − First, open UiPath studio and start a new blank project.
Step 2 − Now, put the PDF file from which you want to read the data in the folder of your current project. We are using sample.pdf file for this example.
Step 3 − Drag & drop a sequence in the Designer Panel.
Step 4 − Drag & drop “Read PDF Text” activity below the sequence in Designer panel. It can be searched from activity panel.
Step 5 − Now, we need to provide the path of the PDF file. Click on the Browse (…) button. It will open the location of your current project where you saved the PDF file. Select that excel file and path will be shown in “Read PDF Text”.
Step 6 − In the properties of “Read PDF Text” activity, provide the name of Output Data Table as variable (Right click in the Data Table text box and then Click Create variable. For example, we give it as readtextoutput. We also need to provide the range of pages. By default, it would be set as “ALL” but you can give the value in range like “1-3” pages, it will read first three pages or you can also specify a particular page like “3”, it will read only 3rd page.
Step 7 − Now, we also want to write the output in text file, we need to drag & drop Write text file activity under Read PDF Text activity.
Step 8 − Now provide the name of the output file in double quotes. For example, we write “Output.txt”. Also in the properties of Write text file activity provide the name of Output Text as variable (as done in step 6). It must be the same provided in Read PDF Text activity's output i.e. readtextoutput.
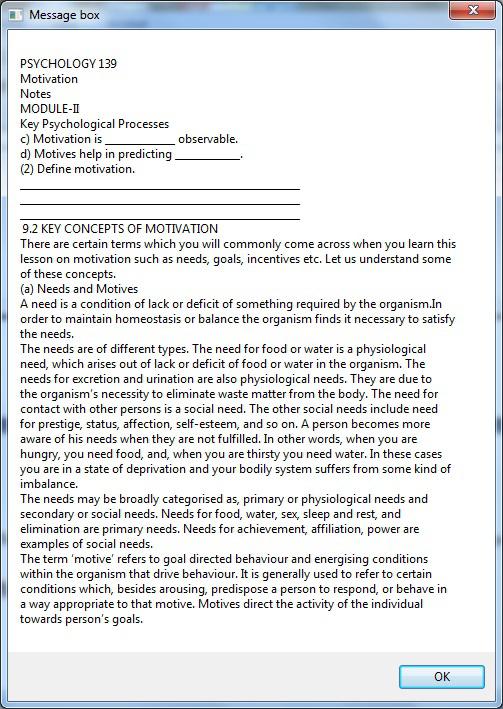
Step 9 − Now, after getting the output we want UiPath to display it. For this we have to drag & drop Message box under Write text file. In the text box of Message box write readtextoutput.
The final project will look as follows −
Step11 − Run the project. It will extract the PDF file and create a text file named output.txt and also give the output in a message box like follows −
The above example will only extract data from PDF file, but if that PDF file contains text as image, then you can use Read PDF with OCR activity instead of Read PDF text. Both are quite similar.
Another way of extracting data from PDF is Screen Scraping which we have already discussed in the previous chapter.
Please note that before implementing this example, make sure that the PDF activities are installed. It can be searched from activity panel. If it shows empty, then you can install it via manage packages under activity panel.
Email Automation
In this example, we are going to deal with the reading of Unread Emails from our Gmail account through UiPath studio.
We can perform this with the help of the following steps −
Step 1 − First, open UiPath studio and start a new blank project.
Step 2 − Drag & drop a sequence in the Designer Panel.
Step 3 − Drag & drop “Get IMAP Mail Messages” activity below the sequence in Designer panel. It can be searched from activity panel.
Step 4 − In the properties of “Get IMAP Mail Messages” activity, provide the name of the server as “imap.gmail.com” and Port as 993 under Host. Also provide Email address and password under Logon property.
Another thing we need to provide is the name of Messages, under Output property, as variable (Right click in the Data Table text box and then Click Create variable. For example, we give it as “Messages”.
You can also select how many unread messages UiPath studio should read by giving the number in Top property under Options. We choose 5 here so it will read top 5 unread messages.
Step 5 − Now, what you want to do for each email? For specifying this we need to drag & drop For Each activity. It can be search from activities. Provide here variable “Messages” which we used in step4. We also have to change TypeArgument to System.Net.Mail.MailMessages from property panel. It can be selected from Browse for Type options.
Step 6 − Now, after getting the output we want UiPath to display it. For this we have to drag & drop Message box under For Each activity. In the text box of Message box write mail.Subject which means it will show only the subject of top 5 unread messages. There are other options also. The final project will look like follows −
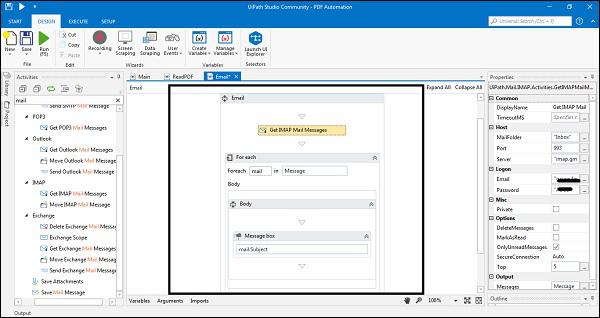
When you will run the above project, UiPath will show the messages having subject with top 5 unread emails from the email id you provided.
Please note that before implementing this example make sure that the MAIL activities are installed. It can be searched from activity panel. If it shows empty, then you can install it via manage packages under activity panel.