UiPath - Detailed Examples
In this chapter, let us understand the concepts that we have studied till now with the help of detailed examples.
Excel Automation
The first example explains Excel automation. In this example, you will learn to −
- Open Excel file
- Read cells or ranges
- Showing the Output.
To do Excel automation using UiPath studio, we need to follow the steps given below −
Step 1 − First, open UiPath studio and start a new blank project.
Step 2 − Now, put the Excel file from which you want to read the data in the folder of your current project. We are reading the data from following Excel file
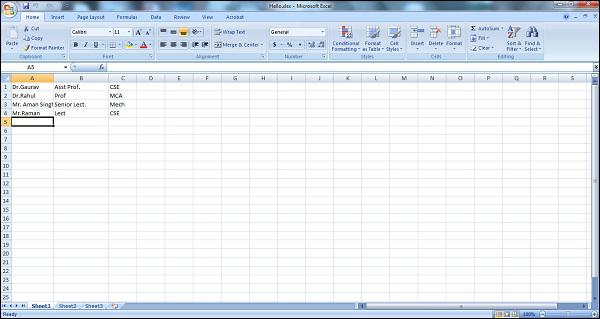
Step 3 − Drag & drop a sequence in the Designer Panel.
Step 4 − Drag & drop “Excel Application scope” activity below the sequence in Designer panel. Note that it can be searched from activity panel.
Step 5 − Now, we need to provide the path of the Excel file. Click the Browse (…) button. It will open the location of your current project where you saved the excel file. Select that excel file and path will be shown in “Excel Application scope”.
Step 6 − As we need to read the file, drag & drop Read range activity under “Excel Application scope” in the Designer panel. It can be searched from activity panel.
Step 7 − In the properties of Read range activity, provide the name of Output Data Table as variable (Right click in the Data Table text box and then Click Create variable. For example, we gave it as DT1.
Step 8 − Now, we also want to see its output, we need to drag & drop Output data table activity under the Read range activity.
Step 9 − In the properties of Output data table activity provide the name of Output Text as variable (as done in step 7). For example, we give it as DTout. Along with that it also requires input, which would be DT1 as provided in read range activity.
Step 10 − Now, after getting the output we want UiPath to display it. For this we have to drag & drop Message box under Output data table. In the text box of Message box write DTout. The final project will look like follows −
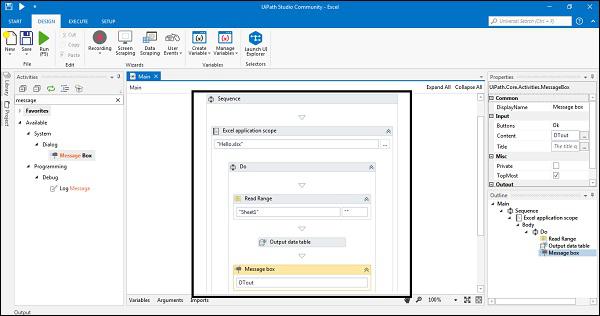
Step 11 − Run the project. It will read the Excel file and give the output in a message box as follows −
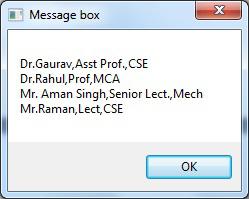
That was a simple example of Excel automation in which we read the data from Excel file.
Please note that before implementing this example make sure that the EXCEL activities are installed. It can be searched from the activity panel. If it shows empty, then you can install it via manage packages under activity panel.
PDF Data Extraction & Automation
In this example, we are going to deal with the extraction of information from mostly used file format i.e. PDF. PDF may contain simple text or text in the form of images. With the help of following steps we can extract data from PDF file and save them into text file or show as a message on screen −
Step 1 − First, open UiPath studio and start a new blank project.
Step 2 − Now, put the PDF file from which you want to read the data in the folder of your current project. We are using sample.pdf file for this example.
Step 3 − Drag & drop a sequence in the Designer Panel.
Step 4 − Drag & drop “Read PDF Text” activity below the sequence in Designer panel. It can be searched from activity panel.
Step 5 − Now, we need to provide the path of the PDF file. Click on the Browse (…) button. It will open the location of your current project where you saved the PDF file. Select that excel file and path will be shown in “Read PDF Text”.
Step 6 − In the properties of “Read PDF Text” activity, provide the name of Output Data Table as variable (Right click in the Data Table text box and then Click Create variable. For example, we give it as readtextoutput. We also need to provide the range of pages. By default, it would be set as “ALL” but you can give the value in range like “1-3” pages, it will read first three pages or you can also specify a particular page like “3”, it will read only 3rd page.
Step 7 − Now, we also want to write the output in text file, we need to drag & drop Write text file activity under Read PDF Text activity.
Step 8 − Now provide the name of the output file in double quotes. For example, we write “Output.txt”. Also in the properties of Write text file activity provide the name of Output Text as variable (as done in step 6). It must be the same provided in Read PDF Text activity's output i.e. readtextoutput.
Step 9 − Now, after getting the output we want UiPath to display it. For this we have to drag & drop Message box under Write text file. In the text box of Message box write readtextoutput.
The final project will look as follows −
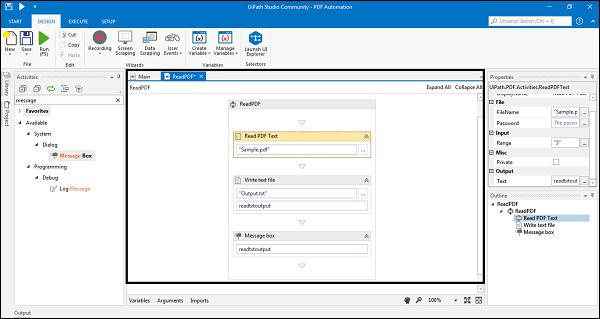
Step11 − Run the project. It will extract the PDF file and create a text file named output.txt and also give the output in a message box like follows −
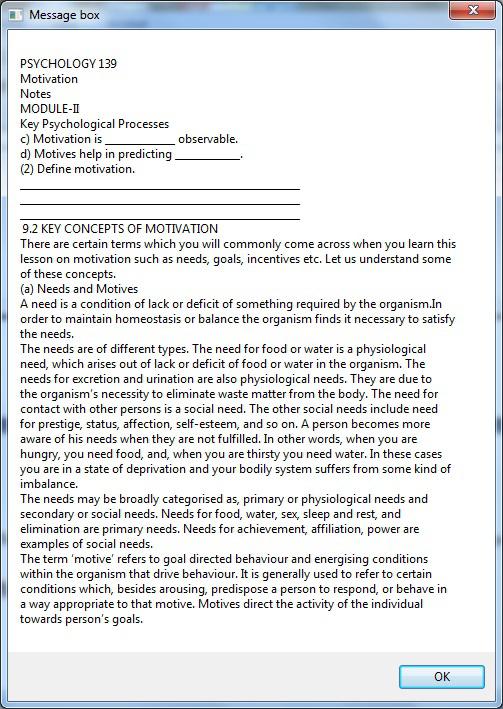
The above example will only extract data from PDF file, but if that PDF file contains text as image, then you can use Read PDF with OCR activity instead of Read PDF text. Both are quite similar.
Another way of extracting data from PDF is Screen Scraping which we have already discussed in the previous chapter.
Please note that before implementing this example, make sure that the PDF activities are installed. It can be searched from activity panel. If it shows empty, then you can install it via manage packages under activity panel.
Email Automation
In this example, we are going to deal with the reading of Unread Emails from our Gmail account through UiPath studio.
We can perform this with the help of the following steps −
Step 1 − First, open UiPath studio and start a new blank project.
Step 2 − Drag & drop a sequence in the Designer Panel.
Step 3 − Drag & drop “Get IMAP Mail Messages” activity below the sequence in Designer panel. It can be searched from activity panel.
Step 4 − In the properties of “Get IMAP Mail Messages” activity, provide the name of the server as “imap.gmail.com” and Port as 993 under Host. Also provide Email address and password under Logon property.
Another thing we need to provide is the name of Messages, under Output property, as variable (Right click in the Data Table text box and then Click Create variable. For example, we give it as “Messages”.
You can also select how many unread messages UiPath studio should read by giving the number in Top property under Options. We choose 5 here so it will read top 5 unread messages.
Step 5 − Now, what you want to do for each email? For specifying this we need to drag & drop For Each activity. It can be search from activities. Provide here variable “Messages” which we used in step4. We also have to change TypeArgument to System.Net.Mail.MailMessages from property panel. It can be selected from Browse for Type options.
Step 6 − Now, after getting the output we want UiPath to display it. For this we have to drag & drop Message box under For Each activity. In the text box of Message box write mail.Subject which means it will show only the subject of top 5 unread messages. There are other options also. The final project will look like follows −
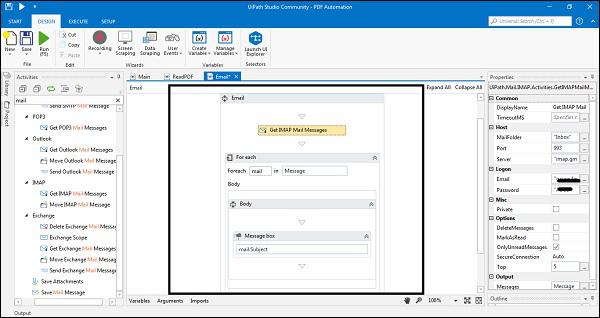
When you will run the above project, UiPath will show the messages having subject with top 5 unread emails from the email id you provided.
Please note that before implementing this example make sure that the MAIL activities are installed. It can be searched from activity panel. If it shows empty, then you can install it via manage packages under activity panel.


