SAP Business Workflow - Quick Guide
SAP Business Workflow - Introduction
In SAP system, Business Workflows are used to execute business processes in applications. Workflows are a key component of SAP system wherein they help design the business processes - it can be a simple release or a complex repeated business process such as creating a material master, etc.
SAP Business Workflows are predefined in SAP R/3 system and the users can also create their new workflows. The workflow allows the users to manage business processes in an efficient manner such that it can be aligned with compliance.
Workflows ensure that right information is sent to the right person at the right time in a correct sequence.
To perform a complex task in SAP system such as invoice approval, purchase request, etc. involves going through different steps. These steps can be performed manually or by using some formal communication such as email, notes, etc. When the tasks are performed manually, there are some common problems associated with it, such as −
- Difficulty tracking the task status
- Dealing with inefficiency
- Difficulty tracking formal communications
- Managing a deadline
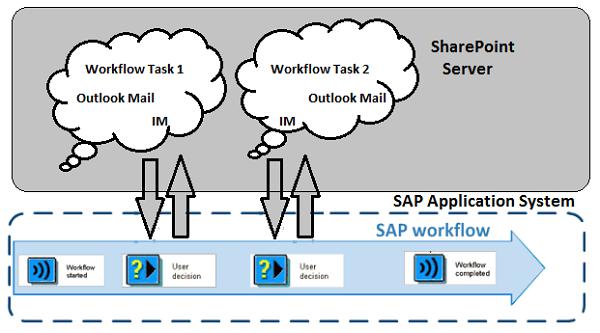
The above image depicts a SAP Workflow process. It is a tool for automating business processes and works uniformly across all the applications. As you can see, it is suitable where the business processes involve multiple people or a group of people.
Business workflows can easily be integrated with Organization Management and SAP NetWeaver BI for analysis purposes so it can easily determine the business processes that suits your organization.
SAP Business Workflow - Challenges
There are different reasons why we need Workflow in business process in SAP system. The longest duration in any business process is the wait time.

The above image shows a standard Purchase Requisition process. It shows that each step involves wait time in the business process and with the use of a standard SAP Workflow, this wait time can be eliminated.
Following challenges are involved in the business processes of an organization −
Raising PO, Invoice, and Sales Order - All require approval from specific stakeholders and involves multiple steps. Hence, a lot of wait time is added to the cycle.
Auditing and Compliance - Areas where auditing is required or any specific compliance has to be based on courtly laws, SOX, etc. They are tough to manage using manual business process.
Specific Processes - Processes which involve standard repeated steps and follow specific business rules. Example: When a new BP is created, you need to define contact information, credit limit, and other information for managing process. It is recommended to manage these specific processes using SAP Workflow.
With the use of SAP Workflows, organizations can easily overcome these challenges and can also perform detailed reporting such as executing time, wait time, etc.
SAP Business Workflow - Benefits/Features
In SAP system, the workflow ensures that right information is sent to the right person at the right time. SAP Workflows are available with SAP applications such as ERP, CRM, and others. Users can easily use these workflows to map the business processes or these can also be edited using the workflow builder.
Note − The Workflow wizard creates workflows, which are not complete and is used only as a framework.
To create the workflows which meets your business process requirement, you should use the Workflow Builder.

Following are the benefits of using SAP Workflow −
Workflow provides automation of business processes that consist of sequence of tasks, activities and steps.
Using workflows, it is easy to manage task dependency and to send notifications in SAP mailbox about pending actions.
With the use of SAP Workflows, it is easy for users to know what tasks have to be performed. Work items are sent to the user in notifications and with a single click, it calls the correct T-code and navigates to the required screen in the application.
SAP applications contain workflows, which are ready to use. Users can also edit the predefined business workflows to map them with the organization’s processes.
With the use of different workflow wizards, users can also create a specific part of Business workflows. The workflow builder can be used to display and to make changes to the existing workflows.
Workflows are not bound to specific SAP applications and it can be customized.
One of the main benefit of using SAP Workflow is that it is similar across all SAP applications.
Workflows are useful for processes that include several people or group of people, sequence of tasks, and coordination between different objects.
Following image shows a sample Workflow for notification of absence in the Workflow Builder.

SAP Business Workflow - Layers
SAP Workflow architecture in SAP Application system consists of the following layers −
- Business Object
- Business Process
- Organization Model
A Business Object in SAP Business Workflow is defined as a collection of methods or events for an entity in the business process. Few common Business Objects in the SAP system include: Customer, Material, and Vendor.
In SAP Workflow, business processes are defined in the Workflow Builder. Each work process is termed as an activity and contains a single step task or workflow template. Business logic using ABAP code are defined in Business Objects.
The organization model contains people or group of people, who are responsible for taking actions in a Business Workflow. People who are responsible for taking an action is also known as an actual agent and they are defined in the workflow activity in the Business Workflow.
Actual agents are agents that actually take an action in the Workflow such as approving a business document, sending email notifications or creating some document in the Workflow.
SAP System contains different predefined business objects, events, and methods. Following are the common Business Objects in SAP PLM −
| DRAW |
Document Management |
| BUS1001 |
Material Master |
| BUS1080 |
BOM |
| ECM |
Change Master |
| BUS1003 |
Class |
| BUS7051 |
Notification |
For each object in SAP system, it comes with a standard set of events and methods to take action on that object. Most common methods and events are −
Methods − Change, Display, Get Details, Create
Events − Created, Changed
In SAP system, Business Objects are known to reduce the complexity of SAP system by dividing it into smaller units. Each business object is commonly defined with these properties −
Object Type ID − It is used for internal identification of the business object.
Object Name − It is used for external identification of the business object. Using this property, the external system can interact with SAP system.
Super Type − It is the parent object from which all the components of the BO are inherited.
Name − It is a descriptive name of the BO.
Description − It is a brief description of the business object type.
Application − The application component to which the BO belongs to.
Program − Program contains the ABAP code of the BO.
SAP Business Workflow - Architecture
As mentioned in the previous chapter, SAP Workflow has a three-layered architecture. Following are the three layers in SAP Workflow architecture −
- Business Object
- Business Process
- Organization Model

In SAP Workflow architecture, business object is the smallest unit and is at the bottom level. Business Object in SAP Business Workflow is defined as a collection of methods or events for an entity in the business process. Few common Business Objects in SAP system include: Customer, Material, and Vendor. With the use of Business Objects, all services are provided in the form of executable methods.
There is a Business Object Repository, which is an object-oriented approach used to model Business Objects and Processes. It is a collection of Business Object types and Interface types with their components such as attributes, methods and events.
In the Workflow architecture, business processes are at the middle level and they define the steps to be performed as part of the Workflow. Business processes are defined in the Workflow Builder. Each work process is termed as an activity and contains a single step task or the workflow template. Business logic using ABAP code are defined in Business Objects.
In SAP Workflow architecture, organization model is the top layer. Organization model contains people or group of people who are responsible for taking actions in a Business Workflow. People who are responsible for taking an action is also known as actual agent and they are defined in the workflow activity of the Business Workflow.
You can create new Business Object using Business Object Builder. Events in Business Object are responsible for the initial start of the workflow and also for the termination of the workflow. Events are also used to call subsequent tasks in the workflow. All the tasks defined under the Workflow will be executed in the mentioned order as per the Workflow definition.
Common task examples include −
- Release Document
- Post Invoice
- Approve Absence
- Run Report
- Change Material
- Call
- Check Work and many more
The following image depicts how a task is performed in SAP Workflow and how it interacts with object type and object methods, organization model, events and texts.

Linking Process, Business Logic & People
In SAP Workflow, business processes are defined in the Workflow Builder. Each step is defined in the Workflow builder and is called an activity. A single step task or workflow template is defined in each of the activities.
Following table shows the components of SAP Workflow.
| Organizational Plan |
Organizational Unit (a functional unit in your enterprise)
Position (represents a post)
Job (classification of functions in an enterprise)
Staff assignments/assignment of user ids
|
| Standard Task |
Task (a description of an activity) |
| Workflow Builder |
Overview
Step types
Tasks
Messages |
| Events |
Triggering Events
Terminating Events |
Business logic is defined in business object and Business Object contains attributes, events and methods in the workflow. Methods contain ABAP code to define tasks. Each and every standard task in the Workflow is linked to a method and a Business Object.
In the organizational model, people/group of people are responsible for performing actions as per the organizational structure. All these are defined in the Workflow Builder. You can view or create Workflow using T-Code: SWDD (Workflow Builder).
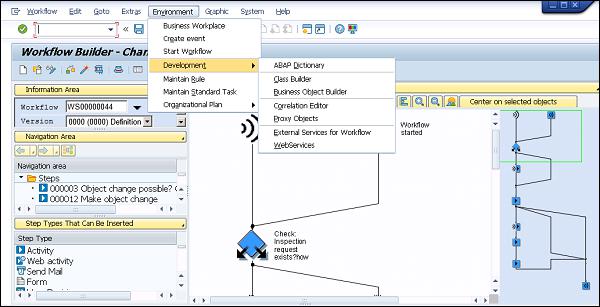
SAP Business Workflow - Business Object
Business Object in SAP Business Workflow is defined as a collection of methods or events for an entity in business process. Few common Business Objects in SAP system include: Customer, Material, and Vendor. With the use of Business Objects, all services are provided in the form of executable methods.
An object in the Workflow represents a Business entity in SAP system. Common entity example includes: Purchase Order, Material, Vendor, etc.
An Object in SAP system performs the following functions −
A Business Object reduces the complexity of SAP system by dividing it in small units.
With the use of Business Objects, different components in SAP system can communicate with each other.
Business Objects can be used in RFCs and Workflows.
With the use of BAPI’s and Business Objects, SAP system can communicate with non-SAP system.
Components of Business Object in SAP System
Each Business Object in SAP system contains the following five components −
Key Fields
Specification of a unique object key - to access a specific instance of a BO
Key field is represented as a combination of one or more fields
Shows a reference to underlying application table
Character based
You can read a Business Object from other non-SAP system
You can’t change a Business Object from outside
Maximum length of concatenated key field can be 70 characters
Attribute
Two types of attributes - Virtual (Set by a BO program) and DB Field (Loaded by database)
An attribute can be read from out of SAP system but it can’t be changed
An attribute of a BO shows properties and characteristics of the object
An attribute can be shown as one line or multi-line
You can have an attribute which is instance independent or instance dependent
Events
Events contain listener outside the BO like SAP Workflow
It is used to trigger or terminate a SAP Workflow
It also shows change in occurrence of a Business Object
Methods
Method can be of two types - synchronous (result is returned to calling program) and asynchronous (result can be returned to calling program using an event)
Method can be instance dependent or instance independent
Method consists of exceptions and parameters such as single/multiline, optional/mandatory, etc.
Interface Types
Status of Business Object Component
A BO in development can have different development statuses −
Modeled − This status shows a BO as only defined - i.e. method and its signature
Implemented − This status shows that ABAP implementation is done and you can use BO for testing purposes
Released − This shows that the method is ready to use
Obsolete − This shows that the method/event shouldn’t be used anymore
Create a Business Object
Step 1 − To create a Business Object, use the Business Object Builder (T-Code − SWO1). The following screenshot pops up.

Step 2 − Click Create. The following window opens. Define the object Supertype.

Step 3 − Fill in all the other details. Select the application from the search list as shown in the following screenshot.

Step 4 − Next, save the package. Save package in “Z” package as shown in the following screenshot.

Step 5 − To change the release status of object type, go to Edit → Change Release Status → Object Type → To Implemented.

Step 6 − Click the Object type and go to Edit. Again to change the release status, go to Change Release Status → Object Type → To released.

Step 7 − In the following window, click Methods → Create button. A pop-up will open, select 'No'. Pass the method name and description as in the following screenshot and click the Tick button.

Step 8 − Now, select the method created. Go to Edit → Change Release Status. Here, first implement the object type component and then release it.


Step 9 − Note that a tick mark in front of the method and BO shows that it is created successfully. Add parameters to the method by clicking the Create button.

Step 10 − Navigate to “Program” tab for adding code to the method as shown in the following screenshot. Click the Save button to save a created object.

Delegate a Business Object
You can also delegate this object to its subtype. Delegation is used to replace an original Business Object by its subtype to which you can add additional events/methods.
To delegate a Business Object, navigate to SWO1 T-code. Setting → Delegate as shown in the following screenshot.

SAP Business Workflow - Start & Termination
A workflow can also be started manually, however, it must have possible agents assigned to it. A possible agent is known as the user who is authorized to start a task and to execute a relevant work item. The possible agent of work items are defined in the task definition and without possible agents, you can’t execute or start a task with a dialog.
If the import parameters of a SAP workflow contain data, you can start them manually and it includes workflows with triggering events.
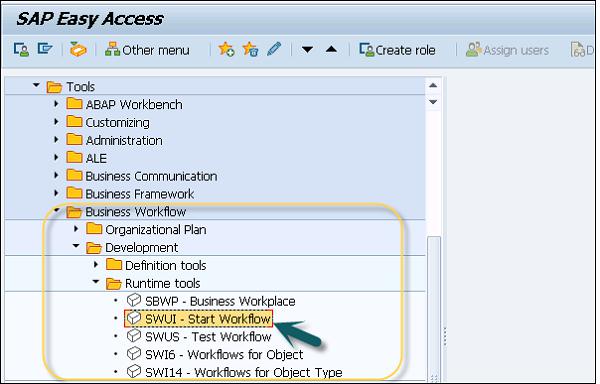
You can use T-codes: "SWUI" and "SWUS" as shown in the following screenshot. In these transactions, you can trigger already defined SAP workflows.
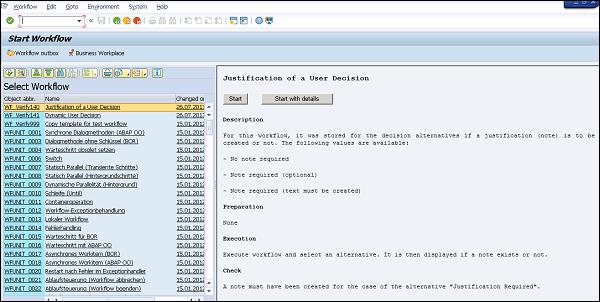
You can select the Workflow from left and use option - Start or Start with Details. On the right side, it shows details about the Workflow. Once you click Start, the next step is to enter the decision step.
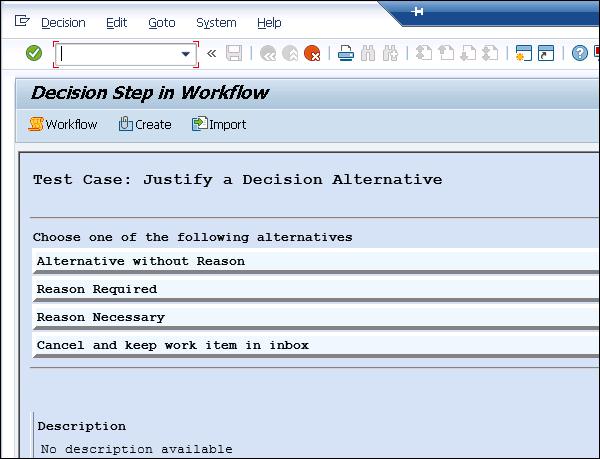
T-code: SWUS (test a Workflow)
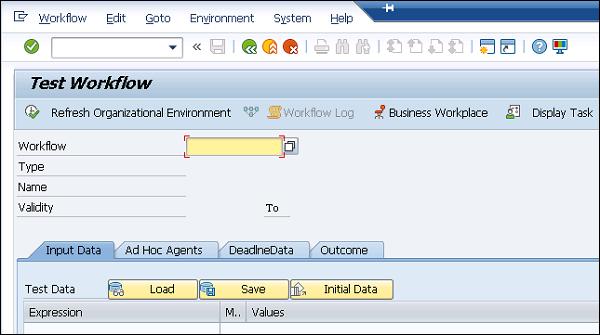
You can navigate to Business Workplace from both the transactions.
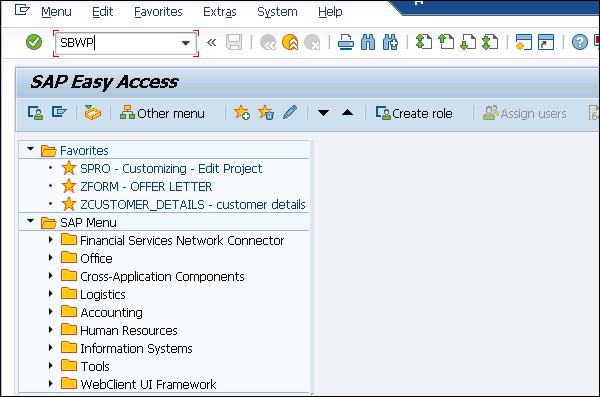
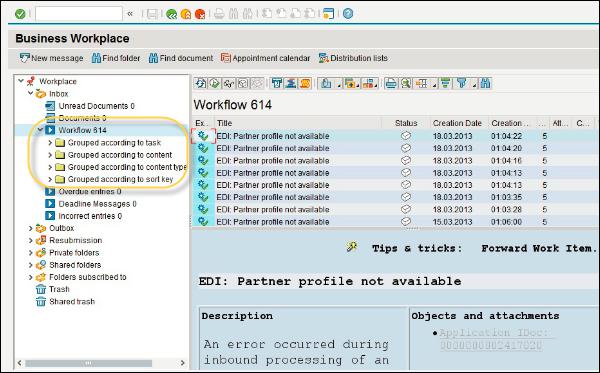
To start a Workflow manually, you have to navigate to SAP Business Workplace (T-code: SBWP). In SAP system, Business Workplace is a work area that is used to perform business processes and is accessed via SAP GUI and not by a web browser or any application. All the requests received by a manager in his inbox is known as WORK ITEM.
Note that the screen for starting SAP workflows has two parts - You have all the workflows for which you have possible agents defined on the left-hand side and on the right side you can see the details of the workflow selected.
To start a workflow, you need to select the workflow and then click the  icon on the left screen area or the Start function on the right screen area.
When you start a workflow, you can also add information such as notes, deadlines or attachments. You have the following tab pages −
Properties
In this tab, you can define the priority of the workflow. You also have an option to set a flag - “Create flag for started workflow in inbox”. This option gets a work item in your inbox when you start workflow manually.
Note, that this flag is deleted automatically when the workflow is terminated.
Page Note At Start
The note that you create here is added to the workflow as an attachment.
Page 0 Attachments
You can use this to create, display, import, and delete attachments.
To use the function Start Workflow, you have to navigate to Office → Start Workflow.
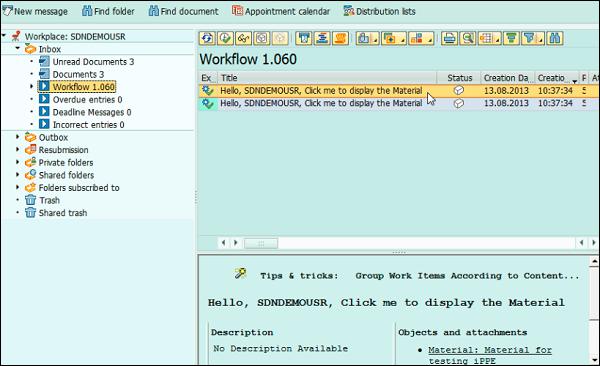
You can also navigate to Tools → Business Workflow → Development → Runtime Tools - > Start Workflow.
Start Conditions for Workflows
You can also add an additional condition at the start of a Workflow. This can be defined for workflows started by the triggering of an event. When you set the start condition, this means that the start of a workflow not only depends on the event but also on this additional condition.
You have the following selection criteria available for selecting a particular workflow −
Start Condition
Using this you can perform a search for the name of a particular start condition defined for a workflow.
Business Object
This option is used to perform a search for workflows with start conditions using a particular object type.
Event
In this option you have all the events for the chosen object type, that are linked with workflows as triggering events are available for selection.
Workflow
This is used to perform a direct search for workflows with start conditions.
SAP Business Workflow - Condition Editor
To pass a start condition to a workflow, the Condition editor is used. There are two ways to use a condition editor −
Direct Text Entry Mode − In this mode you can directly pass the expressions and operators using F4 Input help.
PC Mode − This is also called the mouse-oriented mode. The screen of the condition editor is divided into three areas, namely operators, expression, and processing.
Following is general form of a Condition −
[<Not>] <Expression> <Operator> <Expression> [<And/Or>
<Not> <Expression> <Operator> <Expression> …]

Logical Operators

Note − “NOT” is stronger than “AND”, and “AND” is stronger than “OR” operator.
You have the following input fields for Expression −
- System fields
- Container elements
You can also define the personal settings of the Condition Editor as below. This includes settings related to −
- Display
- User Interface
- Call mode
- Technical Options

SAP Business Workflow - Administration
In SAP Workflow, an administrator is responsible for managing workflows and for ensuring that workflows are executed, transported workflows are enabled, and the workflow engine is monitored.
A Workflow administrator should have access to the following T-codes −
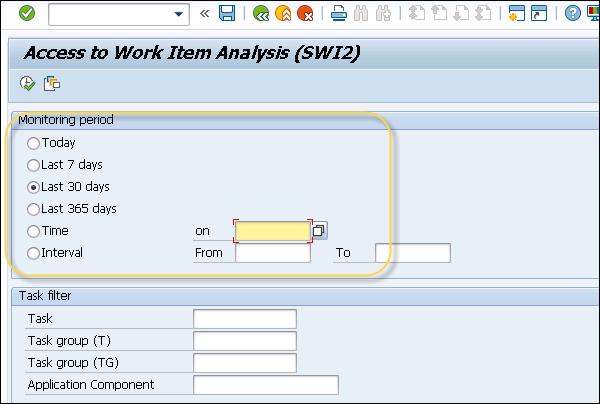
SWI2 is T-code used for analysis of Workitem. However, it provides different filtering options for the following transactions −
- swi2_freq
- swi2_adm1
- swi2_dead
- swi2_diag
- swie (Unlock Workflows)
- swia (Process Workitem as Administrator)
- swpr
- swpc
- swwl
- swui
- swud
- swi5
- swu8
- sbwp
- swel
- swels
- swu0
- swue
- swu1
- swu2
- swu_obuf
- swld
- swb_cond
- swus
- swi1
- swi6
- swu3
We will cover these T-codes and other important transactions with description later in this tutorial.
A Workflow administration performs various tasks which can be divided into the following categories −
- Workflow Runtime
- Event Manager
- Workflow definition time
- WebFlow
Workflow runtime contains different Transactions, which can be used to monitor and control the execution of workflows. T-code: SWDC_RUNTIME

Event Manager Administration
This includes T-codes which are used for controlling and using events in SAP Workflow. Following tasks can be performed under Event Manager Administration −
Event Queue Administration
This is used to define an administrator for event queues and to manage who is notified by e-mail, if there are errors relating to events in Workflows.
Type Linkages and Instance Linkages
This is maintained in the table which contains the assignment of events to the event receivers interested in the event.
Event Trace for Workflows
You can use Event Trace in Workflows to log all information for creating and using events.
Event Queue
You can make use of Event queue to store events temporarily.
General Settings → Workflow → Maintain the event queue settings

In an event trace, maintain the following data −
- Event data
- Triggering program
- Trigger date and time
- Triggering object
- Triggering object Type
- Event name
Following are the useful transactions under SAP Workflow in ABAP development −
SWE4 − Switch event trace on/off
SWEL − Display event trace
RSWELOGD − Delete event trace
SWEC − Link change documents to events
SWED − Assign change document objects to object types
To activate/deactivate the event trace, navigate to the following path −
Tools → Business Workflow → Development → Administration → Event Manager → Event → Switch Event Trace On/Off or use T-Code: SWELS/SWE4


To display the event trace, navigate to the following path −
Tools → Business Workflow → Development → Administration → Event Manager → Event Trace → Display Event Trace or SWEL as shown in the following screenshot.


To delete the event trace, navigate to the following path −
Tools → Business Workflow → Development → Administration → Event Manager → Event Trace → Delete Event Trace or use T-code: RSWELOGD as shown in the following screenshot.

SAP Business Workflows With Errors
You can also list top workitems with errors in Workflow. SAP List viewer in ABAP system is used to view the workflow with errors and these are grouped based on error reason. Following are the possible causes of workflow errors −
- Agent
- Deadlines
- Binding from workflow to workitem
- Other
You can access the processing of workflows with errors navigating to this path: Tools → Business Workflow → Administration → Workflow Runtime → Diagnosis of Workflows with Errors.

You can use T-code: SWI2_DIAG (Diagnosis of Workflows with Errors) - which is defined as the standard SAP code available within R/3 SAP systems depending on your version and release.


You can see the error cause in the workflow diagnosis and also “Restart workflow” from here.
SAP Business - Workflow Configuration
In SAP Workflow, you can create a runtime definition of SAP workflows. These configurations are evaluated when workflows are executed. You can configure the following steps −
- Activity
- User decision
- Document from the template
- Wait
For each workflow definition, you can create a separate workflow configuration. You can activate a workflow configuration separately and when a workflow is run, it checks for the activated workflow configuration.
Note − Data in the workflow configuration always take precedence from data in the workflow definition.
To start the Workflow configuration, navigate to Tools → Business Workflow → Development → Definition Tools → Workflow Configuration.
Or use T-code: SWDD_CONFIG

This opens the window with the name - Process Workflow Configuration. You have to double-click on a step in the workflow definition to display the step definition to enter the values. When the workflow is executed, these values are then used at runtime instead of the values mentioned in the definition of the workflow.

When a workflow configuration is saved, it is by default active. You can also delete a configuration by navigating to Configuration → Delete.

SAP Note while using Workflow Configuration from Easy Access
You can open the workflow configuration of the open workflow directly from the Workflow Builder.
In the workflow configuration, you can adapt a workflow individually without changing the workflow itself. One use of the workflow configuration is for workflows supplied by SAP, which you cannot edit yourself. In the workflow configuration, you can make specifications in the selected input fields, which are given priority in the evaluation during execution.
For example, you can adapt the selection of the responsible agents or the message recipients for completion of all the steps. You can also adapt a defined deadline monitoring to meet your own requirements.
Note − Workflow configuration is specific to the client in SAP system. It is also possible to transport a workflow definition from one client to another client - only active version of workflow definition is transported. In case WF definition exists in the target system with the same version number and no workflows are running, then it is overwritten, otherwise it is saved with the free version number.
SAP Business Workflow - Builder
Workflow Builder is the most common tool for creating, editing, and displaying Workflow definitions. It provides a graphical and tree modeling view for workflow definition. While using SAP GUI for Windows, a graphical view of the Workflow Builder is displayed.
While using other SAP GUI, tree view is displayed in the Workflow Builder.
In the Graphical view of the Workflow builder, following sections are defined −
- Workflow
- Information
- Navigation
- Objects
- Messages
- Step Types
- Overview
The overview area is not displayed in Tree view. On the left side, you have an object, navigation and information pane. In the middle of the screen, you have the Message and the Workflow pane and on the right side you have the Overview and Step Types.
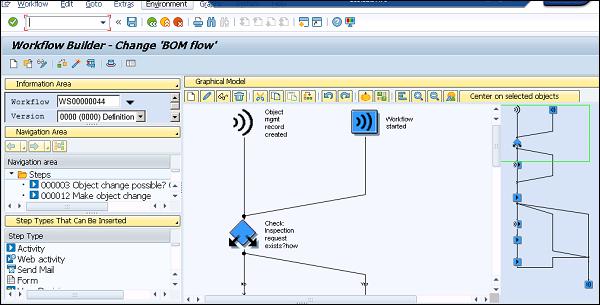
Navigation Pane
In the Navigation pane, you have the workflow steps displayed as per the workflow definition display. Users can also navigate directly to any step definition from the list of steps. This is also used to edit the workflow from the context menu.
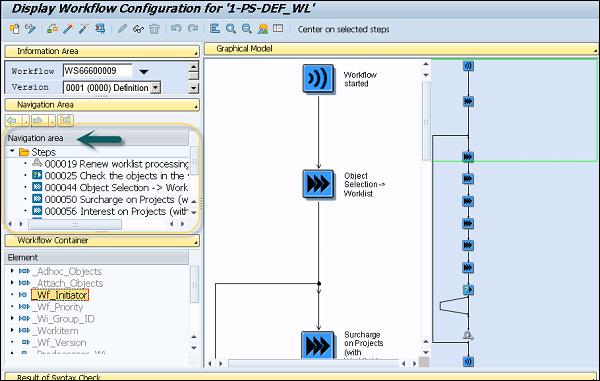
Messages − In the Message pane, it contains all the messages and search results, which are generated in where-used lists and workflow tests are displayed here.
Information − This pane is used to display the workflow loaded and its definition, the status of the respective workflow and the version number in the system.
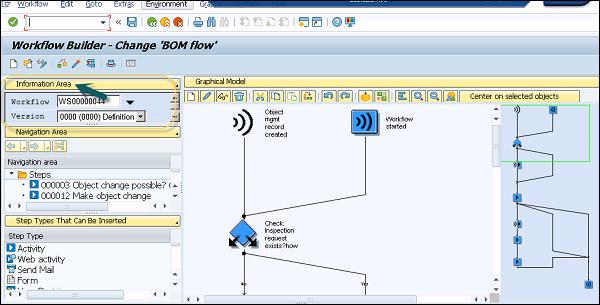
Calling Workflow Builder
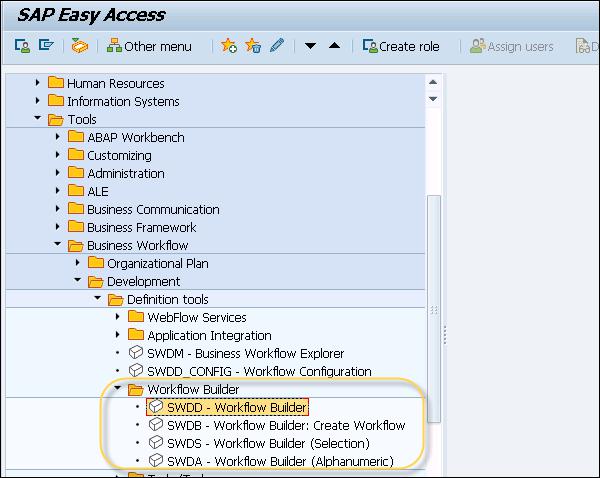
You can call workflow builder using different options. You can call it directly from navigating to this path: Tools → Business Workflow → Development → Definition Tools → Workflow Builder → Workflow Builder or you can also use T-Code: SWDD.
To call the alphanumeric display of the Workflow Builder directly, navigate to Tools → Business Workflow → Development → Definition Tools → Workflow Builder → Workflow Builder (Alphanumeric).
You can navigate between the change mode and the display mode by using the option  . You can also select a different workflow for processing by navigating to Tools → Business Workflow → Development → Definition Tools → Workflow Builder → Workflow Builder (Selection).
In case you want to call Workflow Builder directly with a new and empty workflow, navigate to Tools → Business Workflow → Development → Definition Tools → Workflow Builder → Workflow Builder: Create Workflow.
Note that a workflow start is represented using an indicator symbol  Start workflow. When you call a new workflow from the definition of multistep task in which triggering events are defined, it is shown using the symbol
  .
.
In the Graphical workflow definition, you can add a new workflow definition using an undefined step with an outcome and is shown by the symbol  .
.
The end of the workflow definition is indicated by  .
.
Important transaction codes related to Workflow Builder and configuration are tabulated below.
| SWDA |
Workflow builder (Calls the workflow builder in alphanumeric mode) |
| SWDD |
Workflow builder |
| SWDS |
Workflow builder (Selection) |
| SWDD_CONFIG |
Workflow configuration |
| SBWP |
The business workplace |
| SWDC_DEFINITION |
Workflow builder administration data |
| SWDC_RUNTIME |
Workflow Runtime administration data |
| SWNCONFIG |
Extended notifications for business workflow |
SAP Business Workflow - Import/Export
You can also import and export workflows using XML files. Meta-language BPM0.4 is used to describe the structure of workflows. When you export a workflow, following components of the workflow can’t be exported along with BPML 0.4 (BPML stands for Business Process Modeling Language).
Triggering events
Tasks in steps
Wait steps
Event creators
Task ID exported as SAP-specific extension
In case your workflow contains such step types, during import they are replaced by empty steps
Complex conditions
Data types such as structures, object type references
Modeled deadline monitoring
Activities with more than one outcome
Organization management rules/elements served as responsible agents
To export a workflow as an XML file, navigate to Workflow → Import/Export → Export to XML File.

You can also navigate to view BPML Export → Click Export to xml file and then save the file locally on your system.

You can use this file while importing under Workflow option at the top. To import this, navigate to Workflow → Import/Export → Import from XML file.

SAP Business Workflow - Creating Steps
A Step is used in the workflow to execute a task or also to control the workflow. A Step is always created inside a block and a block always contains a step and its outcome. A Step can be created by changing an undefined step in graphical mode or you can also add a new step.
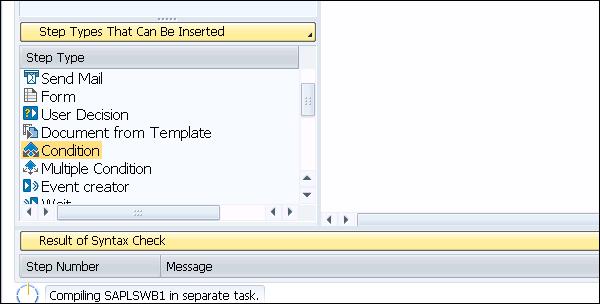
To change an undefined step in the workflow, double-click on the undefined step and this will open Step Selection. Select a Step Type as shown in the following screenshot.
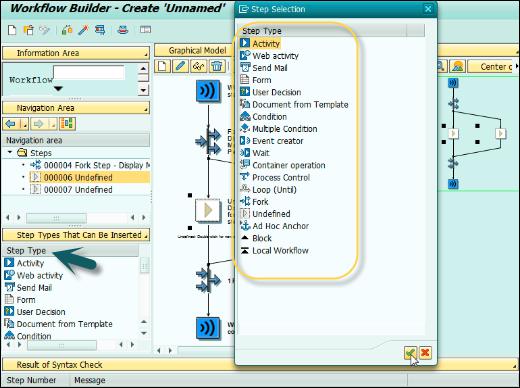
There are different Step types you can select as per the requirement. Following are some common step types, their symbols in the workflow and description.
| Symbol |
Step Type |
Step Runtime Function Description |
 |
Process control |
The functions Cancel workitem or Set workitem to obsolete are applied to other workitems of the current workflow. |
 |
Ad hoc anchor |
In the definition, you save workflows that can replace this step. At runtime, an authorized user can select one of the saved workflows. The ad-hoc anchor is then replaced by the steps of this workflow. |
 |
Activity |
Execution of a task or sub-workflow. |
 |
Condition |
One of two branches defined in the workflow definition is processed. The system makes the decision based on the defined conditions. While doing this, the system takes account of information from the context of the workflow or the application objects processed. |
 |
User decision |
The process flow of the current workflow is controlled on the basis of a decision made by the current agent. |
 |
Document from template |
A document is created from a document template. |
 |
Container operation |
Elementary arithmetic operations or value assignments are applied to individual elements of the workflow container. |
 |
Event creator |
An event is created. |
 |
Form |
The data in a container element that refers to a structure can be displayed, processed, or approved as a form. |
 |
Send mail |
The text entered in this step type is sent as an e-mail. |
 |
Multiple condition |
One of the several branches defined in the workflow definition is processed. To do this, the system checks the value of a container element in the workflow container. |
 |
Fork |
The processing that follows takes place in a fork. You can define how many branches have to be executed for the fork to be successfully completed, or you define an end condition in the condition editor. |
 |
Undefined step |
No function at runtime. Undefined steps always have an outcome. |
 |
Loop (UNTIL) |
A sequence of steps is processed repeatedly until the defined termination condition occurs. |
 |
Loop (WHILE) |
A sequence of steps is processed repeatedly as long as the defined comparisons apply. The system leaves the loop when the basis of comparison does not agree with any of the comparison values. |
 |
Wait for event |
The system waits for a specific event. The work item is only completed if the expected event occurs. The event can also be triggered by the occurrence of an XML document. |
 |
Web activity |
The content of container elements is sent to a URL unchanged or in the form of a generated XML document. The step can wait for a reply. Communication with a process started by a Web activity is possible. A process started by an XML message can communicate with its caller. |
When you insert a new step in an existing workflow, its position depends on the step or the outcome previously selected.
| Where do you want to insert the step |
What do you have to select |
| After a step |
The outcome of the step, which is located in the relevant branch of the workflow definition |
| Before a step |
The step |
| As a new branch of a fork |
The  symbol before the fork symbol before the fork |
Use of Wait Step
A wait step in the workflow can wait for an -
- Event
- Local Event
- Work Item
- Event received by the workflow
When a wait step is waiting for an event, it is terminated when a specific event occurs. The event ends all the wait steps waiting for that specific event. This is commonly used −
- To suspend a workflow till a specific event occurs
- As a result from another workflow started in a different system
- As an event in parallel processing
Same way it works when waiting for a local event, condition or event from other workflow.
 |
Wait for event |
The system waits for a specific event. The work item is only completed if the expected event occurs. The event can also be triggered by the occurrence of an XML document. |
Business Object Builder
You can also create, change or display an object available in Business Object repository using the Business Object Builder. To change an object, you should know the name, ID or description of the object.
An object in the workflow represents a business entity in SAP system. Common entity example includes: Purchase Order, Material, Vendor, etc. You can also access Business Object Repository using Business Object Repository Browser. To call the Business Object Repository Browser from the Business Object Builder, you have to select Business Object Repository and select the number of object types to be displayed in the dialog box.
When you open Business Object Builder by navigating to Tools → Business Workflow → Development → Definition tools → Business Object Builder, you can see the option of Business Object Repository at the top menu.


In Business Object Repository Browser: Entry Screen, Select Filter Other settings to specify individual filter criteria.
To start Business Object Builder, you have to navigate to Tools → Business Workflow → Development → Definition Tools → Business Object Builder.
To create a Business Object, you can use T-code Business Object Builder (SWO1).

Once you click Create, in the next window you have to define the object Super type. All these steps are defined in the previous topic under Business Object definition. To switch directly to the maintenance of an object type, you need to enter the ID of the object type and click Display or Change button in the initial screen.
Following screenshot shows a Business Object and how to change the status of an object in the repository.

SAP Business Workflow - Abap Classes
In SAP ABAP workbench, class builder is a tool in ABAP that allows you to define, change and test global ABAP classes and interfaces. Class Builder has two modes −
- Form based mode
- Source code based mode
With the use of IF_WORKFLOW Interface, you can use ABAP classes in SAP WebFlow Engine. In SAP system, a WebFlow Engine (SAP Business Workflow) is used to define and map the business processes, which are not mapped. It includes the release or approval processes and also complex processes such as creating a Purchase Order, etc. and different actions of the departments involved. SAP WebFlow Engine is mostly used for the processes, which are repeated in nature or involves actions from large number of agents in a predefined order.
A WebFlow Engine can also be used to handle errors in the existing processes and workflows. Using WebFlow Engine, you can also start a workflow when predefined events occur.
To use ABAP classes on Workflows, it is necessary to implement Interface IF_WORKFLOW in ABAP class. This interface includes method that creates specific prerequisites such that the object can be used within the SAP WebFlow Engine.
Interface IF_WORKFLOW contains the following methods −
- BI_PERSISTENT~FIND_BY_LPOR
- BI_PERSISTENT~REFRESH
- BI_OBJECT~EXECUTE_DEFAULT_METHOD
- BI_PERSISTENT~LPOR
- BI_OBJECT~DEFAULT_ATTRIBUTE_VALUE
- BI_OBJECT~RELEASE
How to Add an IF_WORKFLOW in an ABAP Class?
To add an IF_WORKFLOW interface to a class, you have to open Class Builder T-Code: SE24.

Go to the Interface tab, add the IF_WORKFLOW interface. Once you add this interface, it also adds two sub-interfaces: BI_OBJECT and BI_PERSISTENT. When you move to the Methods tab and you will see some methods of these interfaces have been automatically inherited to ABAP Class.
For a Utility class to implement IF_WORKFLOW interface, you need to open each of the methods inherited from the IF_WORKFLOW interface, and then activate the empty source code → activate the ABAP Class.
Note − When you implement IF_WORKFLOW interface in a class, it can be used in any of the workflows. An ABAP class is automatically released to be used with the implementation of this interface. You should only make compatibility changes after the implementation of the interface and shouldn’t remove attributes, type changes, or methods. In SAP system, it doesn’t define a list where it mentions that the class is in use in these workflows.
Also note that IF_WORKFLOW interface shouldn’t be implemented in internal classes of an application, as this would mean that each method of ABAP class can be used in the workflows.
Extended Notifications
You can also configure SAP Workflows to extend the notifications to users that they have work to perform and this can be done using email notifications in MS Outlook or Lotus Notes. You can also ease the work item selection by providing a simplified view of work items.
In SAP Workflow, you can also carry out performance analysis using Transaction SWI2_DURA (Work Items by Processing Duration). This can be used to check different performance parameters such as Average Processing Time of Tasks, etc.
SAP Transaction Code (TCODE): SWI2_DURA
Transaction Description: Work Items by Processing Duration
SAP Module Description: Basis Component

This is used to monitor −
- Predefined task groups that can be used to monitor different processes.
- Single tasks to spot occasional user roles.
With the use of extended notification for SAP Business Workflow, you can notify the users about work items that need to be processed. You can send work items to groupware. For example, MS Outlook or Lotus Notes with backend transactions that the user can directly access and take actions.
Following is a comparison of different notifications in SAP system for the workflow −
SAP MAPI contains SAPoffice Message Store, transport and address book (mpsap32.dll), Executable programs, workflow and business object attachment interpreter (mpinterp.exe, mpbusobj.exe and mpstub.exe), files for column display for workflows and PST file (personal folders) for special SAPforms Outlook form for offline workflow support and setup.
Report RSWUWFML is a standard executable ABAP Report in SAP system used to send Outlook email notifications to the agent in the Workflow about workitems in the agent SAP inbox.
| Feature for workflow |
MAPI |
RSWUWFML |
RSWUWML2 |
Extended notification |
| Deliver workitems to any e-mail client |
- |
X |
X |
X |
| SAP shortcut attachments |
- |
- |
X |
X |
| Prefix AND suffix text (surrounding workitem description) |
- |
- |
X |
X |
| Enhanced address determination |
- |
- |
X |
X |
| Enhanced substitution handling |
- |
- |
X |
X |
| HTML e-mail (Outlook only) |
- |
- |
- |
X |
| Generic decisions |
- |
- |
- |
X |
| Link to new web UIs (WebDynpro, etc.) |
- |
- |
- |
X |
| Lists of workitems in one e-mail |
- |
- |
- |
X |
| Support workitem forwarding via e-mail |
- |
- |
- |
X |
Notifications Configuration
SWN_SELSEN is a standard executable ABAP Report that you can use to select and send the workitems. You can run this report periodically.
Transaction SWNCONFIG is for advanced configuration.

On the left side under the dialog structure, there are different options such as −
- Business Scenario
- Schedule Selection
- Delivery Schedule
- General Settings
- Handler Assignment
- Message Template
- Delivery Type
You can select any dialog structure and click New Entries to add an entry for notification configuration in SAP system.
Transaction SWNADMIN is for basic administration. When you run this T-code, you will be prompted as below.

Once you click Allow, you will be navigating to the page: Administration of extended notification of the workflow.

In this window, you can define extended notifications for your workflows. You can activate/deactivate notifications, define schedule, define messages, recipients, etc.

Integration With Non-Sap Workflow Apps
You can also integrate your workflows with non-SAP workflow apps using external service calls, web service and API calls. Following are some common integration options −
- Create workflow tasks for external service calls and BSPs
- Universal Worklist launch handlers
- SAP NetWeaver Exchange Infrastructure Business Process Management
- Wf-XML and Web Services
Importing ABAP Service
You can use transaction code: WF_EXTSRV to generate your service. This transaction is used to maintain WebFlow Services. You can also access this from the menu path as below −
SAP Easy Access → Tools → Business Workflow → Development → Definition tools → WebFlow Services → Maintain WebFlow Services.

All the Web services that you have to use in SAP Workflow must be registered in the Web service directory. You can either manually register a web service by entering all the data of the web service manually. Use T-Code: WF_EXTSRV.
You can also use WSDL file that contains the definition of web service and you can import this directly using T-Code: WFWS.
To register a web service, select Service in dialog and click New Entries.
Enter a Service ID and a short text for the Web service.
Select log with which the Web service is to be called.
For Host, add the address of the Web service, and for Port, add a port number.
Enter the directory and the call name of the Web service in the field Path.
Define the Call mode of the Web service. Here, you determine whether a dialog or a background Web service is involved and whether and then how a callback is performed.
Double-click and choose a Parameter in the dialog structure.
The parameters determine the interface of the Web service. The task container is created from the parameters in the subsequent task generation.
Enter all the Web service parameters. Make sure you also assign the service ID of your Web service to the parameters. The assignment as import element and export element is required for the subsequent creation of the task container.

To generate your service, click the Generate button as shown in the above screenshot.

You have the following to perform the configuration tasks −
- WF_HANDCUST to configure the workflow URLs.

- WFWS to import external WSDL.

- WF_EXTSRV for BSPs and ABAP services.
- Generate tasks.
- Extend service to perform callback to WF_HANDCUST URL.
SAP Business Workflow - Universal Worklist
Universal Worklist (UWL) is a centralized tool to add alerts, notifications, approvals and ad-hoc tasks for the workitems. All the workitems are created as a part of the business processes and can be easily managed using Universal Worklist.
UWL provides a uniform central access to all the workitems. You can also customize UWM views that meets your requirement. You can easily access additional information from object repositories such as attachments, notifications, etc. You can easily delegate your tasks to other users in your absence.
With the use of UWL, you can bring workitems from different systems. These include −
- Business Workflow
- Business Process Management
- Collaboration Tasks
- SAP Office Notifications
- Guided Procedures
- Workitems fetched by Custom UWL Connectors
Universal Work List Setup
UWL is used to group the different workflow tasks and alerts that are relevant for HR Administrator.
SAP NetWeaver Portal provides UWL Configuration that can be used to configure all the backend workflows. This is totally xml based configuration.
To set up UWL- go to the portal → Select System Administration → System Configuration → Universal Worklist and Workflow → Universal Worklist → UWL System Configuration.

You can set up a new connector, if you do not have a connector in the system connected to the system alias, otherwise you can also use an existing one.
Advantages
Following are the key advantages of using UWL −
- You can access guided procedure workitems in the common UWL inbox.
- You can launch new items, open items in the same window or in a new window.
- To manage the workitems, you can use inbox customization flexibility.
- You can use the pull mechanism that allows you to use auto or manual refresh options for workitems.
- You can also manage item types and view definitions.

SAP Business - Creating Workflows
You can create your workflows in SAP system to automate the business processes that contains sequence of tasks, steps, and events. When you automate tasks using the workflow, this helps the user to easily take action without facing technical/functional difficulties. You can set notifications in the user SAP inbox about pending workitems and with a single click, it calls the correct transaction and navigates to the relevant screen.
Let us see how to create a Workflow, when an employee raises a leave request in the system. Following steps have to be performed −
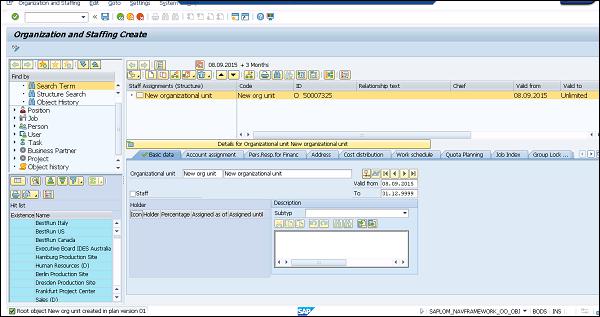
Step 1 − Define Organization Plan T-Code PPOCE
This transaction is the easiest way to define an organization plan in SAP system. You need to enter the start date of Organization unit → click the Green tick mark as shown in the following screenshot.
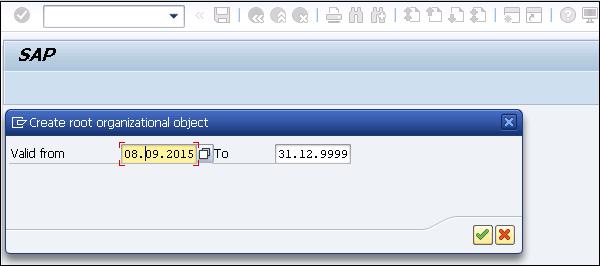
Step 2 − Create a Workflow template T-Code PFTC_INS
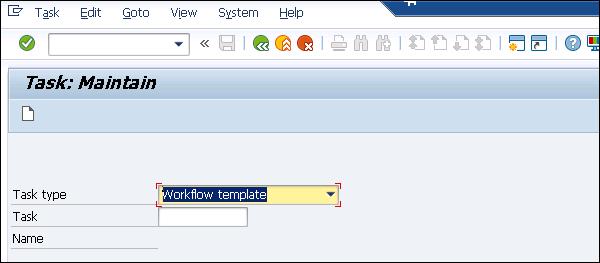
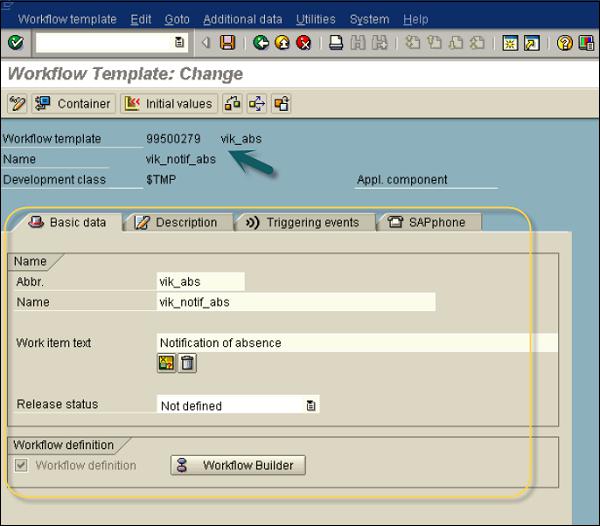
In the Task type field, choose the Workflow template. For Creating tasks: Choose Standard Task in the Task type field as shown above and click Create.
Now to build the workflow in the workflow builder, navigate to T-Code: SWDD
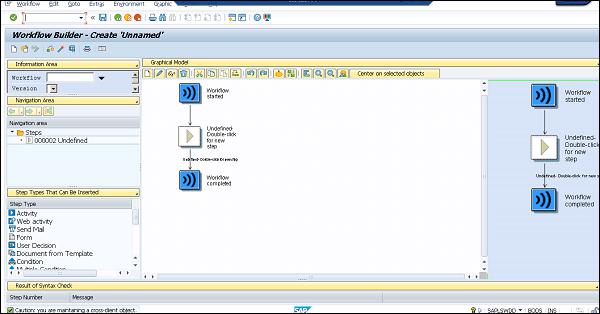
In the Workflow Builder, you have different options called Step types, you can drag and drop and insert into the Workflow.
Step 3 − Create a notification of absence.
To define the first task, navigate to T-Code: PFTC_INS
Select Standard Task in the Task type field.
Enter the following values and Save the task. Once you save the task, you will get code ID in number 93XXX989
- In the Name field, select Form_created
- In Abbr, select create_form
- In Workitem text, select vik_notif_absence-create
- In Object Type, select FORMABSENC
- In Method field, select CREATE
- Checkbox Synchronous object method, Object method with dialog checked
Step 4 − Add the task created in the previous step to the Workflow.
In place of the undefined step in the Workflow, you have to add an activity to your workflow.
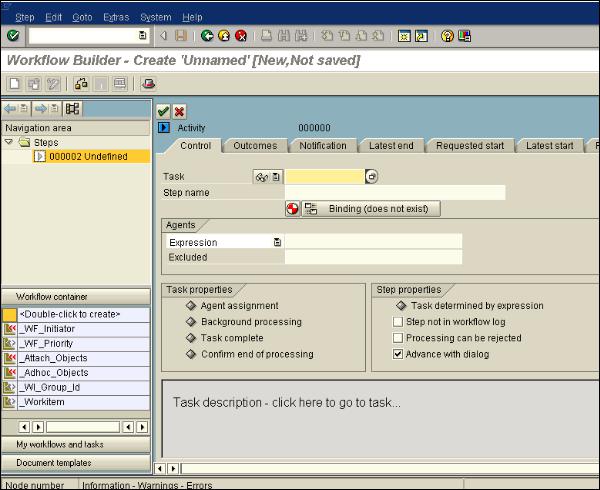
As seen in the following screenshot, using T-Code: PFTC_INS, a Task TS99500654 has been created separately.
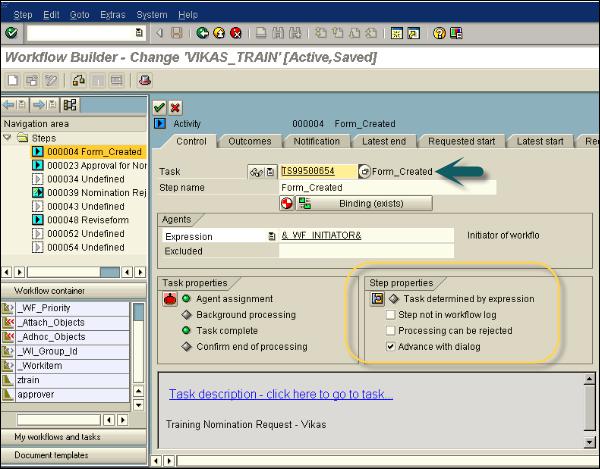
In Step Properties, you can select different options as per the requirement. Here, let us select the checkbox - Advance with dialog as shown in the above screenshot. It shows that the workitem of the workflow is made available for processing immediately. As we have entered WF_INITIATOR in Expression under Agents, the person who will start the workflow is one of the recipients of workitem. Binding option is also defined that confirms absence notification is not only in this task but also in the workflow - _WI_ObjectId → &ABSENCEFORM&.
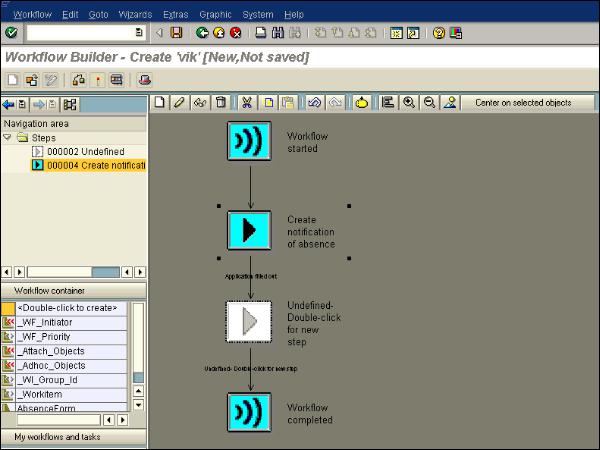
Now the Workflow Builder in graphical mode looks like this −
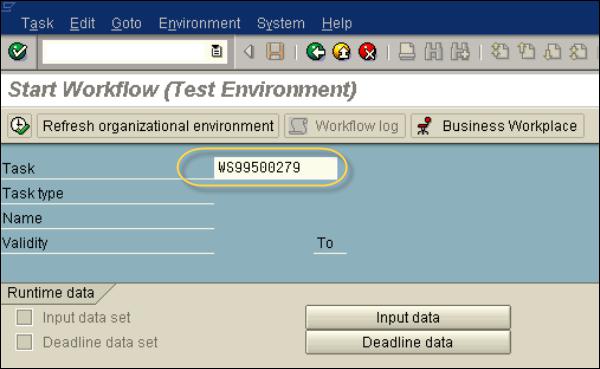
Step 5 − First task in SAP Inbox.
Now the workflow is executed, it creates workitems such as e-mails in the SAP Inbox. When it is executed, it calls the respective task or the transaction screen. When you run this workflow, it shows the notification of absence form.
Click Cancel to cancel the processing of the first notification. The workflow inbox holds one item for processing - creating a notification of absence. Select the workitem and click Execute (F8). This will return to “Create notification of absence screen” where the notification of absence form is displayed. Enter the details in the form and click Save. This will remove the Workitem from the inbox.
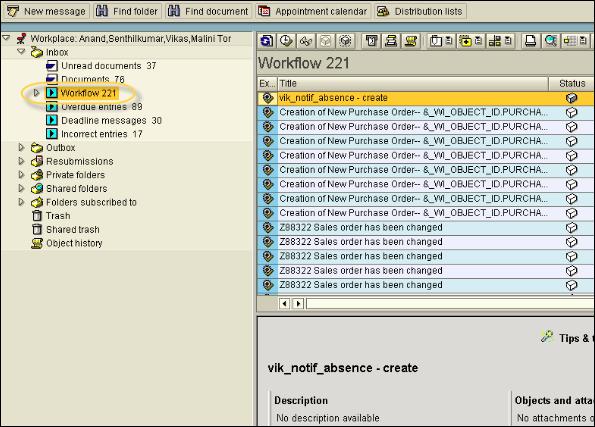
Step 6 − Check Notification of absence in the inbox.
The form that has been created will be sent to the supervisor for approval using the object formabsenc-approve object. Next is to create a new task using T-Code: PFTC_INS
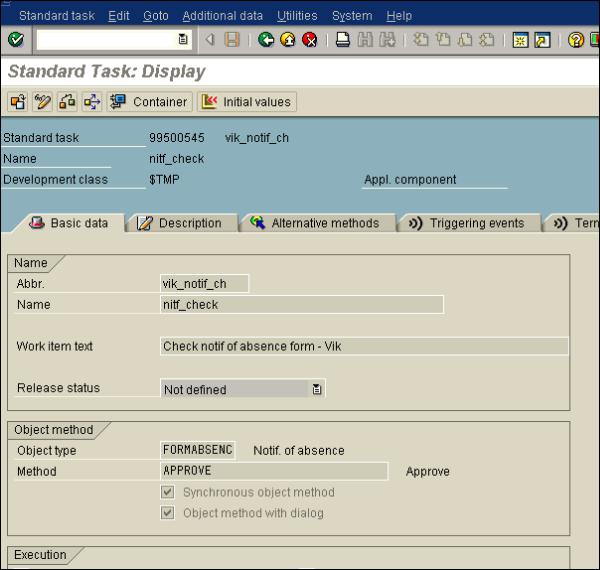
Step 7 − Add a second task in the Workflow.
You have to include Task “Check Notification of Absence in the Workflow” using the task code generated in the previous step.
Also, define the binding properties as shown in the following screenshot.
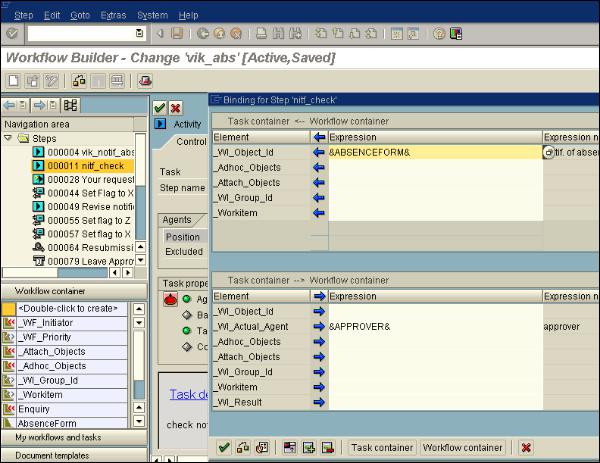
You have to create the Approver variable in the workflow container. Navigate to the left side menu at the bottom, you will see a menu option Workflow container. Double-click the option to create.
Enter the following fields −
- Element − Approver
- Name − Approver
- Description − Approver of the absence request
- Reference table − WFSYST
- Reference field − AGENT
In the Position field, you have to enter the position ID as per the organization plan. This can be checked using T-Code: PPOCE. Don’t prefix “S” in the text field.
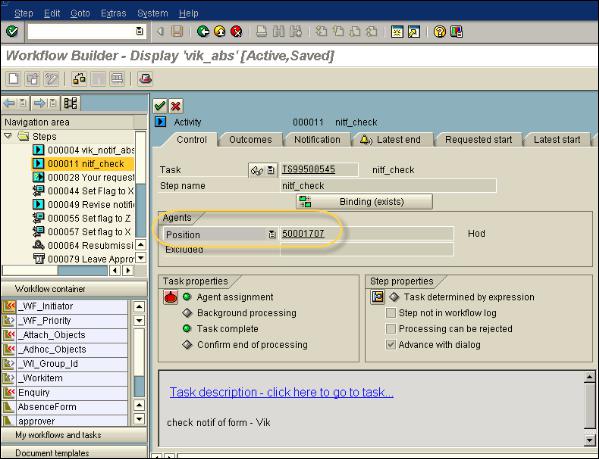
If an approver has not made a decision about Leave request, you can also add deadlines to add a workitem for the missed deadline in Approver’s Business Workplace.
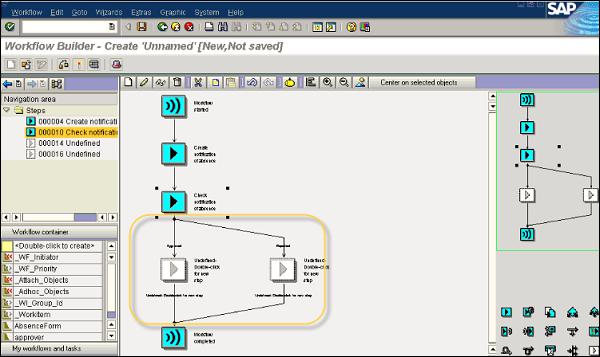
You can see two outcomes in the workflow builder: Approved and Rejected.
Step 8 − Again test in the Inbox.
Next is to execute the workflow and you will be moved to the workitem for creating notification of absence for processing. This is because of Advancing with immediate dialog option selected at the time of creating a task.
Now, navigate to Business Workplace using the user-id of the approver and you will see the workitem to process and other attributes to mention in the Workitem. Select the workitem for checking the notification of absence and choose Execute.
Either reject or approve the request. Notice the two buttons: Approve and Reject.
Step 9 − Integrate User Decision for resubmit.
In case, the leave request is rejected by the approver, you also have an option to add user decision to the rejected output. This allows the requester to make changes and resubmit the request for approval.
You need to add Step type: User Decision to the workflow. This will make your Workflow look like the following −

User Decision step is defined as follows −
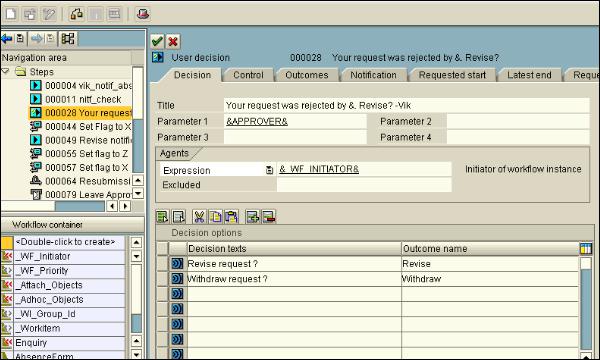
Step 10 − Third Test in SAP Inbox.
When the request is not approved, the next Step is user decision. As we have entered: (&WF_INITIATOR&) as the agent for the step, the request will come back to make the decision. You have two options Revise request or withdraw the request.
Step 11 − Define revise notification of absence
For this, you have to add undefined step - Revise notification.
Step 12 − Add activity → third task to the workflow.
To add this step, you have to make the following entries −
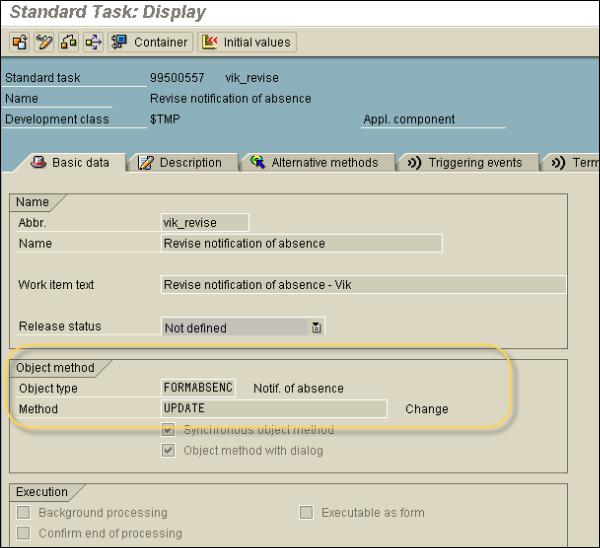
Use FORMABSENC-UPDATE as an object.
In the binding option, enter _WI_Object_ID <= &ABSENCEFORM&
In the Agents → add &_WF_INITIATOR& in the expression field
Step 13 − Send Notification for approval of leave.
To send a notification, you have to add a new step “Send mail”. You have to drag this step to the Undefined Step - after the outcome of the step “Check notification of absence”.
To add this step, you have to make the following entries −
Select the Recipient type − Enter the Organizational object
Select Agents → Choose the Expression &_WF_INITIATOR&.
Enter the subject line as <“Leave Approved”>
Enter the email text as <“Approved”>
When you hit the Enter button, you will be asked for the name and abbreviation of the task.
Archiving Workitems
In SAP system, it is possible to archive all the completed Workitems. You can also achieve all data in a workitem. You can display the achieved workitems but they can’t be loaded in SAP system. When you archive workitems, it includes archiving log data, workflow manager data, dependent workitems and workitem attachments.
Workitems with the following status can only be archived.
- Workitems completed
- Execution of the workitem is completed
- When workitem is not required for the workflow logic
- Cancelled workitems
To archive workitems, you have to navigate to Tools → Business Workflow or Development → Workflow → Administration → Workflow Runtime → Reorganization → Archive Work Item.

To archive the workitem, you can use the following selection criteria −
- Workitem number
- Task identifier
- Actual agent of the workitem
- Creation date
- Completion date

Deleting Archived Workitems
You can also delete workitems which are not archived. To delete workitems, navigate to Tools → Business Workflow or Development → Workflow and then Administration → Workflow Runtime → Reorganization → Archive Work Item or T-Code: SWWL.

With the selection criteria as shown below, you have an option to delete Workitems immediately/Delete log data as well. To delete Workitem, enter the required fields and click the Execute button at the top.

To display archived workitems, you have to use report “RSWWARCR”.
Note − In case you want to delete workitems directly that meet the archiving criteria, it is recommended to archive them first, considering performance-wise to use the delete program of the archiving object WORKITEM than to directly delete the workitems.
Using Swi2_Diag Diagnosis
This is used to diagnose the workflow with error. You can access the processing of workflows with errors navigating to this path: Tools → Business Workflow → Administration → Workflow Runtime → Diagnosis of Workflows with Errors.
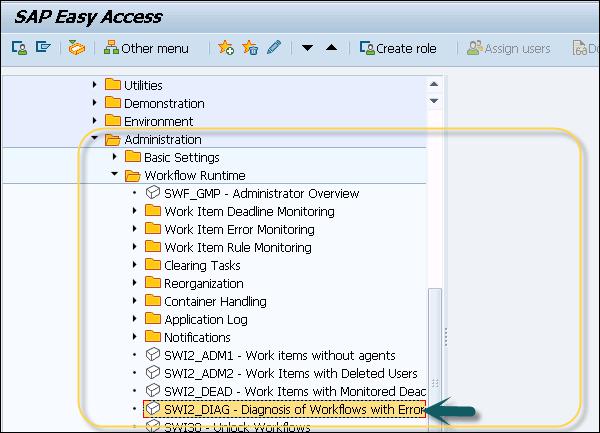
You can use T-code: SWI2_DIAG (Diagnosis of Workflows with Errors) - which is defined as the standard SAP code available within R/3 SAP systems depending on your version and release.
You have to enter the selection criteria as shown in the following screenshot and it will show you the list of all workflows with error.

To use this transaction, select the workflow with the error, and find out the workitem number that contains the error.
Click “Change the workitem” and make changes to the workitem with error and “Save”.
Using The Event Trace
As mentioned earlier, this is an important feature to diagnose the workflows with error. You can use Event Trace in Workflows to log all information for creating and using events.
Event queue
You can make use of Event queue to store events temporarily.
General Settings → Workflow → Maintain the event queue settings

In an event trace, you maintain the following data −
- Event data
- Triggering program
- Trigger date and time
- Triggering Object
- Triggering Object Type
- Event Name
Following are the useful transactions under SAP Workflow in ABAP development −

RSWELOGD - Delete event trace
SWEC - Link change documents to events
SWED - Assign change document objects to object types

To activate/deactivate the event trace, navigate to the following path −
Tools → Business Workflow → Development → Administration → Event Manager → Event → Switch Event Trace On/Off or use T-Code: SWELS/SWE4.

SAP Business Workflow - Transactions
In SAP system, you have built-in functions that defines different tasks to be performed in the workflows. These are related to creating new workflows, workflow tools, workflow diagnosis, performance, workitems and administration of workflows.
Few common T-codes and their description is mentioned in the following table −
| Sr.No. |
Transaction Code & Description |
| 1 |
PFAC
Create and maintain Rules
|
| 2 |
PFOM
Maintain assignment to SAP organizational objects
|
| 3 |
PFOS
Display assignment to SAP organizational objects
|
| 4 |
PFSO
Organizational environment of a user
|
| 5 |
PFTC
Create and maintain tasks
|
| 6 |
PPOCW
Create organizational plan
|
| 7 |
PPOMW
Maintain organizational plan
|
| 8 |
PPOSW
Display organizational plan
|
| 9 |
SWDA
Workflow Builder (Calls the Workflow Builder in alphanumeric mode)
|
| 10 |
SWDD
Workflow Builder
|
| 11 |
SWDS
Workflow Builder (Selection)
|
| 12 |
SWDD_CONFIG
Workflow configuration
|
| 13 |
SBWP
The Business Workplace
|
| 14 |
SWDC_RUNTIME
Workflow runtime administration data
|
| 15 |
SWNCONFIG
Extended notifications for business workflow
|
| 16 |
SWDM
Business Workflow Explorer
|
| 17 |
SWEINST
Evaluation and maintenance of instance linkages
|
| 18 |
SWEINSTVC
Evaluation and maintenance of instance linkages
|
| 19 |
SWE2
Evaluation and maintenance of type linkages
|
| 20 |
SWE3
Evaluation and maintenance of instance linkages
|
| 21 |
SWE4
Switch event trace on/off
|
| 22 |
SWEL
Display event trace
|
| 23 |
RSWELOGD
Delete event trace
|
| 24 |
SWEC
Link change documents to events
|
| 25 |
SWED
Assign change document objects to object types
|
| 26 |
SWEQADM_1
Event queue administration
|
| 27 |
SWEQBROWSER
Administration of event queue browser
|
| 28 |
SWETYPV
Evaluation and maintenance of type linkages
|
| 29 |
SWI1
Selection report for workitems
|
| 30 |
SWI2_FREQ
Workitems per task
|
| 31 |
SWI2_DEAD
Workitems with monitored deadlines
|
| 32 |
SWI2_DURA
Workitems by processing duration
|
| 33 |
SWI11
Tasks in workflows
|
| 34 |
SWI13
Task profile
|
| 35 |
SWI5
Workload analysis
|
| 36 |
SWL1
Settings for dynamic columns
|
| 37 |
SWLV
Maintain workitem views
|
| 38 |
SWFVISU
Parameters for Workitem Visualization in the UWL
|
| 39 |
SWO1
Business Object Builder
|
| 40 |
SWO6
Customizing object types
|
| 41 |
SWR_WEBSERVER
Customizing Web server
|
| 42 |
SWU_CONT_PERSISTENCE
Administration of container persistence
|
| 43 |
SWU_EWCD
Wizard for event creation using change documents
|
| 44 |
SWU_EWLIS
Wizard for event creation using the Logistics Information System
|
| 45 |
SWU_BTE
Wizard for event creation using Business Transaction Events
|
| 46 |
SWU0
Event simulation
|
| 47 |
SWU2
RFC monitor
|
| 48 |
SWU3
Automatic Workflow Customizing
|
| 49 |
SWU4
Consistency check for standard tasks
|
| 50 |
SWU5
Consistency check for customer tasks
|
| 51 |
SWU6
Consistency check for workflow tasks
|
| 52 |
SWU7
Consistency check for workflow templates
|
| 53 |
SWU8
Switch workflow trace on/off
|
| 54 |
SWU9
Display workflow trace
|
| 55 |
SWU10
Delete workflow trace
|
| 56 |
SWUD
Diagnostic tools
|
| 57 |
SWUE
Trigger event
|
| 58 |
SWUI
Start workflows/tasks
|
| 59 |
SWUS
Testing workflows/tasks
|
| 60 |
SWXML
Display XML documents
|
| 61 |
SWUY
Wizard for linking messages to workflows
|
| 62 |
SWWCOND_INSERT
Schedule background job for workitem deadline monitoring
|
| 63 |
SWWCLEAR_INSERT
Schedule background job for clearing tasks
|
| 64 |
RSWWCOND
Execute single background job for workitem deadline monitoring
|
| 65 |
RSWWCLEAR
Execute workitem clearing work once
|
| 66 |
WF_HANDCUST
WebFlow service handler maintenance
|
| 67 |
WF_EXTSRV
Maintain Web Service Repository
|
| 68 |
WFWS
Import WSDL files
|
| 69 |
SWIA
WI Administration Report
|
SAP Business Workflow - Function Modules
Function modules are sub-programs that contain a set of reusable statements with importing and exporting parameters. Unlike Include programs, function modules can be executed independently. SAP system contains several predefined function modules that can be called from any ABAP program. The function group acts as a kind of container for a number of function modules that would logically belong together. For instance, the function modules for an HR payroll system would be put together into a function group.
Following Function modules can be used in the workflow in SAP system −
SWW_WI_CONTAINER_READ − This function module is used to read the container elements in SAP workflow.
SWW_WI_DEADLINES_CHANGE − This function module is used to change the attributes of deadline monitoring for a particular workitem.
SWW_WI_ENABLE − This is used for unlocking of workitems against execution.
SWW_WI_DISABLE − This function module is used for locking workitems for execution.
You can view the parameters of the function module. Use T-code SE37, enter the function module name and click the Display button.

Once you click Display, it will show all the parameters defined in the mentioned Function Module. Similarly, you can check/display all function modules in SAP Workflow.

SAP Business Workflow - Job Responsibilities
Following are the job responsibilities of SAP ABAP Workflow analyst −
Designs, develops, and maintains SAP Business Workflows and ABAP Web Dynpro applications
Develops the workflow tools - workflow Builder, Business Object Builder and UWL
Develops reports, workflows, and metrics within the software environment
Designs, develops, codes, and tests complex programs for SAP modules and functions using ABAP programming language
Creates specialized reports for SAP modules using ABAP programming languages
Develops all RICEF objects and troubleshoots using own ABAP skills
Maps technical business needs to architectures, standards, and reusable assets
Debugs and corrects SAP module problems using ABAP programming language to implement OSS notes
Contributes to the development of process standards and evaluation of tools as needed





 . You can also select a different workflow for processing by navigating to Tools → Business Workflow → Development → Definition Tools → Workflow Builder → Workflow Builder (Selection).
 Start workflow. When you call a new workflow from the definition of multistep task in which triggering events are defined, it is shown using the symbol
  .
. .
. .
.


 symbol before the fork


