SAP BPC - Consolidation
SAP BPC Consolidation module is used to manage and prepare consolidated data and provides a correct view of consolidated data in an organization. Consolidation module also provides an environment to perform consolidation tasks over the web.
In SAP Business Planning and Consolidation NetWeaver version, you have consolidation monitor that is used to manage consolidated data reported by groups and entity members. Consolidation monitor also controls the reported data.
Consolidation central contains journals, which are used to create and manage journal entries for updated consolidated data in database.
It contains Ownership Manager to manage ownership-based hierarchies.
Setting Up Environments and Master Data
Setting up environment includes managing master data load after you have completed the installation of BPC. Business users can set up to refresh master data on nightly or weekly basis. This can be achieved in the following different ways.
First option is you download the data from SAP BW system to a flat file and then using BPC DM Manager load the data from flat file to BPC dimensions.
Other option is to load the data directly to BPC dimension through SAP BW Transformations. The selection of option depends on your business requirement to find out which solution has to be implemented.
Following steps illustrate how to import a transport and create a new data manager package to process master data import.
First step is to Import Transport - Transaction Code: STMS


Next step is to create Data Manager Package to load from Application Server. Open BPC Excel and login. Go to Action Pane and select Manage Data.

Now to create a new package, go to Maintain Data Management → Manage Packages.

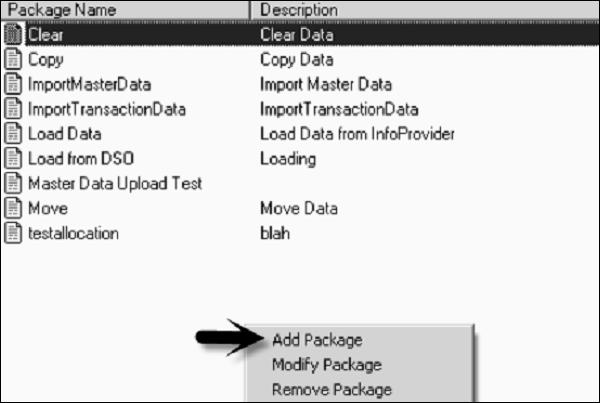
To create a new package, right-click on the blank area and select Add Package.

Click Process chain dropdown option and select Z_IMPORT_MASTER_DATA_LOAD. Click on the Select option.

Enter the Package name and description. Click on Add and Save.

Now go to Manage Packages option under Maintain Data Management. Select the package which has been created in the previous step and click on Modify.

In next window, click on View Package and then click ‘Advance’ button.

In next window of maintain dynamic script, click ‘OK’.

Click ‘Save’ and ‘OK’ and close the setup.
Creating Models for Consolidation
Models are used to hold the relationships, calculations and data in an organization. There are two types of models that can be created −
- Reporting Model
- Non Reporting Model
We use reporting models for analysis purpose. Non Reporting modules include Driver and Rates model and are used for currency rates, price, ownership data, etc.
Types of Reporting Models − Following are the types of non reporting models.
- Consolidation
- Finance
- Generic
Types of Non Reporting Models − Following are the types of non reporting models.
Note that you can do reporting on non-reporting models but you can’t assign work status to them.
To create a model, login to Business Planning and Consolidation Administration.

Go to Dimensions and Models on the left side of the screen, click ‘Models’ tab. To create a new model, click on “+ New” sign.

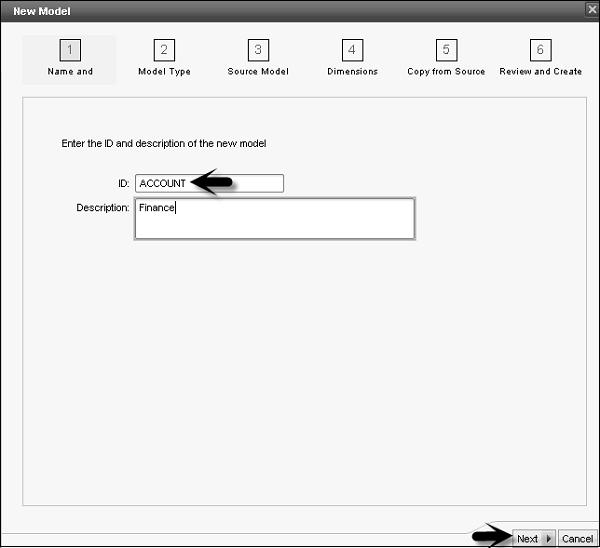
In the next window, you have to enter model Id and description and go to Next button.

Select the Model Type - Reporting or Drivers and Rate and click ‘Next’.

In the next screen, you have an option to select a blank model or you can copy from an existing model.

Once you select next, in the new screen you have to select dimensions to be included in the new model. You have to add specific dimensions as per model type.

Click ‘Next’. In the last window, you will get a summary and create option. Click ‘Create’ option to create a new model.

Similarly, you can copy an Existing model.
Creating Consolidation Logic
A logic is defined as calculations performed at different level. Execution of consolidation logic requires some sort of expertise and business requirement. A logic can be defined at different levels −
Within a dimension using Microsoft MDX language.
With the help of scripts.
Using business rules that are executed with predefined business requirements.
BPC Excel formulas.
A logic can be executed at different levels −
- Analysis Services
- BPC Application Server
- Excel/Live Reporting
Creating a Consolidation Logic
Login to Business Planning and Consolidation Administration → Rules.

Select Logic Scripts option on the left side of the screen. Select the Model from the right side of the screen.

Click on + New sign and enter the Logic Script File Name. Go to ‘Create’ button.

Enter the Logic script and click ‘Validate’.

Once the script is validated, click ‘Save’ button.


