Neo4j CQL - Creating Nodes
As discussed, a node is a data/record in a graph database. You can create a node in Neo4j using the CREATE clause. This chapter teaches you how to −
- Create a single node
- Create multiple nodes
- Create a node with a label
- Create a node with multiple labels
- Create a node with properties
- Returning the created node
Creating a Single node
You can create a node in Neo4j by simply specifying the name of the node that is to be created along with the CREATE clause.
Syntax
Following is the syntax for creating a node using Cypher Query Language.
CREATE (node_name);
Note − Semicolon (;) is optional.
Example
Following is a sample Cypher Query which creates a node in Neo4j.
CREATE (sample)
To execute the above query, carry out the following steps −
Step 1 − Open the Neo4j desktop App and start the Neo4j Server as shown in the following screenshot.

Step 2 − Open your browser, copy paste the following URL in your address bar http://localhost:7474/. This will give you the built-in browser app of Neo4j with a dollar prompt as shown in the following screenshot.

Step 3 − Copy and paste the desired query in the dollar prompt and press the play button (to execute the query) highlighted in the following screenshot.

Result
On executing, you will get the following result.

Verification
To verify the creation of the node type, execute the following query in the dollar prompt.
MATCH (n) RETURN n
This query returns all the nodes in the database (we will discuss this query in detail in the coming chapters).
On executing, this query shows the created node as shown in the following screenshot.

Creating Multiple Nodes
The create clause of Neo4j CQL is also used to create multiple nodes at the same time. To do so, you need to pass the names of the nodes to be created, separated by a comma.
Syntax
Following is the syntax to create multiple nodes using the CREATE clause.
CREATE (node1),(node2)
Example
Following is a sample Cypher Query which creates multiple nodes in Neo4j.
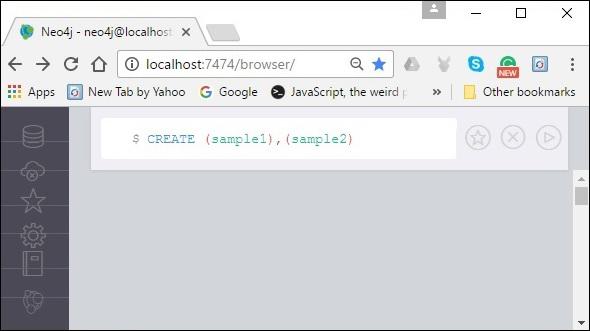
CREATE (sample1),(sample2)
To execute the above query, carry out the following steps −
Step 1 − Open the Neo4j desktop App and start the Neo4j Server. Open the built-in browser app of Neo4j using the URL http://localhost:7474/ as shown in the following screenshot.

Step 2 − Copy and paste the desired query in the dollar prompt and press the play button (to execute the query) highlighted in the following screenshot.

Result
On executing, you will get the following result.

Verification
To verify the creation of the node, type and execute the following query in the dollar prompt.
MATCH (n) RETURN n
This query returns all the nodes in the database (we will discuss this query in detail in the coming chapters).
On executing, this query shows the created node as shown in the following screenshot.

Creating a Node with a Label
A label in Neo4j is used to group (classify) the nodes using labels. You can create a label for a node in Neo4j using the CREATE clause.
Syntax
Following is the syntax for creating a node with a label using Cypher Query Language.
CREATE (node:label)
Example
Following is a sample Cypher Query which creates a node with a label.
CREATE (Dhawan:player)
To execute the above query, carry out the following steps −
Step 1 − Open the Neo4j desktop App and start the Neo4j Server. Open the built-in browser app of Neo4j using the URL http://localhost:7474/ as shown in the following screenshot.

Step 2 − Copy and paste the desired query in the dollar prompt and press the play button (to execute the query) highlighted in the following screenshot.

Result
On executing, you will get the following result.

Verification
To verify the creation of the node, type and execute the following query in the dollar prompt.
MATCH (n) RETURN n
This query returns all the nodes in the database (we will discuss this query in detail in the coming chapters).
On executing, this query shows the created node as shown in the following screenshot.

Creating a Node with Multiple Labels
You can also create multiple labels for a single node. You need to specify the labels for the node by separating them with a colon “ : ”.
Syntax
Following is the syntax to create a node with multiple labels.
CREATE (node:label1:label2:. . . . labeln)
Example
Following is a sample Cypher Query which creates a node with multiple labels in Neo4j.
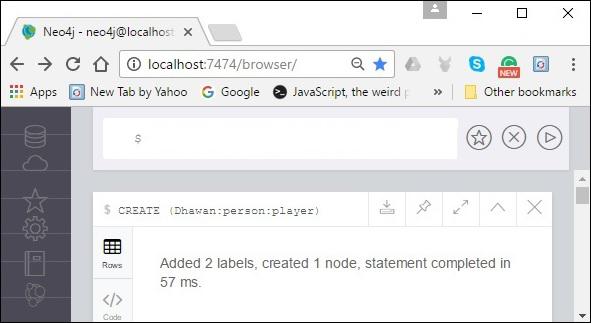
CREATE (Dhawan:person:player)
To execute the above query, carry out the following steps −
Step 1 − Open the Neo4j desktop App and start the Neo4j Server. Open the built-in browser app of Neo4j using the URL http://localhost:7474/ as shown in the following screenshot.

Step 2 − Copy and paste the desired query in the dollar prompt and press the play button (to execute the query) highlighted in the following screenshot.

Result
On executing, you will get the following result.

Verification
To verify the creation of the node, type and execute the following query in the dollar prompt.
MATCH (n) RETURN n
This query returns all the nodes in the database (we will discuss this query in detail in the coming chapters).
On executing, this query shows the created node as shown in the following screenshot.

Create Node with Properties
Properties are the key-value pairs using which a node stores data. You can create a node with properties using the CREATE clause. You need to specify these properties separated by commas within the flower braces “{ }”.
Syntax
Following is the syntax to create a node with properties.
CREATE (node:label { key1: value, key2: value, . . . . . . . . . })
Example
Following is a sample Cypher Query which creates a node with properties.
CREATE (Dhawan:player{name: "Shikar Dhawan", YOB: 1985, POB: "Delhi"})
To execute the above query, carry out the following steps −
Step 1 − Open the Neo4j desktop App and start the Neo4j Server. Open the built-in browser app of Neo4j using the URL http://localhost:7474/ as shown in the following screenshot.

Step 2 − Copy and paste the desired query in the dollar prompt and press the play button (to execute the query) highlighted in the following screenshot.

Result
On executing, you will get the following result.

Verification
To verify the creation of the node, type and execute the following query in the dollar prompt.
MATCH (n) RETURN n
This query returns all the nodes in the database (we will discuss this query in detail in the coming chapters).
On executing, this query shows the created node as shown in the following screenshot.

Returning the Created Node
Throughout the chapter, we used the MATCH (n) RETURN n query to view the created nodes. This query returns all the existing nodes in the database.
Instead of this, we can use the RETURN clause with CREATE to view the newly created node.
Syntax
Following is the syntax to return a node in Neo4j.
CREATE (Node:Label{properties. . . . }) RETURN Node
Example
Following is a sample Cypher Query which creates a node with properties and returns it.
CREATE (Dhawan:player{name: "Shikar Dhawan", YOB: 1985, POB: "Delhi"}) RETURN Dhawan
To execute the above query, carry out the following steps −
Step 1 − Open the Neo4j desktop App and start the Neo4j Server. Open the built-in browser app of Neo4j using the URL http://localhost:7474/ as shown in the following screenshot.

Step 2 − Copy and paste the desired query in the dollar prompt and press the play button (to execute the query) highlighted in the following screenshot.

Result
On executing, you will get the following result.


