SAP PP - Quick Guide
SAP PP - Introduction
SAP Production Planning is one of the key modules in ERP and deals with planning processes, such as capacity planning, material planning, execution of production order, bill of material and goods movement. SAP PP module handles the master data required for Bill of Materials (BOMs) activity, work center and routing, and keeps it in a separate component.
SAP PP submodules vary as per industry type like discrete production, repetitive production, or production industries.
Discrete production is an industry where produce materials change with each lot and costs are calculated as per orders and lots.
In repetitive production, the product is not changed for a long period of time. Production takes place in total quantity and not in the form of individual lots.
For most of the industry types, above-mentioned planning and execution submodules are commonly used. Before the production execution, many steps are performed as a part of the planning process −
Material Requirement Planning (MRP) run (More details later in this tutorial).
Bill of material and routing master data is entered in a planned order automatically with MRP run.
Planning quantities are maintained in the system.
Key Steps in Production Execution
Following are the key steps in executing a production order. It starts with a planned order and ends with goods receipt against a Production order.
Convert Planned Order to Production Order
The first step is to convert a planned order to production order. When you create a production order, type is defined in SAP PP system.
Issue the Production Order
To start the production process, it is necessary to issue production order. Till a production order is released, execution of the production process cannot start.
Issue Goods for Production Order
To execute the production order, goods need to be issued. Once goods are issued, the document number can be updated in the system.
Production Order Confirmation
All the sub processes are executed in accordance with the required operations to confirm the production as per the production order.
Good Receipts w.r.t Production Order
Once the execution of production order is complete, goods produced w.r.t production order are received and placed in the storage area.
SAP PP - Common Tables
In this chapter, we will discuss some of the important tables in SAP PP.
For Material Requirement Planning
| Table |
Description |
| MDKP |
Document Header data |
| MDTB |
Table Structure |
| MDVM |
Planning File Details |
| MDFD |
MRP Date details |
| S094 |
Stock Analysis |
For Demand Management
| Table |
Description |
| PBED |
Independent Requirements Data |
| PBIM |
Independent Requirements by Material |
For Planned Orders
| Table |
Description |
| PLAF |
Planned Order Details |
For Repetitive Manufacturing
| Table |
Description |
| S025 |
Run Schedule Quantities |
| S026 |
Material Usage |
| S028 |
Reporting Point Statistics |
| SAFK |
RS Header Master Data |
There are various tables in SAP PP system for BOM, routing, discrete production, material allocation, goods receipts, etc.
| Table |
Description |
| MAST |
Material BOM |
| STKO |
BOM Header |
| STOP |
BOM Positions |
| PLKO |
Routing Group Header |
| PLSO |
Routing Group Sequence |
| PLPO |
Routing Group Operations |
| AFKO |
Production Order Header |
| AFPO |
Production Order Position |
How to View SAP PP Tables in SAP ERP System?
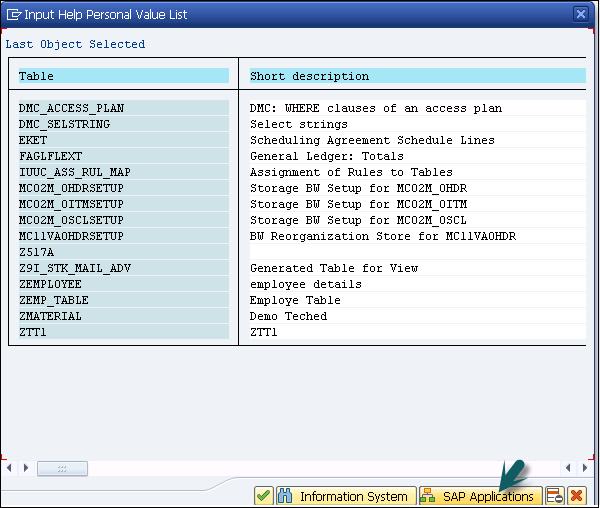
Step 1 − In ERP system, use T-Code: SE16.

Step 2 − Go to SAP Applications.
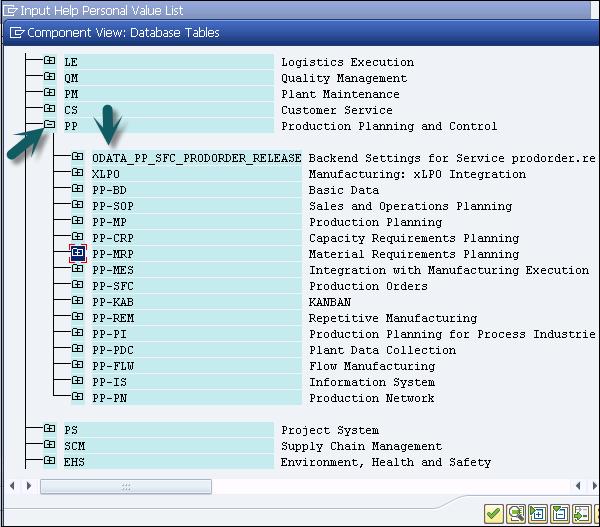
Step 1 − Click the ‘+’ sign and you can see the list of all tables in ERP as shown in the following screenshot.
SAP PP - Organization Structure
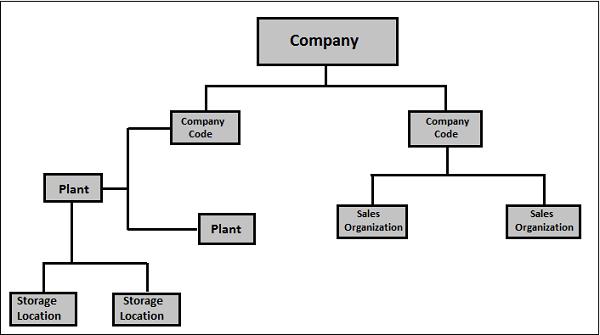
In SAP PP module, the organization structure defines the location of manufacturing plants and storage locations within the plant. At the top of the structure, you have the company and the company code and then each company code contains different plant and storag locations.
Following diagram represents a common organization structure in live SAP Production Planning environment.
All the planning activities are performed at the plant level.
Production master data in Production Planning is created at the plant level.
Production confirmation process and the movement of goods occur at the plant and storage level.
SAP PP - Integration with Other Modules
To perform Production Planning and Control activities, SAP PP is closely integrated with other SAP ERP modules: SAP Sales and Distribution (SD), SAP Material Management (MM), Quality Management, Finance Accounting, and Project System.
You can find a list of the following activities from Production Planning that are related to other SAP modules and integration with other modules.
SAP PP and SAP MM
This involves movement of goods, auto goods receipt.
It includes creating a reservation for Production Order/Planning.
Raising purchase orders with MRP Run.
Quotations and Vendor selection.
SAP PP and SAP SD
This is used to check the availability of material for production order.
To perform MRP Run, Requirement Types.
Bill of Material components and operation.
SAP PP and SAP FICO
Updating price in material master data.
Defining activity type in the cost center.
Assigning activity type to work center.
Cost Estimation.
Production cost controlling
Posting accounting activities related to goods movement, material request, etc.
SAP PP and Project System
Assigning planning activities to WBS in the Project.
Running Material requirement planning at Project level (MD51). The procured material attached to WBS are reserved as project stock against the particular project.
The component attached to the network are planned at the plant level and are reserved as plant stock.
SAP PP and Quality Management
SAP PP - Master Data
Master data contains the main detailed objects in SAP Production Planning module. In SAP PP, main objects are Bill of Materials, material master, routing, and work center. Master data contains the key properties of these objects such as production order, material type, planning requirements, goods issue, and goods receipt.
Following are the types of master data that exists in PP −
Bill of Materials
Bill of materials master data is related to material requirement planning and provides the list of components to produce the product.
To produce a product with different variants, you can create super Bills of Material that has a list of components to manufacture different variants of a product. Selection of component depends on the details mentioned in the planning order. You can create up to 99 Bills of Material.
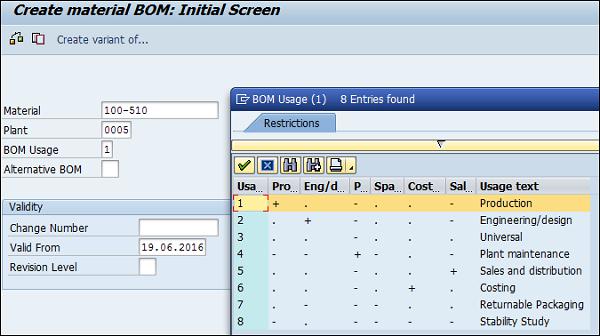
For Bills of Material master, use T-Code: CS01 or go to Logistics → Production → Master Data → Bills of Material → Bills of Material → Material BOM → Create
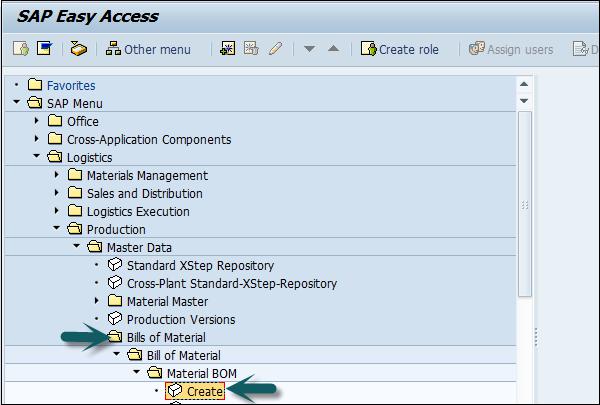
Select the following details −
- Material
- Plant
- BOM usage (usage 1 is production)
Material Master
Material master contains information related to different material types like finished product, raw material. Material master can be used for identifying a product, purchase material, goods issue or good receipt, MRP, and production confirmation.
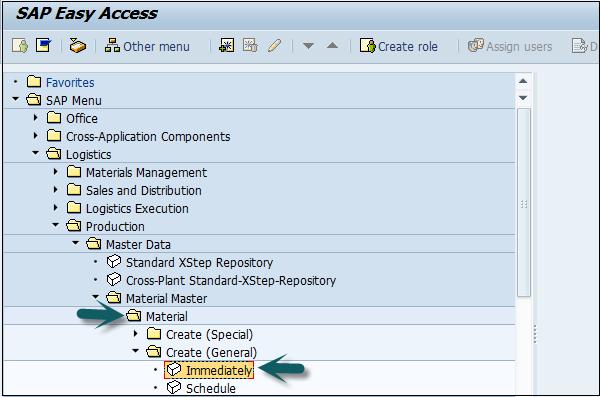
For Material master data, use T-code: MM01 or go to Logistics → Production → Master Data → Material Master → Material → Create (General) → immediately
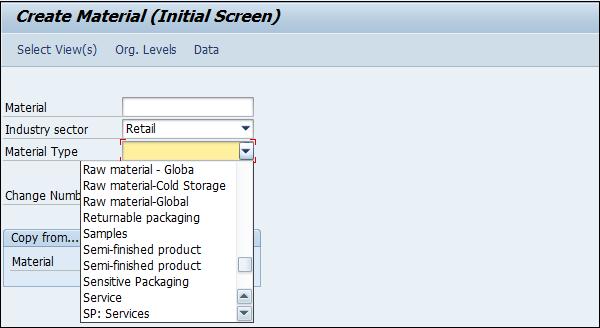
Enter the following details −
- Industry Sector
- Material Type
Work Center
Work center consists of master data related to routing of products. It contains data related to scheduling, capacity planning, and production costing.
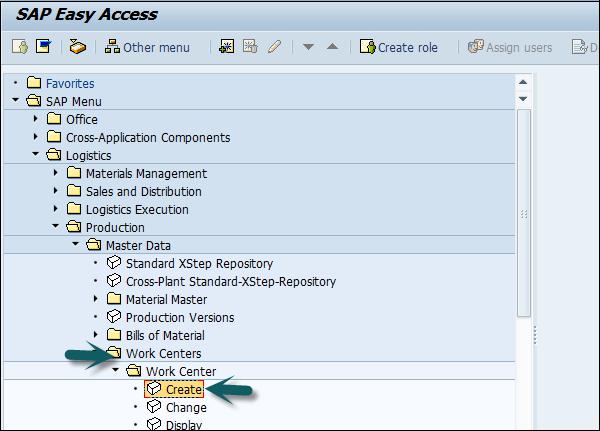
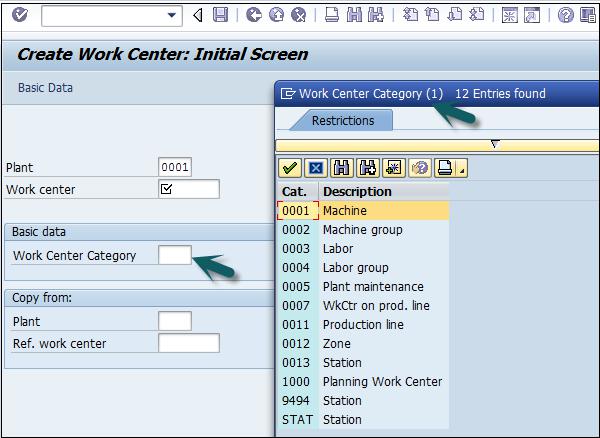
For work center, use T-code: CR01 or go to Logistics → Production → Master Data → Work Centers → Work Center → Create
Enter the following details −
- Work center name
- Plant name where work center is located
Select Work Center Category and click the tick mark.
Routing
Routing defines the sequence of activities performed at the work center. Routing plays an important role in calculating production cost, machine time, and labor time.
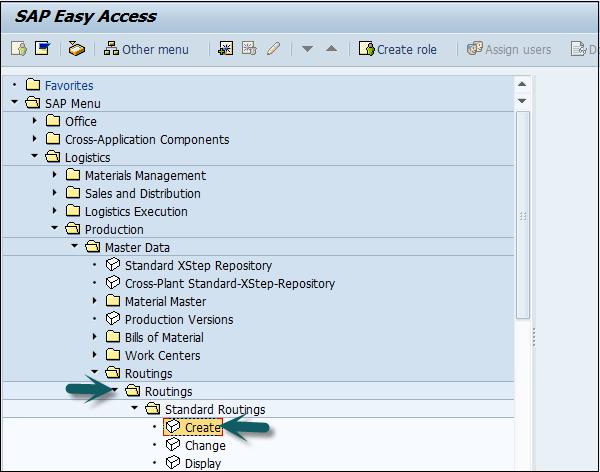
For Routing Master data, use T-Code: CA01 or go to Logistics → Production → Master Data → Routings → Routing → Standard Routing → Create
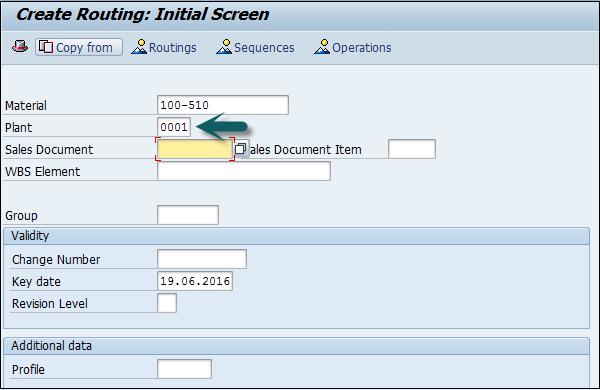
Enter the following details −
Click the tick mark.
SAP PP - Bill of Materials
Bill of Materials master data is related to material requirement planning and provides the list of components to produce the product.
To produce a product with different variants, you can create super Bill of Materials that has a list of components to manufacture different variants of a product. The selection of component depends on the details mentioned in the planning order.
Characteristics of BOM
You can create single level or multiple level Bill of Materials.
BOM type depends on the size, validity dates, and production method.
You can create up to 99 Bill of Materials as per the material type.
You can use material Bill of material for the material available in PP module and equipment Bill of Material is used in Plant Maintenance module.
As mentioned you can create super BOM for different variants of a product.
How to Create BOM?
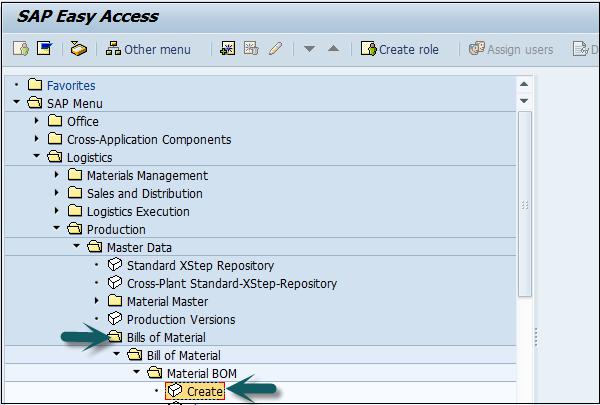
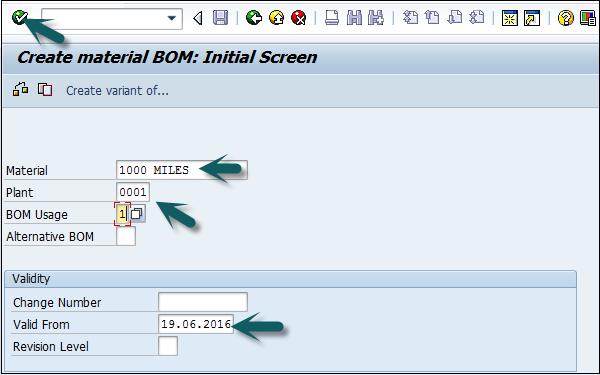
Use T-Code: CS01 or go to Logistics → Production → Master Data → Bills of Material → Bill of Material → Material BOM → Create
Select the following details −
- Material
- Plant
- BOM usage (usage 1 is production)
By default, it takes the current date as Valid from. You can select the date as per your requirement.
Click the tick mark at the top of the screen.
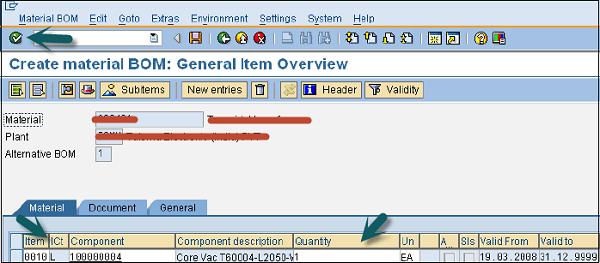
In the next window, enter Item category ‘L’. L shows the stock item and N shows nonstock item.
Enter the following details −
Few of the fields it will automatically fill up. Click the tick mark at the top of the screen as shown in the following screenshot.
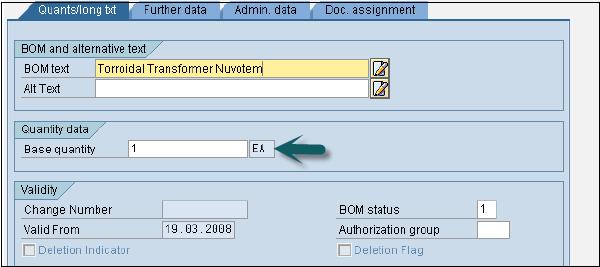
To see Bill of Material header −

Enter the base quantity of the parent material. If this is 1 EA (each), then the component quantity will describe how much is needed to produce 1 item.
To save BOM, click Save the new BOM, after check.
To change Bill of Material, use T-code: CS02 or go to Logistics → Production → Master Data → Bills of Material → Bill of Material→ Material BOM → Change
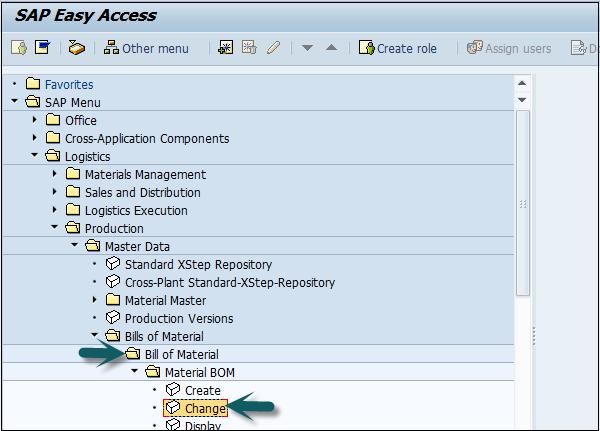
Enter the following details −
- Material
- Plant and BOM usage.
Click the tick mark on the top of the screen.
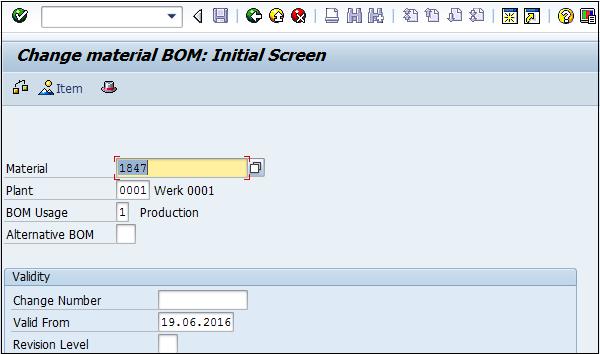
You can edit the item category, component or quantity. Click the Save icon at the top of the screen to save the changes to BOM.
How to Display BOM?
Use -Code: CS03 or go to Logistics → Production → Master Data → Bills of Material → Bill of Material → Material BOM → Display
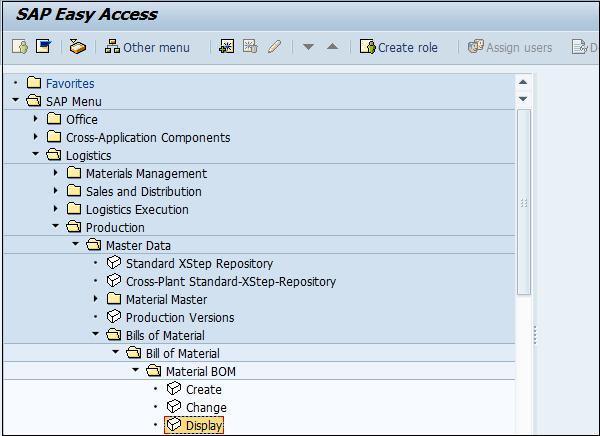
Enter the following details −
- Material
- Plant and BOM usage.
Click the tick mark on the top of the screen. To see BOM Header data, click the Header icon.

You can display BOM header and check the base quantity of the product.
Types of BOM
There are two types of BOMs −
Material BOM
When a BOM is created for a material, it is known as a material BOM in SAP. Material BOMs are mainly used to represent the structure of products manufactured within your company.
Sales Order BOM
Sales Order BOM is used when you specially tailor the make-to-order production of products as per the requirements of the customers. To meet the customer requirements, you make sales order specific modifications to various assemblies.
SAP PP - Work Center
Work center consists of master data related to routing of products. It contains data related to scheduling, capacity planning, and production costing.
All the manufacturing activities are performed in the work center. The work center can be used to monitor the following activities −
Scheduling − You can schedule the operations in Production order as per operating times in Routing and formulas mentioned in the work center.
Production Costing − You can also check the production costing as per formulas mentioned in the work center. The work center is also linked to the cost center and it defines the cost of operation in the production order.
Capacity Planning − You can find the current capacity and the future capacity requirements stored in the work center.
How to Create a Work Center?
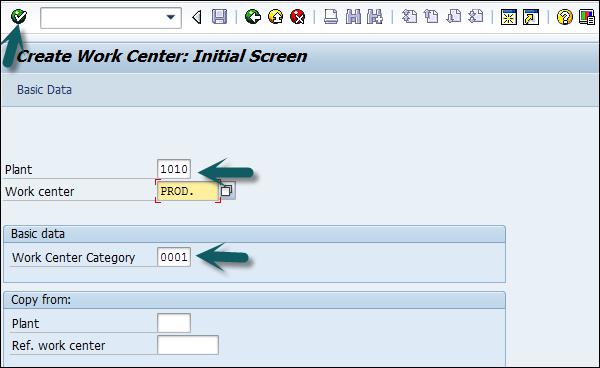
Use T-code: CR01 or go to Logistics → Production → Master Data → Work Centers → Work Center → Create
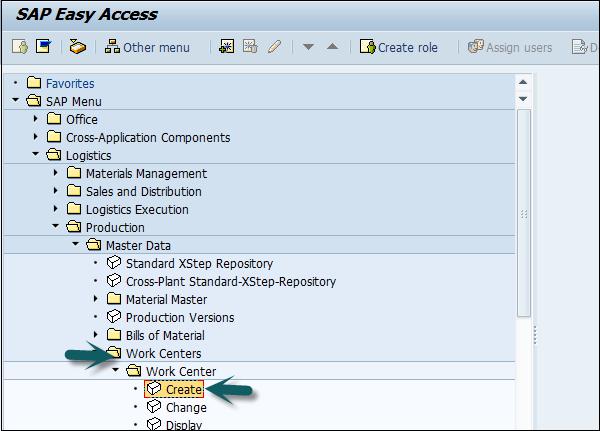
Enter the following details −
- Name of the work center name
- Plant name where the work center is located
Select the Work Center Category and click the tick mark.
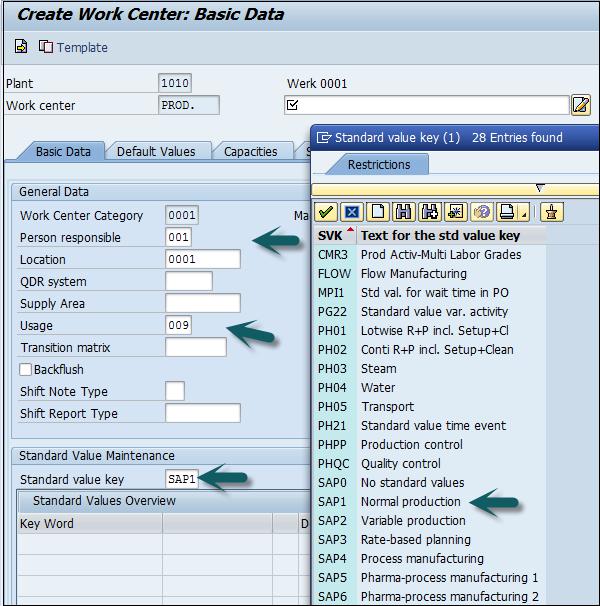
Enter the following details −
Enter usage as 009: Work Center is valid for all task list types such as production routing, maintenance task list, etc.
Enter the standard Value key which contains different activity types used for standard cost calculation.
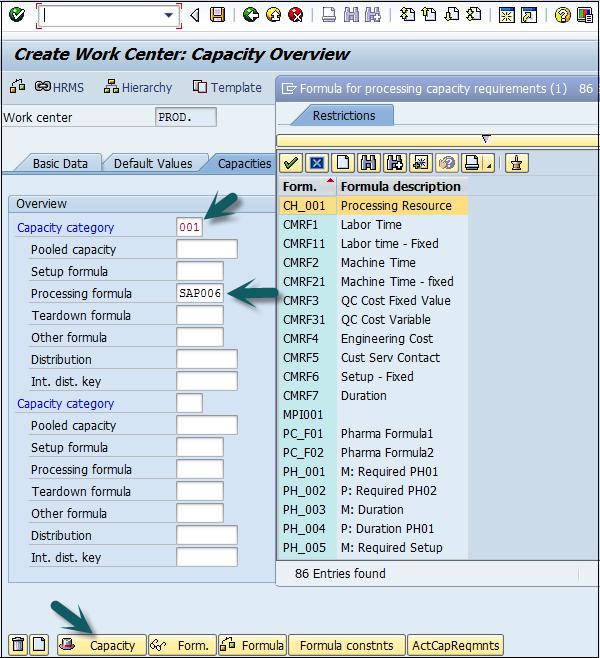
Go to Capacities tab, enter the following details −
To represent a machine category, enter capacity category 001.
To calculate available capacity, enter Processing formula as: SAP006= (operation quantity *machine time)/ base quantity
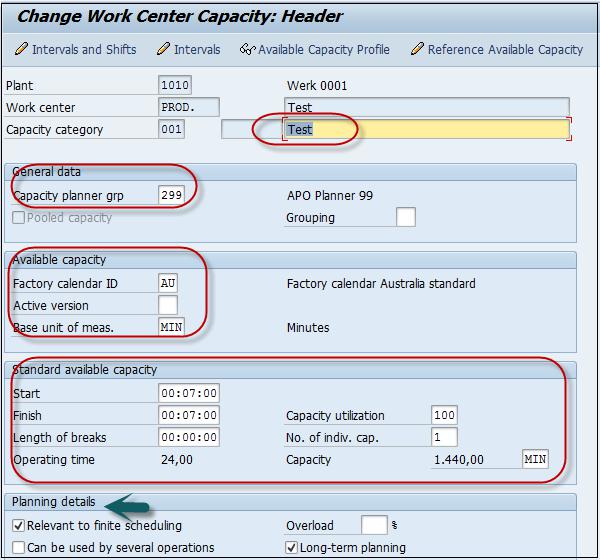
Click the Capacity tab at the bottom and enter the following details −
Enter the capacity description.
Enter details about Input capacity planner group, which is responsible for machine capacity.
Enter the factory calendar ID, which has public holidays listed for your plant. On holidays capacity for that work center would be zero.
Input base unit of measure as "MIN" which means the work center’s available capacity will be measured in time, i.e. min.
Enter the time period (start and finish time) for which the work center would be available for the operation.
Enter the capacity utilization percentage (how much time is utilized out of the standard available working time) of the work center considering the breakdown and preventive maintenance of the machine. Input number of capacities means number of similar work centers.
Check relevancy for finite scheduling and long-term planning flags, which indicates if there is a capacity constraint, then the operation is moved to a certain date where it can be processed without capacity constraints.
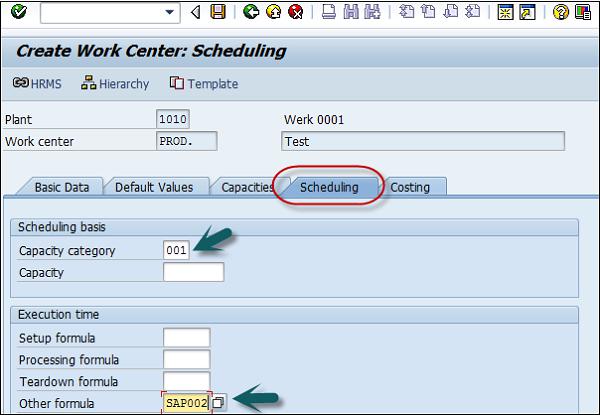
Click the back button at the top of the screen and go to Scheduling tab. To enter machine category, enter 001 as Capacity category.
To calculate scheduling time, enter SAP002 as input processing formula.
Go to Costing tab, and enter the following details −
Start and Finish date. This shows the validity date of the cost center.
The cost center to book the operation cost.
Enter all activity types and formulae, which would be used for calculating the activity costs.
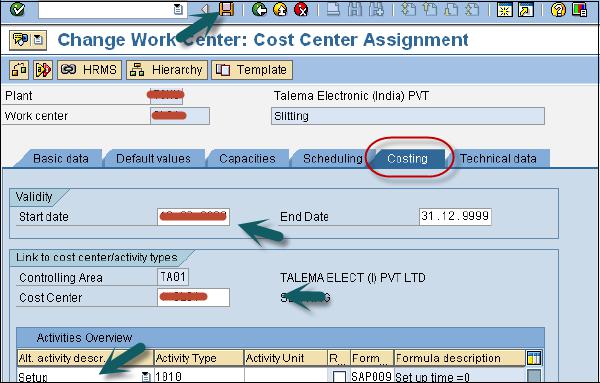
Click the save icon at the top and you will get a confirmation, Work center xxxx in plant xxxx was created.
How to Change or Display Work Center?
Use T-code: CR02 for change or go to Logistics → Production → Master Data → Work Centers → Work Center → Change
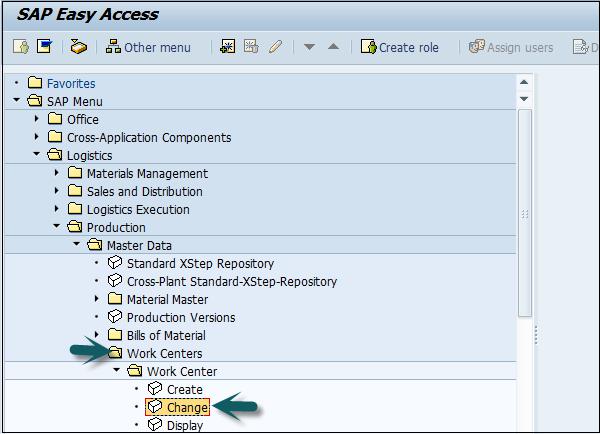
Enter the plant number and work center.
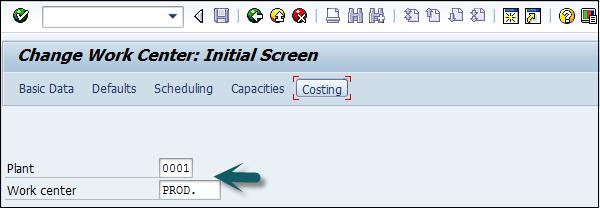
You can directly go to any field using the options at the top: Basic data, Defaults, Scheduling, Capacities, and Costing or you can click the tick mark at the top of the screen.
You can make any changes related to scheduling, capacities, or costing.
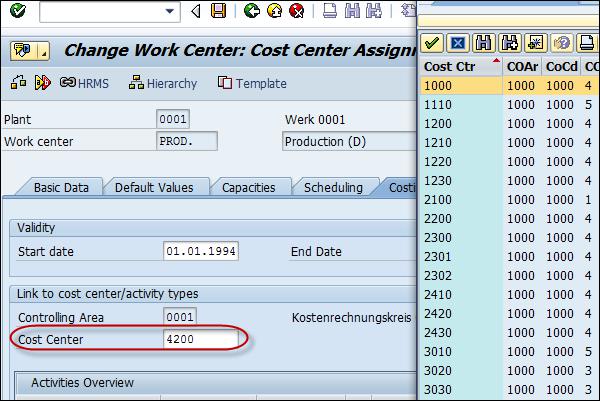
Click Save after making the changes.
How to Display Work Center?
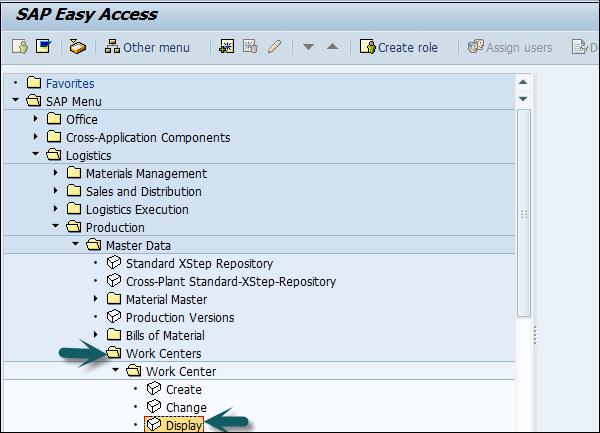
Use T- code: CR03 or go to Logistics → Production → Master Data → Work Centers → Work Center → Display
Enter the following details −
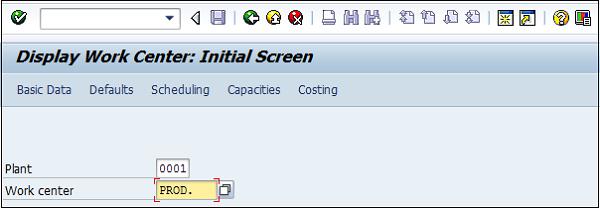
You can directly go to any field using the options at the top of the screen: Basic data, Defaults, Scheduling, Capacities, and Costing.
SAP PP - Routing
Routine defines the list of activities to be performed for the production process. Routing defines a sequence of activities performed at the work center. Routing plays in important role in calculating production cost, machine time and labor time.
Key Features Related to Routing
To create routing, it is mandatory to first define the work center.
Multiple materials can follow through a single routing group.
Routing is used for scheduling and costing of operation for raw and finished products.
Routing is used to calculate the operation cost for a finished product.
How to Create Routing in PP?
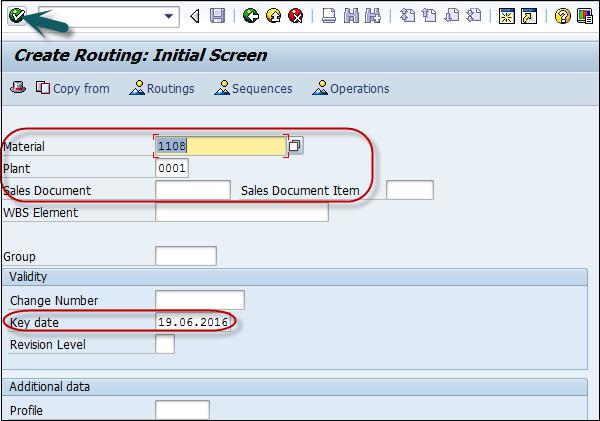
Use T-Code: CA01 or go to Logistics → Production → Master Data → Routings → Routings → Standard Routings → Create
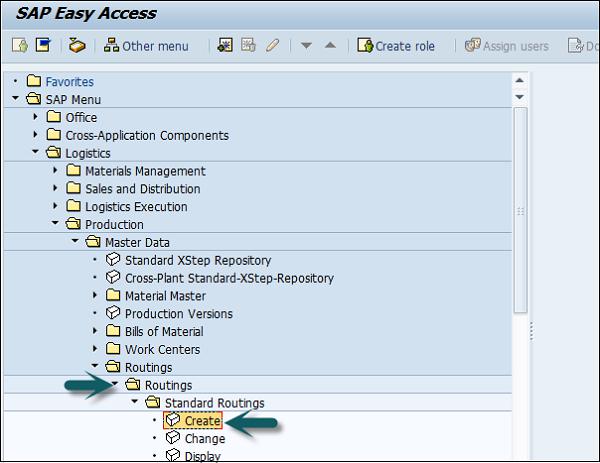
Enter the following details −
- Material for which routing needs to be defined
- Plant Code
- Routing validity date as key date
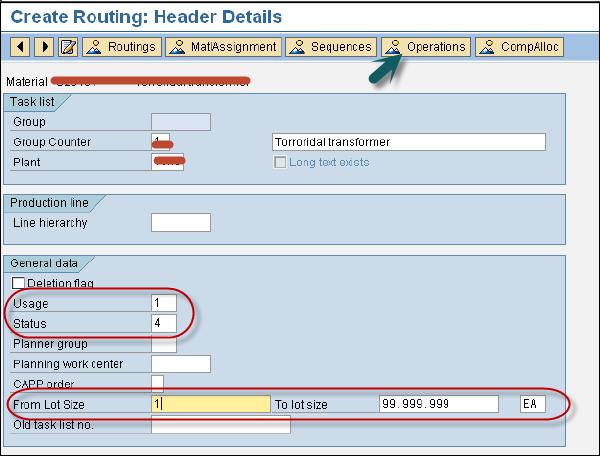
Go to the routing header and enter the following details −
Usage as 1: Production routing and will be used in Production Order.
Select Status as 4 shows the released status. It indicates that routing is valid for material requirement planning and costing.
Mention the Lot Size 9999999, which means that routing is valid for order quantity between 0 and 9999999.
You can go to Operation button to add the sequence of operation and repeat the above step.
Now we need to maintain Operation data for which we need to −
Enter the Work Center code.
Select Input Control Key to determine the operation to be scheduled, costed, etc.
Enter the base quantity and set up time in minutes for base quantity.
Enter machine time in minutes for base quantity.

Click Save and you will get a confirmation that routing is saved.

How to Change Routing in PP?
Use T-Code: CA02 or go to Logistics → Production → Master Data → Routings → Routings → Standard Routings → Change
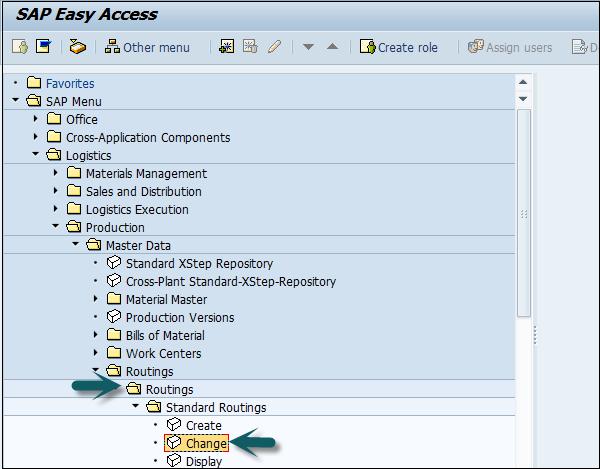
Enter the following details −
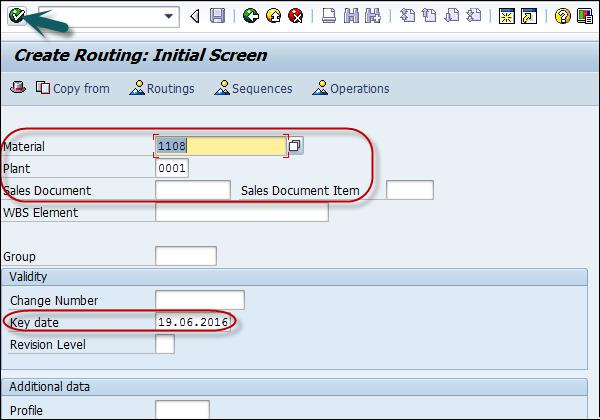
You can change the values like Control key or machine time.

Click Save to make the changes.
SAP PP - Demand Management
In SAP PP, demand management is performed by Planned Independent Requirement (PIR). Planned Independent Requirement provides input for production planning. A PIR contains one planned quantity of product and one date for material or a planned quantity is split over a span of time period.
To set your PIR version active, use the value 00 to specify the requirement would be considered in material requirement planning. To maintain the number of versions of PIR, you can set some numbers to active and others to inactive.
PIR defines the planning strategy in material master, which determines the planning methods - make to order and make to stock.
In Make-to-Stock environment, PIRs are used where stock is built based on the forecast and not on sales order.
Planning Strategies
Planning strategies are divided into two categories −
Make-to-Stock Planning Strategy
This is a planning strategy where the stock is produced without sales order. It is used to meet the customer demands in future.
When you use Planning strategy 10, only PIR quantity is considered for MRP run and sales order is completely ignored. In this PIR, the requirement type is LSF and is reduced when you deliver stock to the customer.
When you use Planning strategy 40, for MRP run a maximum of 2 PIR and Sales order can be considered, and PIR is reduced when you enter the Sales order. In this case, the requirement type is VSF.
Make-to-Order Planning Strategy
In this planning strategy, the finished products are not produced until you receive the sales order from a customer. For MRP run, you only consider Sales order.
In MTO strategy, you only produce sales order, stock and products are delivered as per sales orders from a specific customer.
You use Planning strategy 20 for MTO process and planning strategy 25 is used to produce product variants when there is a request for variant products from the customer.
SAP PP - Creating PIR
Use T-code MD61 or go to Logistics → Production → Production Planning → Demand Management → Planned Independent Requirements → Create.
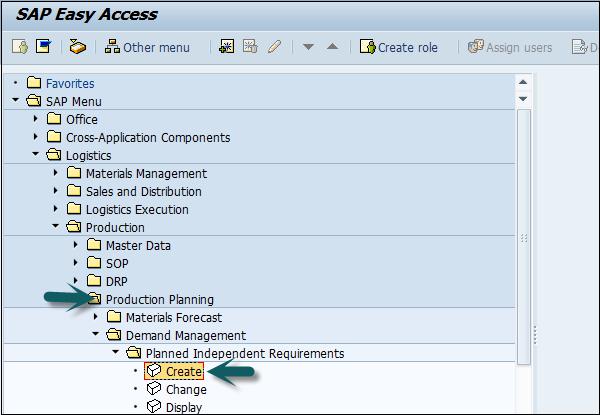
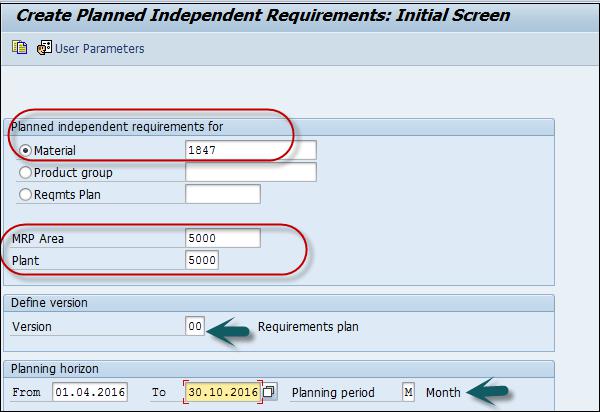
In the next window, enter the following details −
The single material for which demand needs to be created.
MRP area and Plant Code.
Version as 00, which shows the active version and requirements would be considered in MRP run.
The planning horizon dates for which the demand needs to be created.
Planning period as month M.
After entering the details, click the tick mark on top of the screen.
Enter Version 00 and by default the Active checkbox is flagged, showing it is an active requirement and would be considered in MRP run.
Enter the requirement quantity in monthly buckets.

Click the save icon to save the PIR.
How to Change and Delete PIR?
To delete a PIR, select the row in the above screen and click the Delete button.
To change PIR, use T-code: MD62 or go to Logistics → Production → Production Planning → Demand Management → Planned Independent Requirements → Change
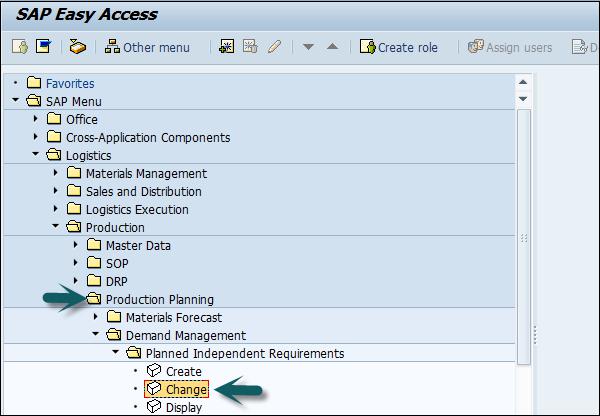
Enter the following details −
In the next window, make changes to the requirement quantity and click Save to enter the changes.
SAP PP - Material Requirement Planning
MRP run or planning run is an engine which is used to fill the demand and supply gap. Issues and Receipts are called MRP Elements. Issues include PIRs, dependent requirements, order reservations, sales orders, issuing stock transfer orders, etc. Receipts include production orders, purchase requisitions, purchase orders, open production orders, receiving stock transfer order, schedule lines, etc.
MRP Parameters
MRP parameters are required to run material requirement planning to meet PIR, and to use routing information.
Processing Key
NetChange − In this run system, consider those material which has undergone some changes from the previous MRP run.
NetChange in Planning Horizon − This run considers the requirement in predefined planning horizon and not like net change, which checks the future requirements. In this run, the system considers only those material which has undergone some changes from their last MRP run.
Regenerative Planning − In this run, the system considers all the materials irrespective of changes. It is time consuming and not common in Production planning.
Scheduling
Basic Scheduling − It only calculates the basic dates for orders in MRP run and in-house production time for material master in use.
Lead Time Scheduling − In this MRP, production dates are defined by lead time scheduling for planned orders.
Running MRP for All Products
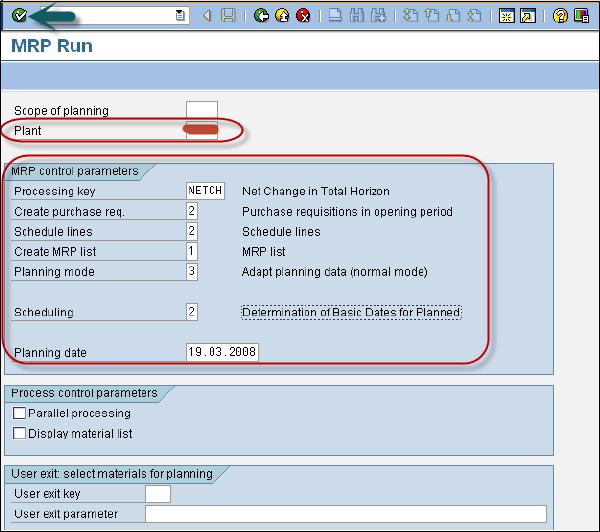
Use T-code: MD01 or go to Logistics → Production → MRP → Planning → Total Planning → Online
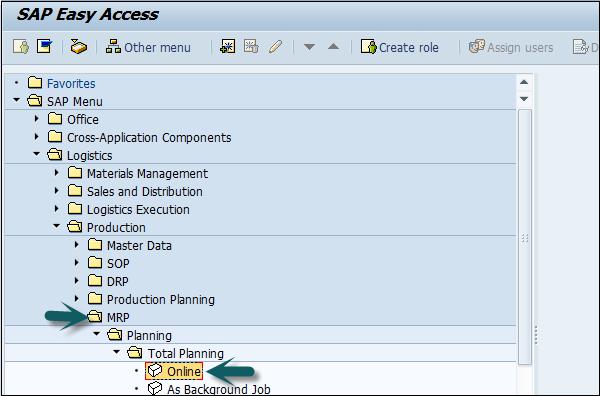
To run MRP with Net Change in planning horizon, enter the following details −
The manufacturing Plant for which you want to calculate MRP run.
The processing key as NETCH.
Input 2 in Create Purchase req. shows purchase requisition in the opening period.
Input 2 for schedule lines shows.
Input 1 in MRP List and the system will create MRP list similar to stock/requirement list for later analysis of previous MRP run.
Planning mode 3 as we will delete and recreate all planning data for all materials.
Enter Scheduling indicator 2 shows MRP will do lead time scheduling and consider routing times to calculate planned order dates.
Click the tick mark on top of the screen.
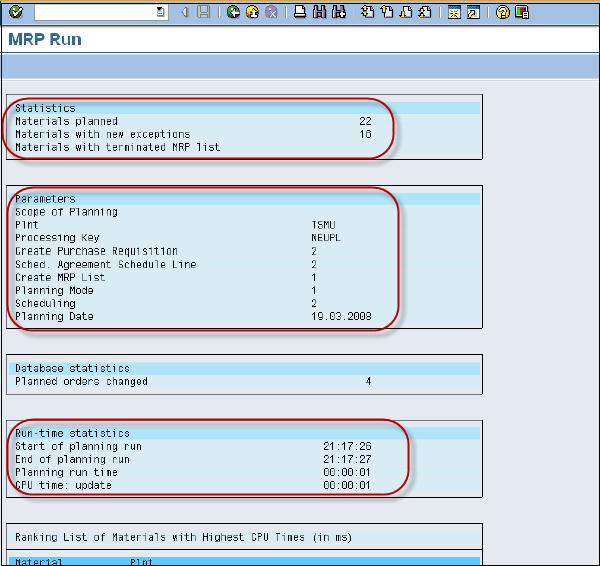
If you are sure on MRP run, click the tick mark.

The system will take some time to run MRP and calculation is done. You can see the material requirement and what parameters have been considered during the run.
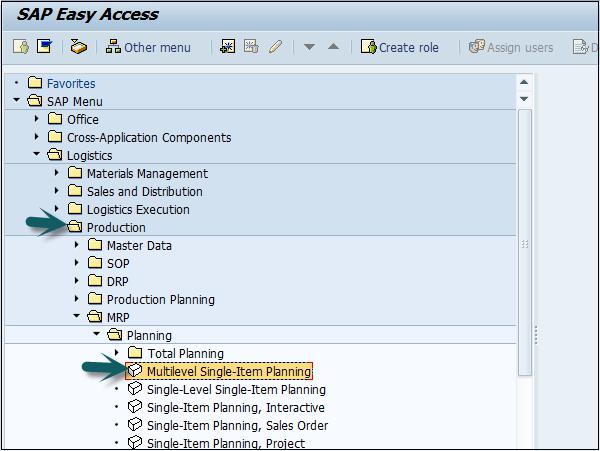
To perform MRP run for a single material, use T-Code: MD02 or go to Logistics → Production → MRP → Planning → Single item Multilevel
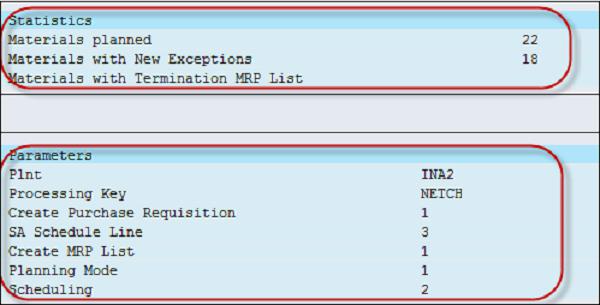
This is used to plan individual item planning. Enter the following details −
- Material number and Plant
- Processing key, NETCH (Net Change for total horizon)
- Create purchase req. 2
- Delivery schedules 2
- Create MRP list 1
- Planning mode 3
- Scheduling 2
Click the tick mark on top of the page.
MRP Evaluation: Stock/Requirement List
This is used to see current stock and planned receipts. Use T-code: MD04
Enter Material and Plant and click the tick mark on top of the page.
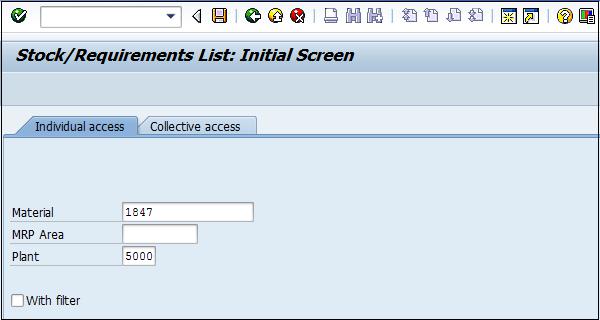
BOM for material was exploded. Enter Purchase requisition.

SAP PP - MRP List
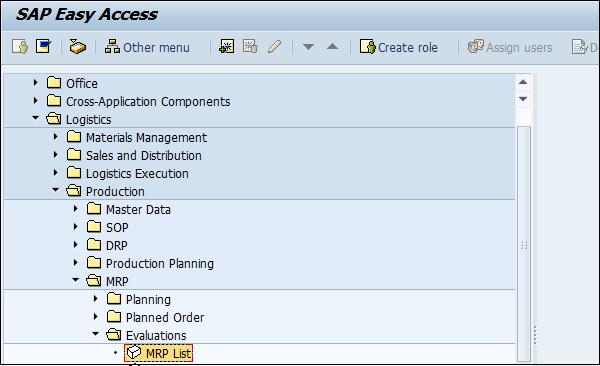
MRP List is used to generate static report that contains planning run material wise and it displays time of MRP run at the top.
Use T-Code: MD05 or go to Logistics → Production → MRP → Evaluation → MRP list
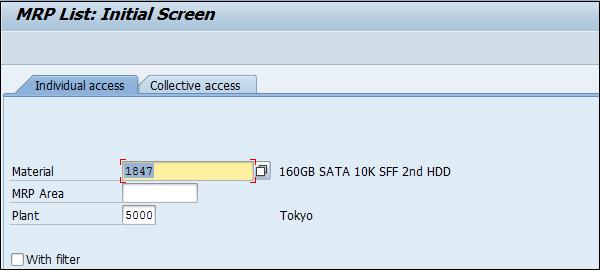
Enter the material and Plant name and click the tick mark. In case, no MRP list exists for the selected material, you will get a message.

SAP PP - Long Term Planning
Long Term Planning (LTP) in SAP PP is used to check future demands at all BOM levels. You can check the current capacity and vendor ability to provide the material in the required time period.
This is not an actual run but is used to see if all capacity requirements can be fulfilled. You can also transfer simulative area to operative area, if requirements are fulfilled.
Also note, it is not necessary that you perform simulative planning in long duration. It can be for short term and there is no time restriction.
Key Objectives of Long Term Planning
The purchase department can use the outcome of LTP to forecast future purchase orders. This allows them to negotiate with vendors on contract terms.
PIR can be active or inactive version. For LTP, it is always inactive as it is used for simulative purpose. LTP allows you to perform simulation of demand program at all BOM levels.
You can also rerun LTP with new requirement in an inactive version. To delete LTP, you need to delete all planning scenarios.
LTP is almost similar to material requirement planning in simulate version to predict the production plan as per future requirements.
You can also use LTP to transfer routing activities to cost centers. You can use the existing BOM and routing data for LTP, and can also have different master data.
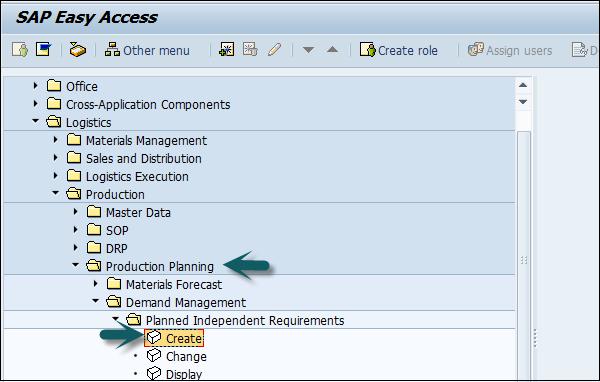
Creating an Inactive Version PIR
Use T-code: MD61 or go to Logistics → Production → Production Planning → Demand Management → PIR → Create.
Enter the following details −
Material code for which the requirement needs to be created.
Plant Code.
Input version as 02 which is inactive version and requirements would be considered in LTP run and not MRP.
Planning horizon dates for which the demand needs to be created.
Planning period as month M.
Click the tick mark on top of the screen.
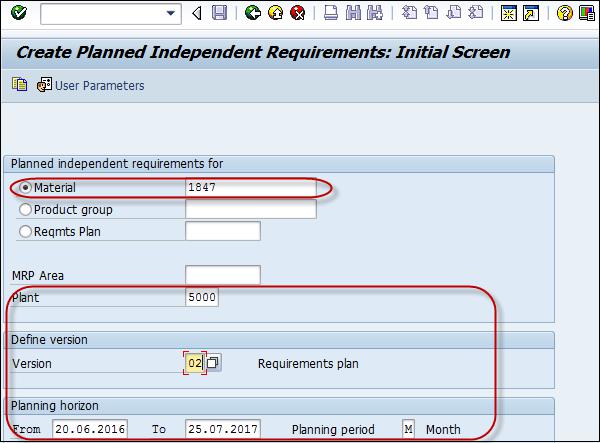
In the next window, you will see version 02 and the active checkbox will not be flagged which shows Inactive version for LTP.
Enter the quantity in the monthly box. Click the save button to save the data.
Creating Planning Scenarios
Planning scenarios are required to perform LTP run for annual simulative requirements. You can also include or exclude planned receipts or current stock from the planning run.
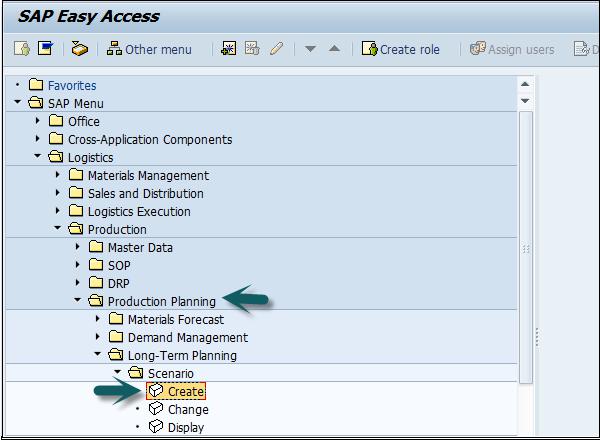
To create Planning scenario, use T-code: MS32 or go to Logistics → Production → Production Planning → Long Term Planning → Scenario → Create
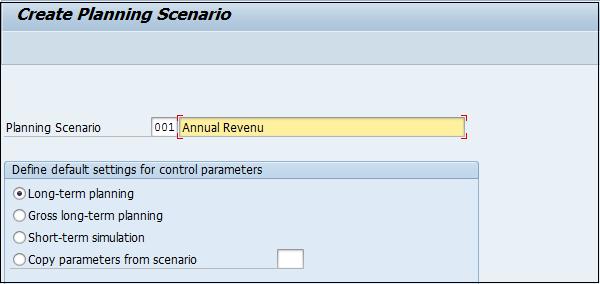
Enter the name of the Planning scenario and the description, and press Enter.
In the next screen, enter the following details −
The planning period for which LTP has to run.
Keep opening stock as blank which means it will not consider the current stock.
Select BOM as 01 to include active BOM.
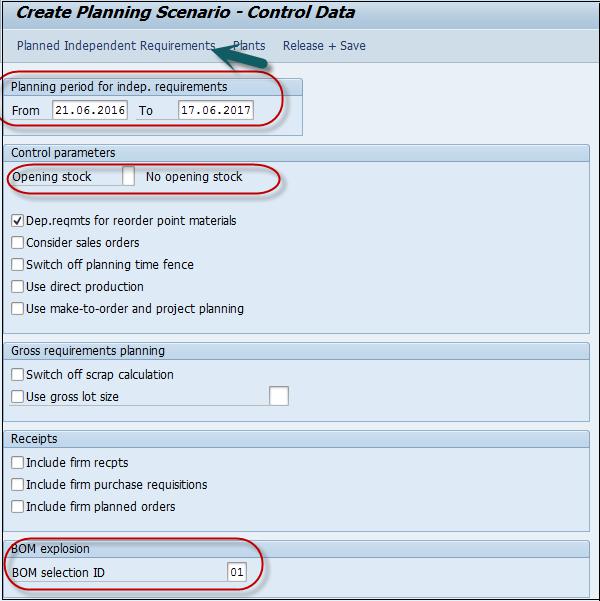
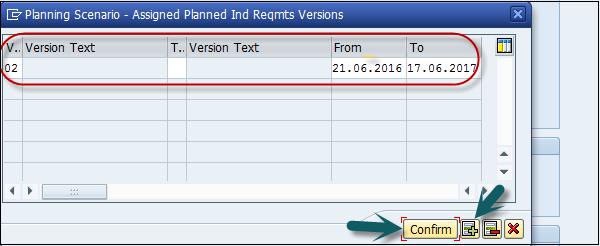
Click the PIR button on top of the screen and you will get a small pop-up window.
In the small pop-up screen, click the + sign for a new entry and enter version 02 and the planning period.
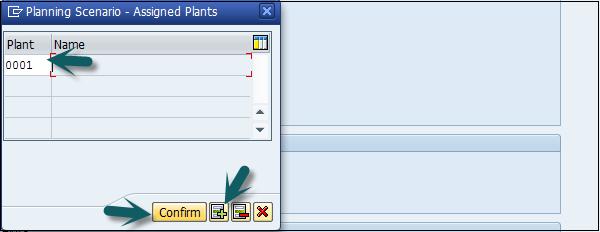
Click the Plant button at the top of the screen. Enter the Plant code and click confirm.
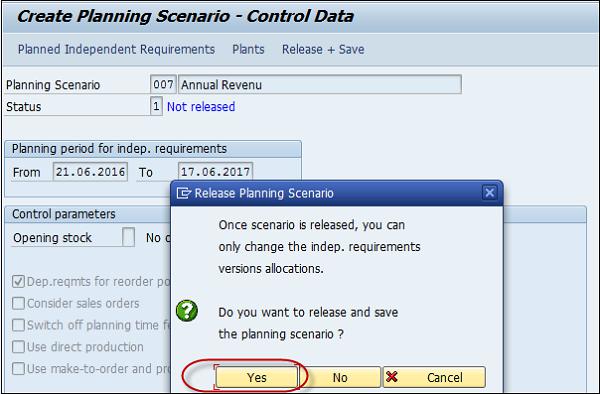
The next step is to click the Release+Save button and the entry will be saved. You will be prompted to confirm the planning scenario. Click Yes.

In the next window, you will get an option to run entries in the background/online.
Planning file entries are generated. Click the button "immediately" to generate the entries.
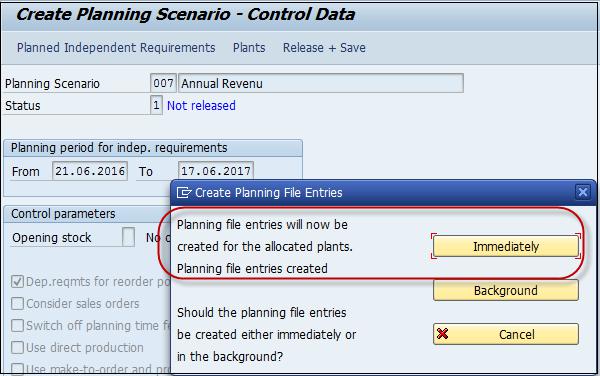
You will be notified that system has identified number of materials relevant for long term planning run.

SAP PP - Production Orders
A production order is used to define the material to be produced, plant location where production has to be done, date and time of production, and quantity of goods required. A Production Order also defines which components and sequence of operations are to b used and how the order costs are to be settled.
BOM and routing data of the materials are copied into the production order, which determines the list of components and operational data in the order.
Following are the key steps involved in Production Order confirmation.
The first step is to convert a planned order to a production order. When you create a Production Order, type is defined in SAP PP system.
To start the production process, it is necessary to issue a Production order. Till a production order is not released, the execution of production process does not start.
Issuing goods is required for providing the goods to execute the Production order. Once goods are issued, the document number can be updated in the system.
All the sub processes are executed in accordance with the required operations to confirm the production as per the Production order.
Creating a Production Order Directly from Stock Requirement List
A Production Order can be created in the following ways.
Using Planned Order Number
Use T-Code: MD16 or go to Logistics → Production → Production Control → Order → Create → From Planned Order
Without Referring the Planned Order
Use T-Code: CO01 or go to Production → Production Control → Order → Create → With material
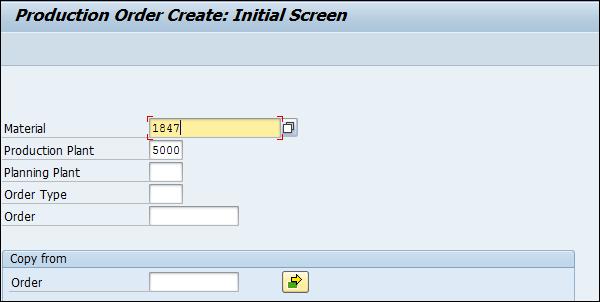
Enter the following details −
Click the tick mark in the above screenshot.
In the next window, input the order quantity. Under Scheduling, select the option current date as shown in the following screenshot −
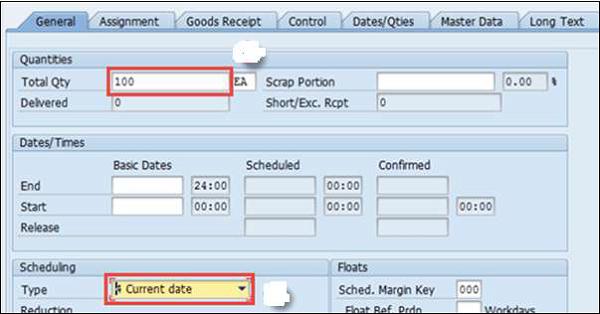
Click the tick mark at the top of the screen to confirm and the system will then copy BOM and Routing data in the order.
To release the order, click the Release flag at the top  and you will get a message Release carried out.

Click the Material button to check material availability.

Click the save icon at the top and you will get an Order number saved in the system.
Using Planned Order Number
Use T-Code: MD16. Select MRP controller from the list and click the tick mark.
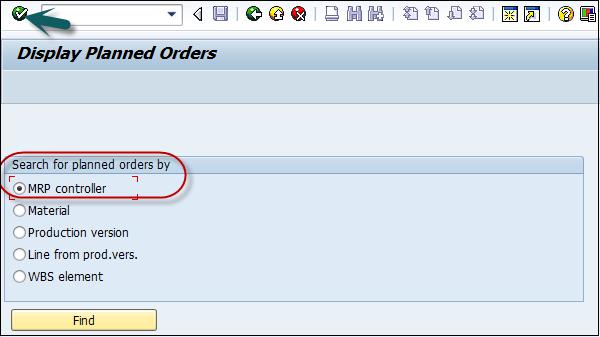
In the next window, enter the following details −
- Plant code
- MRP controller
- End selection date till all planned orders will be extracted.

Select Planned orders that you want to convert into Production Order.

This will create Production Orders in the system.
SAP PP - Production Order Change
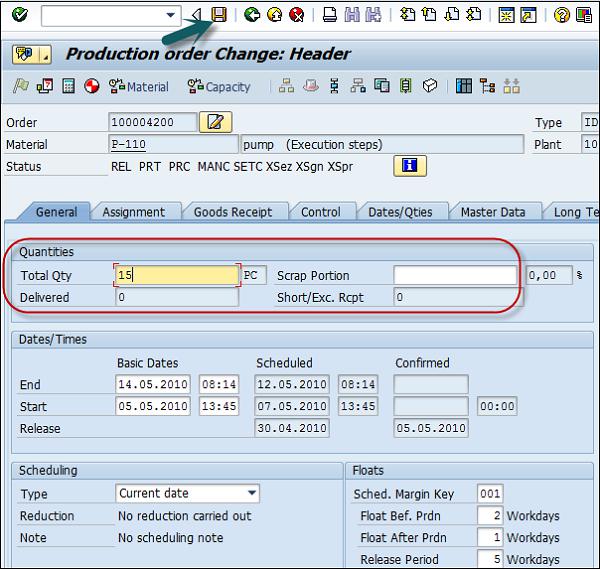
You want to change the details in the Production Order, you can do this by using the following code.
Use T-code: CO02

In the next window, enter the Order number to be changed. By default, it selects the Display overview radio button. You can also select the Production Order by searching it in the system.
Click the tick mark.
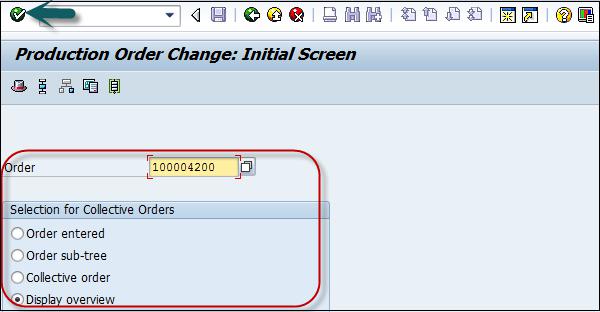
Change the total quantity and click the Save button at the top of the screen.
SAP PP - Production Order Confirmation
To confirm Production Order, use T-code: CO15.
You can perform the following activities −
Generate the confirmation document
Consume raw materials or semi-finished goods
Good receipt of the finished goods or semi-finished goods

In the next screen, enter Production Order number and click the tick mark.

In the new window, enter the yield quantity that shows produce quantity to be declared.
Click the Goods Movement button at the top of the screen to confirm the automatic goods movement happening along with confirmation.
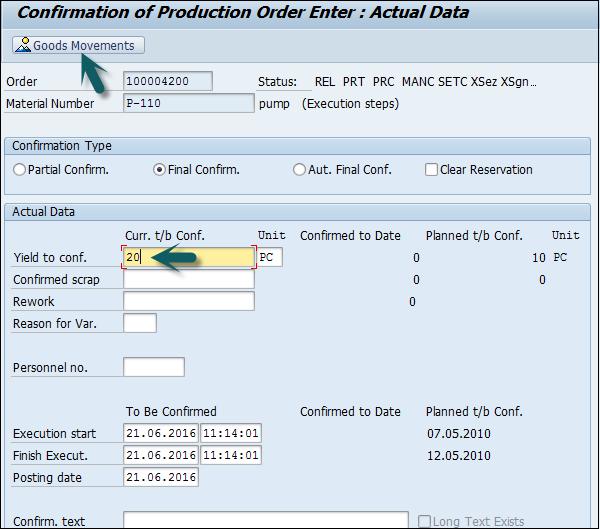
In the next window, you will see goods receipt and goods issue of the components.
Auto Goods Receipt (GR), production of material carried out with movement type 101 in the entry.
Auto Goods Issue (GI), consumption of components carried out using movement type 261 in the entry.
Click the save button at the top of the screen and you will get a confirmation message.

It will show a number of successful goods movement and failed count.

SAP PP - Canceling Production Order
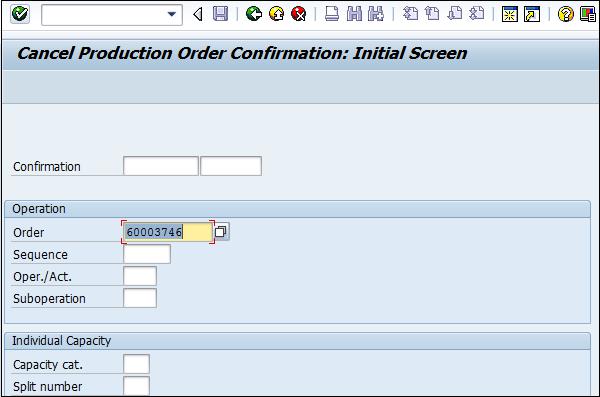
Use T-code: CO13. Enter the order number and click the tick mark at the top of the screen. You will be prompted to confirm the action.

SAP PP - Capacity Planning
Capacity planning is done to balance the load at the work center. You can calculate the production capacity based on the requirement of the product as per the available capacity.
Capacity leveling takes place for detailed production planning purpose. This is done through a planning table used for detailed planning of capacity requirements over time in future.
You need to check the capacity load on the work center. If any work center is overloaded, we need to move orders to different work centers.
To Check Capacity Loads
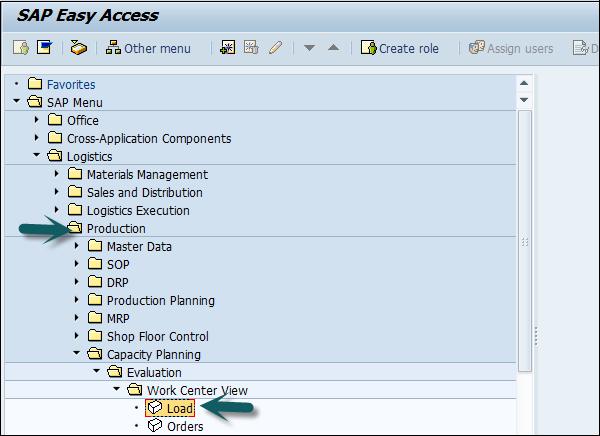
Use T-Code: CM01 or go to Logistics → Production → Capacity Planning → Evaluation → Work Center View → Load
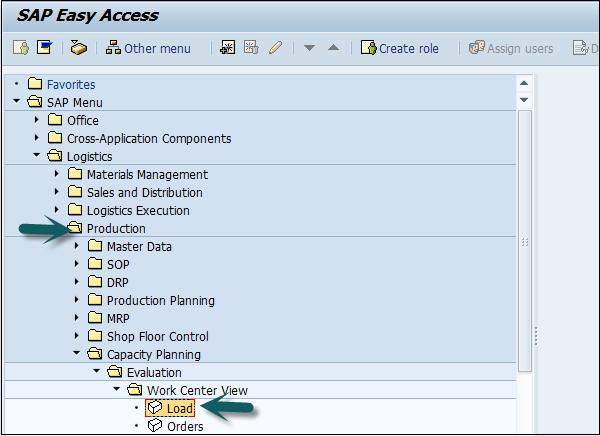
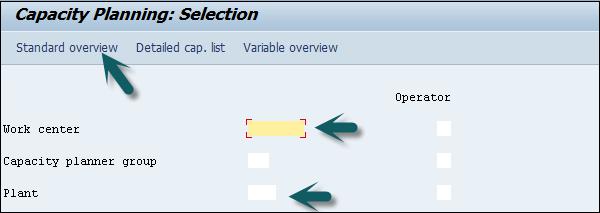
Enter the following details −
Click the Standard view.
In the next window, you can see the capacity requirement, the available capacity, the work load, and the remaining available capacity.
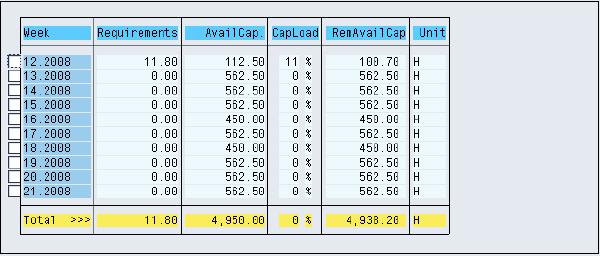
You can select a particular week and click the Cap. Details /Period. You can see the detailed load elements at an individual level.

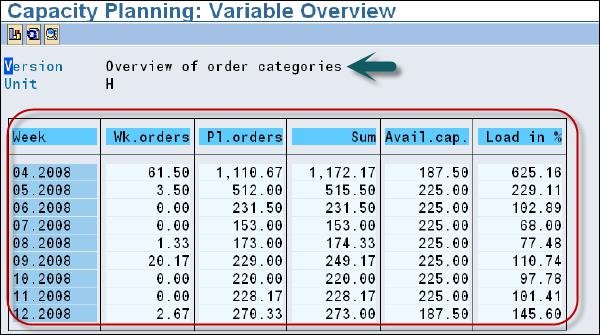
To see Planned Orders and Production order details, use T-code: CM01
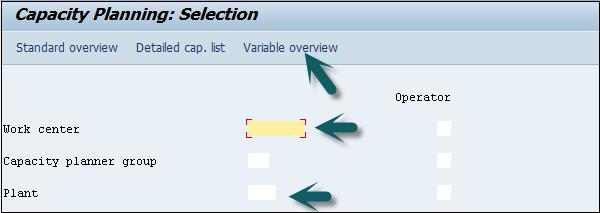
Enter the following details −
Click Variable view.
SAP PP - Capacity Leveling
You can perform Capacity Leveling using the Planning table. Orders are processed as defined in the work center to meet the Production process.
To perform capacity leveling, use T-Code: CM21
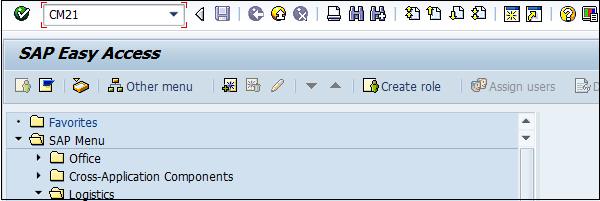
Enter Plant and click Execute.

In the next window, you will see Order details at the top and the work center details at the bottom of the screen. Select an order from the order pool. Click Dispatch to assign that order to the work center.
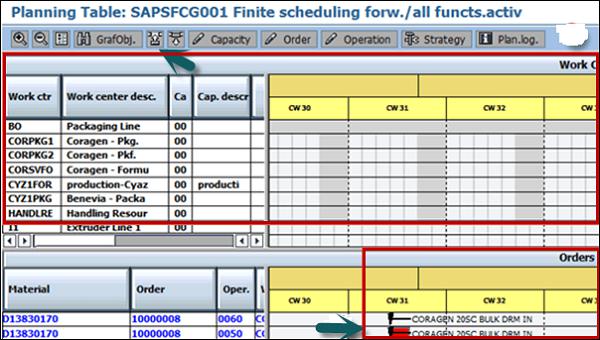
You can also dispatch other orders to the work center and capacity leveling is performed.
SAP PP - Goods Receipt
Good receipt is performed when the material is produced as per Production order and goods are placed at the storage location. The stock quantity is increased and the movement type 101 is entered.
Creating Goods Receipt
Use T-code: MIGO. Select the Goods Receipt, Order and Production order number.
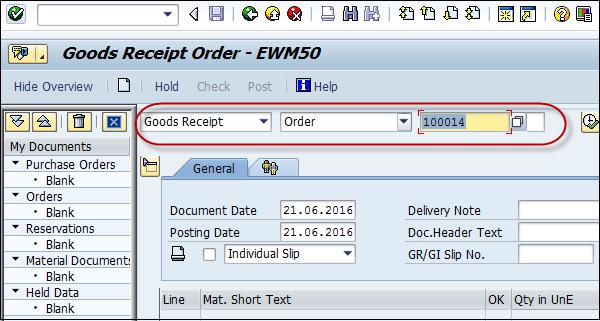
Enter the movement type 101. If the material is subject to quality inspection, you can see the stock type as quality inspection. Now, enter the batch number.
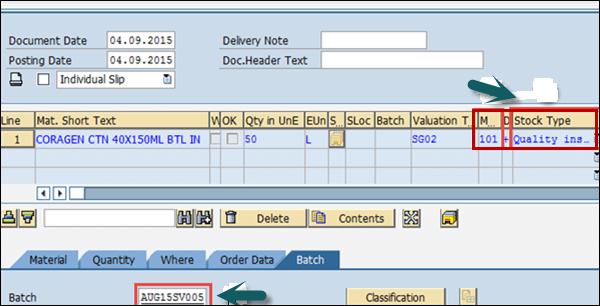
Enter manufacturing data and click Item OK. Click the Check button at the top of the screen.
To save the document, click the save button at the top of the screen. You will get a confirmation material document posted message.

SAP PP - Stock Overview
You can use Stock overview to check the available stock at any point of time. Stock overview can be checked using T-Code: MMBE or go to Logistics → Materials Management → Inventory Management → Environment → Stock → Stock Overview
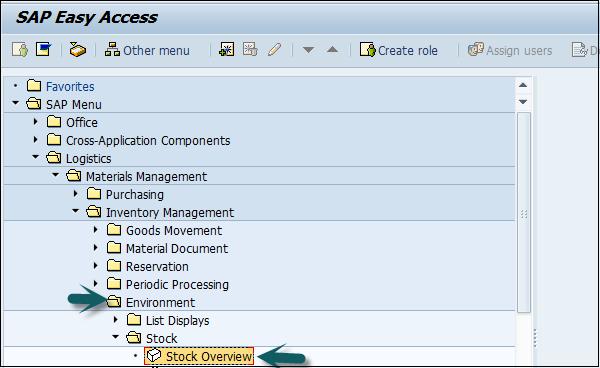
Enter the following details −
Click Execute.
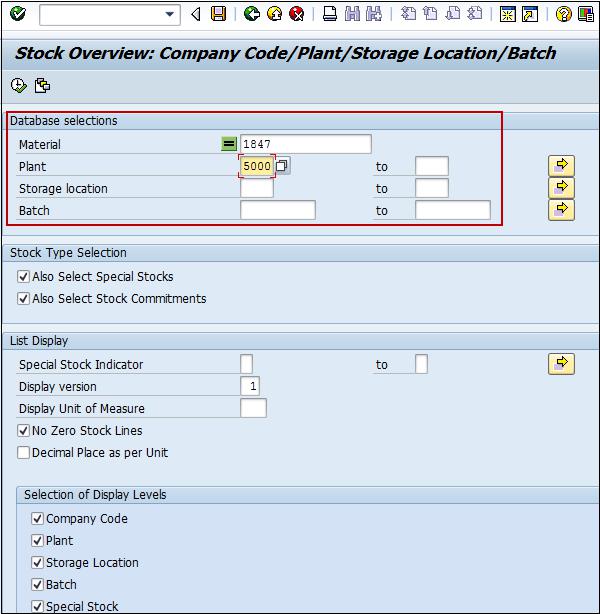
In the next screen, you can see the quantity is in unrestricted use.

SAP PP - Goods Issue
In SAP PP, goods issue takes place when the raw material is consumed to produce material as per Production order. When goods are issued, the system decreases the inventory of components at the storage location in the Production Planning system.
Movement type 261 is used for goods issue.
To perform goods issue, use T-code: MB1A or go to Logistics → Production → Production Control → Goods Movement → Goods Issue
Enter the following details −
- Movement type 261 for goods issue
- Plant and Storage location
If you want to print, select the checkbox for print.
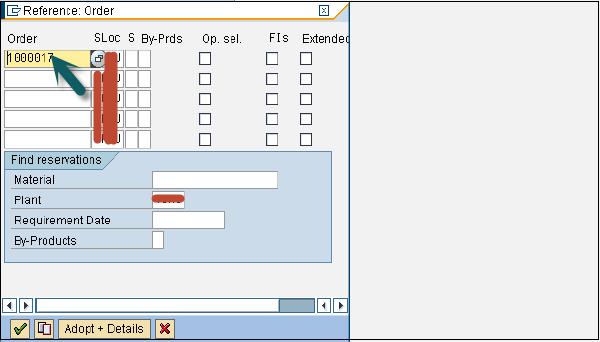
Click the To Order…button at the top of the screen as shown in the following screenshot −
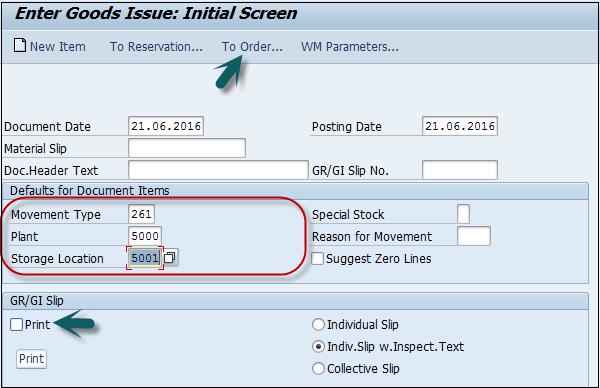
Enter the following details −
- Order no. and click Adopt Details.
- Input materials in the Material column
- Required quantities for each material in the Quantity column
- Unit of measure KG in UnE column
- Respective storage location in the column SLoc
Click the Adapt button. You will see the following details. Click the save icon to save the details. You will get a confirmation that the document has been posted.
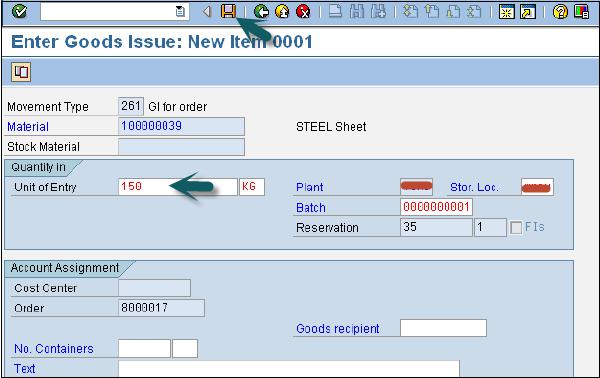
Information “Document 56754500001” posted.
SAP PP - Goods Issue Reversal
Goods issue reversal is used when you cancel the goods issue for an order. Goods issued can be cancelled before the order status is confirmed (CNF) in the system.
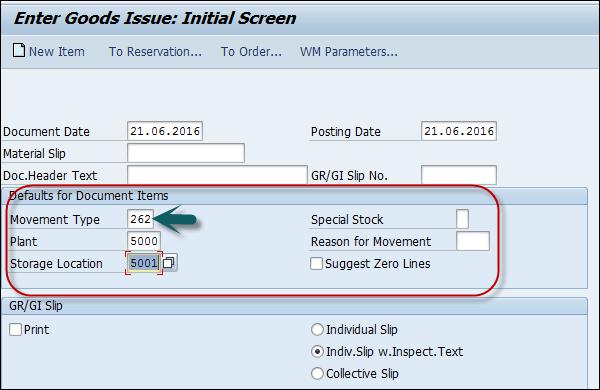
Movement type is 262 in Goods issue reversal.
To perform goods issue reversal, use T-code: MB1A or go to Logistics → Production → Production Control → Goods Movement → Goods Issue
Enter all the details except movement type is 262.
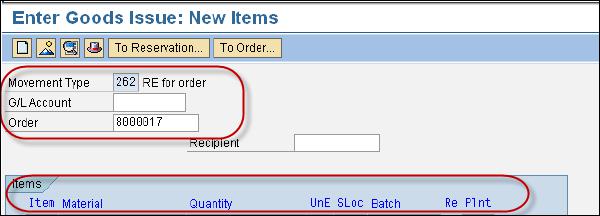
Enter the Material codes, reversal quantities, unit of measure, even the same batch no. that was issued before.
Click the tick button at the top left of the screen. In the next screen, click the save button to make a reversal.
SAP PP - Lean Manufacturing
To optimize the production planning and material handling process, organizations can involve Lean management principles. This allows organizations to smoothen the production process in a repetitive or discrete manufacturing environment.
Technical details of the component −
Technical Name of Business Function |
LOG_PP_LMAN |
Type of Business Function |
Enterprise Business Function |
Available From |
SAP ERP Enhancement Package 2005.2 |
Technical Usage |
Central applications |
ECC Application Component |
Production Planning and Control(PP) |
Supplementary Constituents in Further SAP Applications |
SAP Auto-ID Infastructure All 5.1, SAP Netweaver 7.0 BI Content Add-On3 |
Business Function Requiring Activation in Addition |
Not Relevant |
Using this business function, material requirement planning gets a better idea on crossmaterial overviews of available inventory and requirement in the production process.
This new function enhances the flexibility option in production, provides more transparency, optimizes the production process and makes efficient use of stock in production planning and control.
SAP PP - Reports
In SAP PP, there are various standard reports provided related to the production planning process, master data, order status, available stock in real time and future requirement, consumption of material in the production process and target quantity.
Key Reports in SAP PP
Following are the important features of the key reports in SAP PP.
To view the overall plant situation and production planning in different manufacturing environment.
To view the consumption of material data for a specific time period.
To check the current stock status in real time.
To track the current order status and target order quantity built in the production process.
Displaying Order Information Systems
This report is used to view the order list, order status, quantity, and goods movement w.r.t an order. You can also check the order priority and it allows you to process the order which are high on priority and actual quantity generated for an order.
To view this report, use T-Code: COOIS
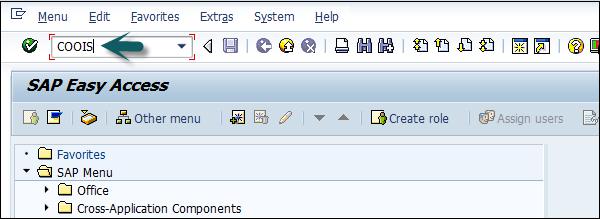
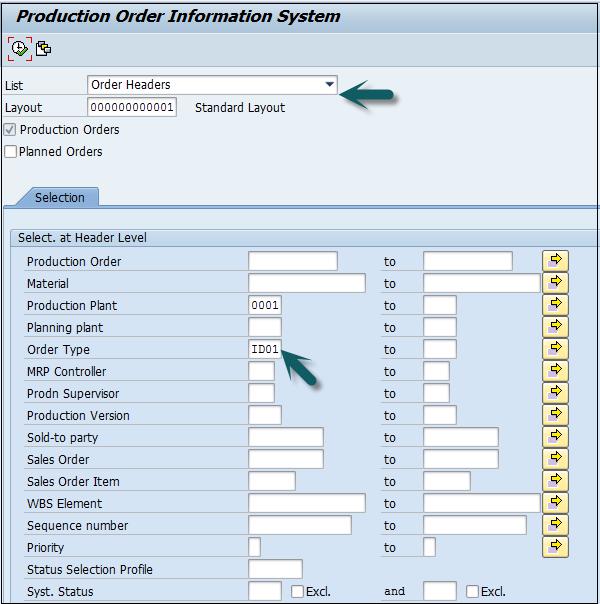
In the next window, in the List dropdown, select Order Headers. You can also include various other parameters like goods movement.

Select the checkbox Production Order. Then, enter the manufacturing plant code.
You can select the order type for which you want to pull the report. In case it is left blank, the report will be generated for all the orders.
You can also select various other parameters to pull the report.
In the next window, you can see the following details −
List of orders with material code and target quantity.
Order basic start and finish dates for the planner.
Order status by which you can identify whether the order is delivered or yet to be executed at the shop floor.

SAP PP - Material Document List
Material document list is used to generate any goods movement such as goods receipt, goods issue for a production order, etc.
Use T-Code: MB51. Enter manufacturing plant code. Movement type 101 is to see Production data.
To display production, enter the posting period.
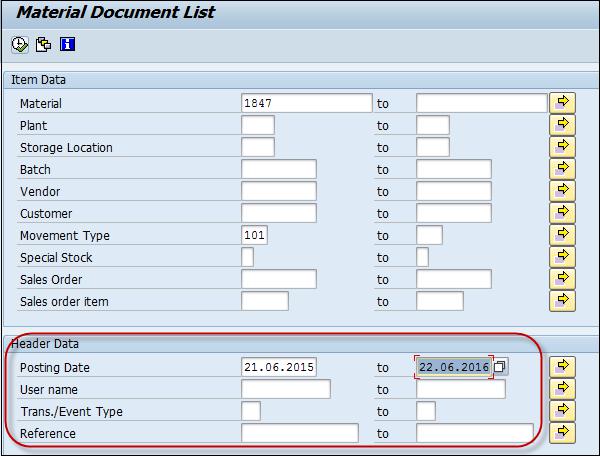
You will get the material document list −

You can also see the material document list for input movement type for Goods issue 261, goods receipt, etc.
SAP PP - Stock of Multiple Materials
To see real-time stock, you can use this report for multiple materials. At the time of goods movement, you can use this report to view real-time stock information.
Use T-Code: MB52. You can enter single material or a range of material.
Enter the Plant code and then enter the Storage location and other details. Click Execute.
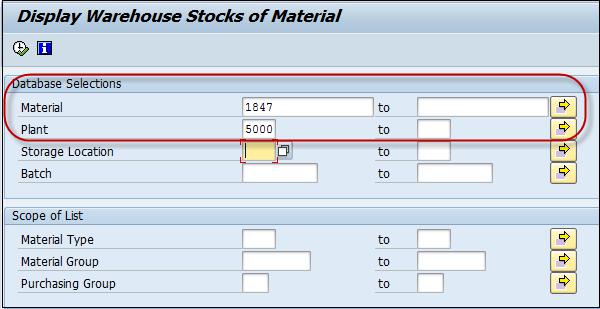
If no stock exists, you will get a message.

Otherwise, you will be displayed with the material codes along with the stock quantity and value at the storage location displayed.
SAP PP - List in Bill of Material
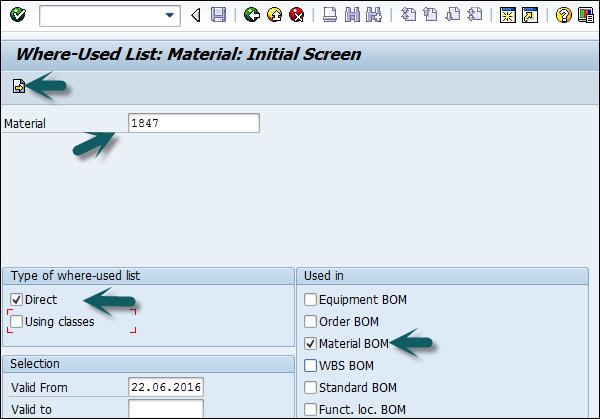
Let us now discuss how to verify if an item exists in a Bill of Material. You can find out the parent material in which a component is used as BOM. Use T-code: CS15

To view the parent material, input material code.
Select direct checkbox and material BOM. Click the Next button at the top of the screen.
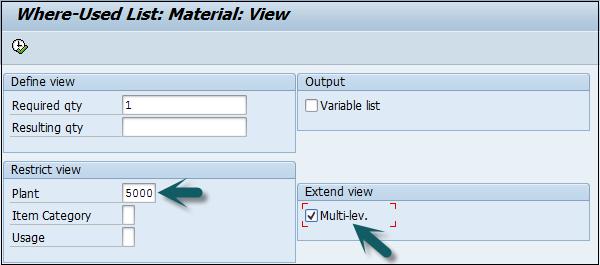
In the next window, enter the required quantity. Then, enter the Manufacturing plant.
To see all Bill of material level for the component, select multilevel and click Execute.
In the next screen, you will see a different level of BOM and parent material in which the component is present as follows −

This shows the list of different SAP Standard reports that you can pull in SAP PP module related to material, order details, BOM, etc.




 and you will get a message Release carried out.


