ServiceNow - Development
ServiceNow provides a lot of inbuilt features and applications, which we can easily use to implement ITSM in any organisation. At the same time, there are business requirements to set up different processes and features. ServiceNow is highly customisable and developers can easily create applications and modules based on customer’s requirements using principles of Javascript.
Javascript is mandatory for ServiceNow scripting. In this section, we will give you an overview of ServiceNow development.
Application Creation Overview
ServiceNow provides an application called “Studio”, where you can create your new applications, give the source codes, create new tables for your applications, etc. The Studio provides guided and easy to use interface for creating new applications. Let’s create a new application for the following case of BookWorm ltd.
The Frontend IT team needs an application in ServiceNow wherein the Manager can publish the shift ROTA (shift rotation). There would be a 6 hrs shift for each employee and the team has to support 24 X 7.
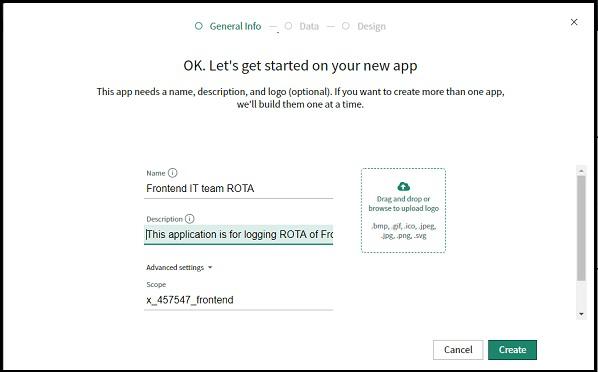
From the navigator goto Studio, a new window will open. Click on Create application. You will be prompted to enter the application name and description. Finally, click Create.
You will find the application page below. Now, it is time to create a table for our application. Go to “Create application file”.

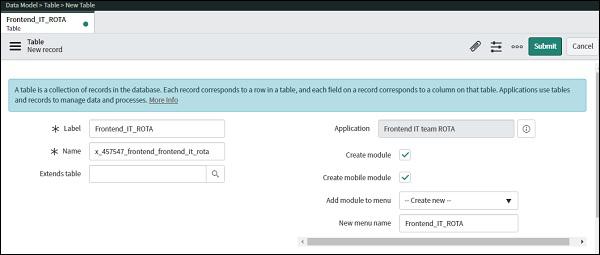
Click on Table under Data model and click create. You will be prompted to enter the details for the new table. Give the name of the table and keep remaining details as default.
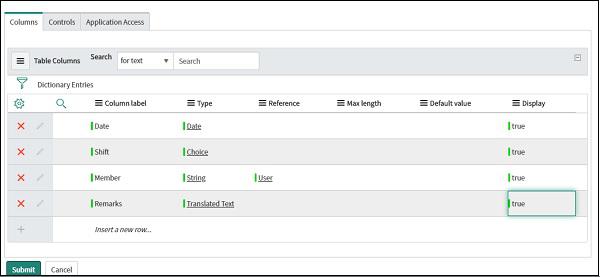
Now scroll down and start defining the columns for these tables. We have below column definition, the important point to note here is that, we have selected reference of sys_user in Member column.
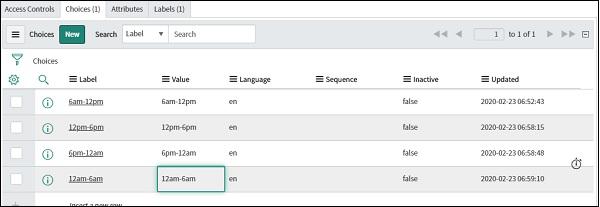
Now, click on the Shift column and select “Create choice list” as here, we will create choices of shift like 6am-12pm, 12pm-6pm, 6pm-12am and 12am-6am.
So, now that we have created the table our application in the studio looks like this.
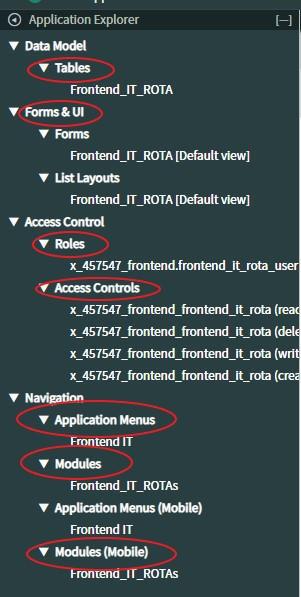
The studio has automatically created Form, list, module, application menu for us. We can create additional modules, tables, UI etc. from the create application file option, as we did for creating the ROTA table.
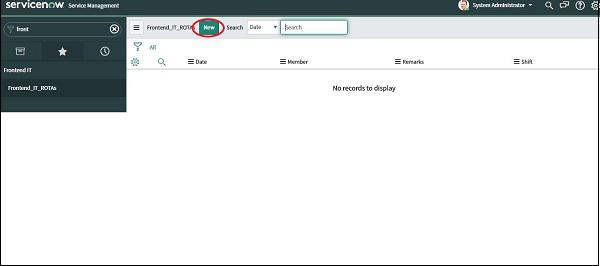
Now let’s see how our application looks in service now. Search Frontend_IT_ROTA in the navigation bar and go to our new module.
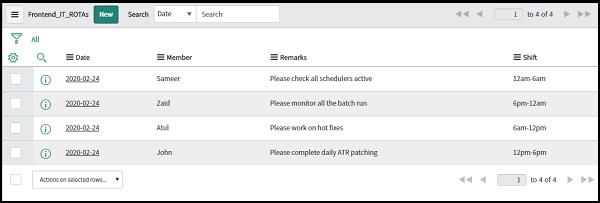
Let’s go ahead and add some new ROTA records in our application. Click on the New button.

UI Policy and Actions
ServiceNow defines UI policies as a tool through which, we can dynamically change the behaviour of information on a form and control custom process flows for tasks. UI action on the other hand is used to make the UI more interactive, customised, and specific to user activities. Let’s understand this with the help of an example.
Suppose, we have to configure the Incident form in such a way that, if any incident is assigned to the Frontend IT team assignment group then, the Services field should become invisible and Configuration items should get disabled. The UI policy here is, “if assignment group is selected as frontend IT team” and UI actions here, is “Services field should become invisible and Configuration item field should get disabled”.
The UI action can be implemented through, an easy way to use interface and also through the client script. Writing client script will help us, to do advanced operations in the fields. We will also demonstrate the client scripting later in this section.
The important point to note over here is that, UI actions are faster and executed first, followed by client scripts. Let's create an UI policy and action for our use case. From the navigation bar, open “UI policy” module under “System UI” application and click on New button.

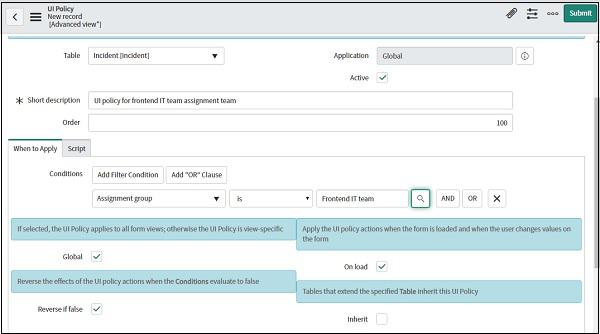
Give the name of the table, it is Incident in our case. Keep application as Global. If you can't find the option of global, navigate to the cog wheel in the top right corner and from developer tab select application as global.
Now, start giving the conditions in the next section. It would be “Assignment group is Frontend IT team” in our case. Next, there are some checkboxes, which are as follows −
Global − tick if you want, your UI policies to be implemented globally.
On load − tick if you want, to run your UI policy every time the page is refreshed.
Reverse if false − tick if you want, to reverse all the actions which we created if the conditions are changed.
Inherit − tick if you want, the table (in which UI policy is created) that extend the specified table inherit this UI Policy.
Fill all the required details and press submit.
Now, open the UI policy again and you will find the option to enter the UI actions. Let’s give the UI actions as per our use case. Click on the New button in the UI action section.

We will select the following actions for Services and Configuration items fields.


Click submit to confirm your UI actions and finally, click ‘Update’ to save the changes in UI policy. You can now go, to incident forms and verify your UI policy and actions.
ServiceNow Scripting
There are two types of scripting in ServiceNow, which are Client side and Server side. The server side scripting means that, processing takes place at the web server, while client scripting means, processing takes place at the user's machine. There are specific tasks, which could be accomplished by each type of script. Let's discuss, examples of both the scripts −
Client side scripting
The client side scripting can be used in various scenarios like populating some default values in the field of form, displaying some alert message, setting value in one field based on the response by the user in another field in a form, altering the choice list, etc. There are three main types of client scripts.
Onload() - This gets executed, when the form is loaded.
Onchange() - This gets executed, when particular field in the form is changed.
Onsubmit() - This gets executed, when form is submitted.
Let’s create a client script for two use cases. In our new application, “Frontend IT team ROTA”, we will implement an alert “Please use this application once a week, to set shift rotation”, once the application is loaded. Then, we will display an alert “The Member is entitled for shift allowance”, if the shift timing is selected as 12am-6am.
Navigate to Studio module, open the application and click ‘Create application’ file. Then, select client script under client development option and give the required details as below −
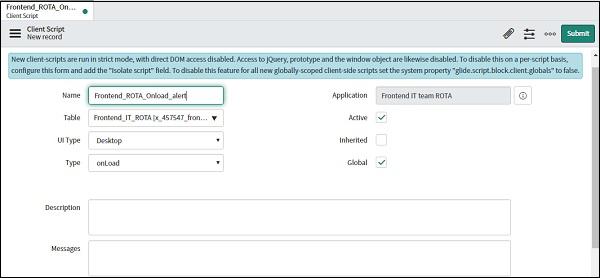
Scroll down and give the script. We will give an alert as below.

Function onLoad() {
alert (“Please use this application once a week to set the shift rotation”);
}
Click submit and load your new application to see the result.
Now, let us implement the next use case. Here, we will use onChange. The onChange Function is automatically passed with 5 arguments by ServiceNow.
Control − It is the field for which the Client Script is configured
OldValue − It is the value of the field, when the form is loaded (prior to the change).
newValue − It is the value of the field after the change.
isLoading − It is the boolean value indicating whether, the change is occurring as part of a form load. Value is true if, change is due to a form load. When form loads, all the field values on the form changes.
isTemplate − It is the boolean value indicating whether, the change that occurred, is due to the population of the field by a template. Value is true if, change is due to population by a template.
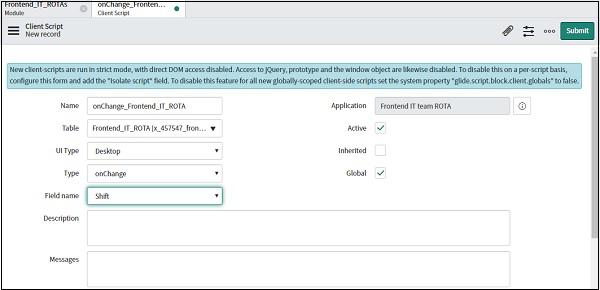
function onChange(control, oldValue, newValue, isLoading, isTemplate) {
   if (isLoading || newValue === '12am-6pm') {
      alert("The member is entitled for shift allowance");
      return;
   }
}

Glideform (g_form) class
The glideform is the class which is used to control the forms and the fields of the forms. We can perform tasks such as Hide a value of field, set the value of field based on the response on the other fields, add fields to choice list, etc.
The glide form class comes with many methods. A few important methods are addOption(), clearOptions(), showFieldMsg(), clearMessages(), clearValue(), setValue(), etc.
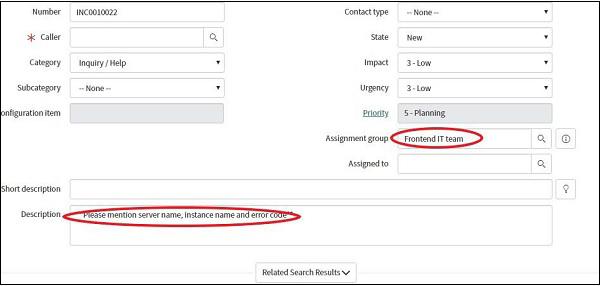
Let’s create a client script in incident form to populate some message in the description field, if the assignment group is selected as the Frontend IT team. Go to UI policies and create a new policy. Give the condition in the “Where to apply” section as “Assignment group is Frontend IT team”.
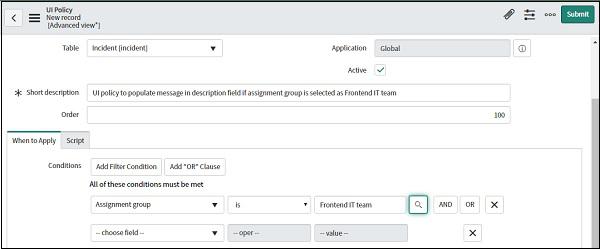
Submit the UI policy, open it again and then, click on the advanced view. Later, you will find the option to give the script.

The script is automatically populated with function onCondition(). The onCondition function will be executed automatically once, the condition we have given in UI policy is met. Another point to note is that there are two scripts, “Execute if true” and “Execute if false”.
The ‘execute if true’ script will execute once the condition is matched and if, we change the values in the fields such that, condition we have mentioned is no longer met, then the script in ‘execute if false’ will execute.
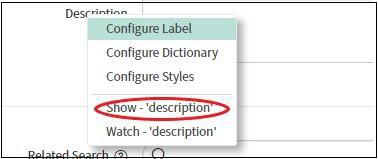
Let's write a script for both. Here, we will use setValue and clearValue methods. To get the field name, which needs to be mentioned in the script, open the incident form and right click on the desired field, you can find the field name in format “Show - <fieldname>”
On true script
function onCondition() {
   g_form.clearValue('description');
   g_form.setValue(‘description’,'**Please mention server name, instance name and error code**');
}
On false script
function onCondition() {
   g_form.clearValue('description');
}
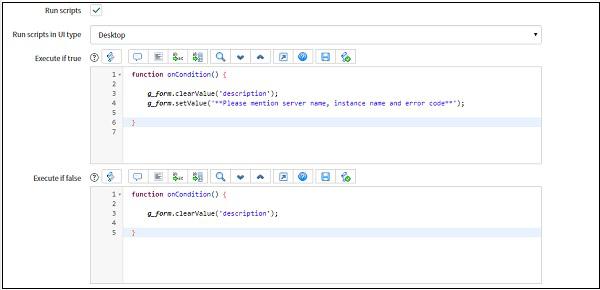
Now, open the incident form and check the result.
Server Side Scripting
Server-side scripts execute on the ServiceNow server or database. Server side scripting has two categories −
Business rules
Script include
Let us take a look into each category one by one.
Business rules
The business rules module can be found in System definition application. To create a business rule, click on new. We can create a simple business rule using business rule actions, which have a simple dropdown interface.
You can use business rule action to set the values of the field or to add a message in the form. We can choose, when to run the business rule as below −
Before − The logic in business rule executes before the database operation
After − The logic in the business rule executes after the database operation
Async − Async Business Rules executes their logic after a database operation occurs but the scheduler queues the task to be run as soon as possible but not necessarily immediately after the database operation.
Display − Display Business Rules executes their logic, when a form loads and a record is loaded from the database.
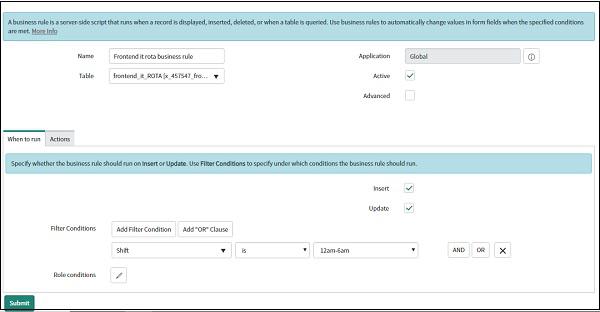
We can also choose the database operation, at which the business rule should execute. Let us create a business rule action, in the Frontend IT team ROTA application, we created in the last section.
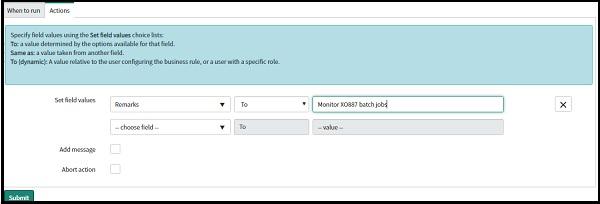
We have to set the value in the Remark field as “Monitor XO887 batch jobs” if the shift timing is 12am to 6am. Give the name and table frontend_it_rota. Inside, when to run tab give the condition, as shift is 12am to 6am and check ‘insert’ and ‘update’ box.
Inside Action tab give your condition for the remark field.
We can also give our custom script in this business rule. To start writing the custom script, check the Advanced checkbox and you will see, the new Advanced tab to write the script.
Let us write a script, to abort the insert transaction when the member, time or date field is not given. We will use ‘current’ and ‘previous’ objects for this purpose.
(function executeRule(current, previous /*null when async*/)) {
   if((current.member = ' ') || (current.date = ' ') || (current.shift = ' '){
      current.setAbortAction(true);
   }
}

Script Include
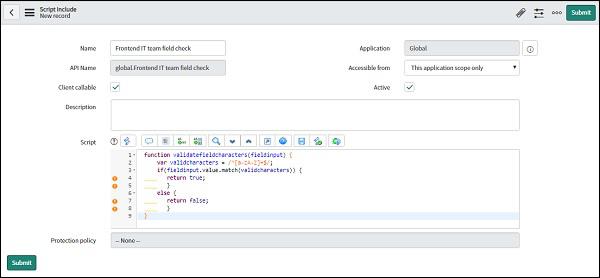
Using script includes, we can write custom functions or classes and then, use them in other scripts as many times we need. They are sort of reusable scripts; we can use in other client-side or server side scripts. However, they get executed only, when called by the other scripts explicitly. To create a new script include, we have a module “Script include” under the “System definition” application. Click on new to create a new script include.
In the script include form, give the name of the script include. The API name field is the internal name of the script include and it is used, when this script include is called from other applications. Check the client callable checkbox, if you want to use this script include in client-side scripts. In the application, give the application for which this script is used. In the ‘accessible from’ field, give the application scope.
Let us write a script for the following case in Frontend IT team ROTA application. First, we will write a script include, which will check an invalid character in any field. We will define a function, which will take the argument as a string and return true or false, based on the characters in the string.
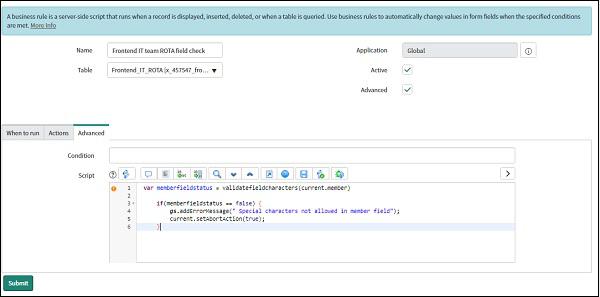
We will use this function in our business rule scripting to validate, if the value given in the Member (Name) field (in frontend IT team ROTA app), does not have any invalid character while submitting the form.
Open the script include module, below is the script which we will use.
function validatefieldcharacters(fieldinput) {
   var validcharacters = /^[a-zA-Z]+$/;
   if(fieldinput.value.match(validcharacters)) {
      return true;
   } else {
      return false;
   }
}
Now, let us write down the Business rule script to validate the Member field. Open business rule module and create a new business rule for our application Frontend IT team ROTA.
var memberfieldstatus = validatefieldcharacters(current.member)
   if(memberfieldstatus == false) {
   gs.addErrorMessage(" Special characters not allowed in member field");
   current.setAbortAction(true);
}
Debugging
We can use various debugging techniques, if our script is not performing as per the expectations, or if we are getting some error. Let’s discuss various ways in which, we can debug client side and server side script.
Debugging client scripts
The best way to debug the client script is referring to logs. The Javascript provides jslog() method to write messages in Javascript logs. The jslog() method accepts messages, which we want in the logs in the argument. Below is an example on, how we can implement the jslog(). You can use the below script in the business rule script.
function onLoad(){
   jslog("This log is displayed from jslog().");
   jslog("The value of Member field is = " + g_form.getValue('Member'));
}
This will give the value given in the member field in the logs. In this case, we have used the getvalue method, to retrieve the value of the member field. Now, the next step is to turn the logs on. Go to setting option on the top right corner and click on developer tab. Turn on the “Javascript log and Field watcher” option.
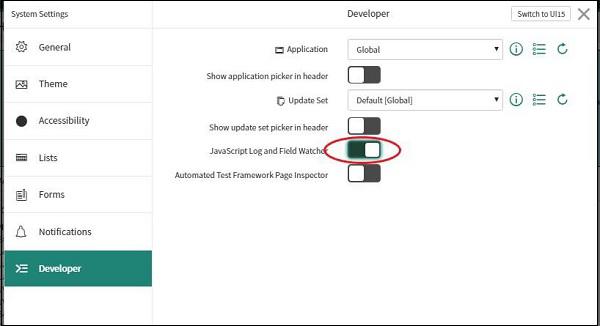
The JavaScript Logs will open in a new section at the bottom of the main ServiceNow browser window.

Apart from jslog() we can also use try/catch statements which we generally use in Javascript to debug the scripts.
Debugging server side script
The most common way of debugging server side script is using “Script debugger” module. The script debugger can be used to place breakpoints, traverse the code step by step, view value of variables, etc. To access script debugger, find “script debugger” in the navigation bar. It is present inside “System Diagnostics” application.
Apart from this, we can also refer to “Application logs” module, which is present inside “System log application”.


