SAP Basis - Managing Transport Routes
Transport routes are defined as routes that are defined by a SAP Administrator to transmit the changes between different SAP systems.
The following are the two types of transport routes −
Transport Request
This contains a number of changes to be implemented in the development system. It consists of the types of changes, purpose, change category, target system and other details.
Transport request are named in a standard format like <SID>K<Number>
For example, in <SID>K<Number> −
- SID represents System ID
- K stands for fixed keyword/alphabet
- Number can be anything from a range starting with 900001
There are two type of request types that can be created in the SAP system −
Workbench Request
This request type contains the repository objects and cross-client customizing objects. Workbench requests are used to make changes in the ABAP workbench objects.
Customizing Request
This request type contains objects that belong to ‘client-specific’ customizing. These requests are created in system automatically when a user performs customizing setting and a target system is automatically assigned as per the transport layer.

To create a Transport Request, use transaction code — SE01
A Transport Request can be created in the following two ways −
Automatic − This way you can create or modify an object, or perform customizing settings. Here, the system displays the 'Dialog box' for creating a transport request or mention name of an already created request, if available.
Manual − This way you can create the transport request from the Transport Organizer, and then enter required attributes and insert objects.

Import / Export of Objects
Once transport request is completed in the source system, you have to export the request from the source system and import it to the target system. To perform the import, you have to select an import queue.
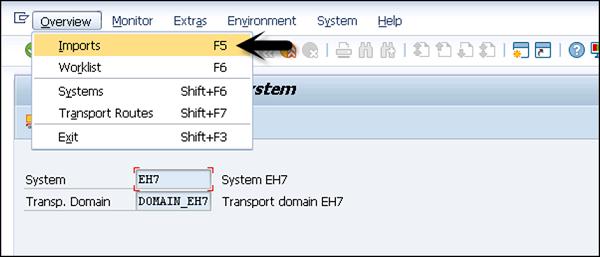
Transaction STMS → Import or you can go to Overviews tab at the top → Imports

You can see a list of systems in the current domain, description and a number of requests available in Import Queue and the status.

Import a Queue
This list contains Transport Requests in the common directory. These requests are ready to be imported to the target system.

To add a request manually, you can go to other requests → Add (you should know the name of Transport request).

Transport Request Logs
You can also check the logs once the transport request is completed. To check the logs, use transaction code — SE01 → GoTo → Transport Logs

There are two types of logs available in Transport Management System −
Transport Logs
It keeps track of the transport log files that have been moved in a Transport Request.
Action Log
It includes the details of all the actions that have been performed in a Transport Request. Actions such as exports, import, etc.
One of the important functions provided by the logs are the following return codes −
0 − This value represents that export was successful.
4 − This value represents that a warning was issued and the objects were transported successfully.
8 − This value represents that a warning was issued and at least one object could not be transported.
12 or higher − This value represents an error in transport request and it is generally not caused by the objects in Transport Request. This probably occurs because of system failure.


