RichFaces - Selection Components
In this chapter, we will learn about different selection components provided by RichFaces Technology.
<rich:pickList>
Using this tag, we can select one value from the populated list. It also allows us to add and remove a list component to another List. Following example demonstrates how this works. Go ahead and create one xhtml file and name it as “pickListExample.xhtml” and place the following code in it.
<?xml version = "1.0" encoding = "UTF-8"?>
<!DOCTYPE html>
<html xmlns  =  "http://www.w3.org/1999/xhtml"
   xmlns:h = "http://java.sun.com/jsf/html"
   xmlns:f = "http://java.sun.com/jsf/core"
   xmlns:ui = "http://java.sun.com/jsf/facelets"
   xmlns:a4j = "http://richfaces.org/a4j"
   xmlns:rich = "http://richfaces.org/rich">

   <h:head>
      <title>PickList Example</title>
   </h:head>

   <h:body>
      <h:form>
         <h:outputText value  =  "Pick List Example"/>
         <br/>
         <br/>

         <rich:pickList value = "#{managedBean.subjectList}"
            sourceCaption = "SubjectList"
            targetCaption = "Selected Subject"
            listWidth = "170px"
            listHeight = "120px"
            orderable = "true">

            <f:selectItems value = "#{managedBean.subjectList}"
               itemValue = "#{subject}" itemLabel = "#{subject.subjectName}"/>
         </rich:pickList>
      </h:form>
   </h:body>

</html>
We need to modify our managedBean.java file to populate the list components in the xhtml file. Following is the snapshot of our modified Java file.
import java.util.Arrays;
import java.util.List;
import javax.faces.bean.ManagedBean;
import javax.faces.bean.RequestScoped;

@ManagedBean
@RequestScoped

public class managedBean {
   String message;
   String job;
   private List<String> SubjectList = Arrays.asList(
      "Richface","AJAX","JAVA","JSF","DOTNET","python");

   public String getMessage() {
      return message;
   }
   public void setMessage(String message) {
      System.out.println("setMessage method is getting called with--"+message);
      this.message = message;
   }
   public String getJob() {
      return job;
   }
   public void setJob(String job) {
      System.out.println("setJob method is getting called with--"+job);
      this.job = job;
   }
   public List<String> getSubjectList() {
      return SubjectList;
   }
   public void setSubjectList(List<String> SubjectList) {
      this.SubjectList = SubjectList;
   }
}
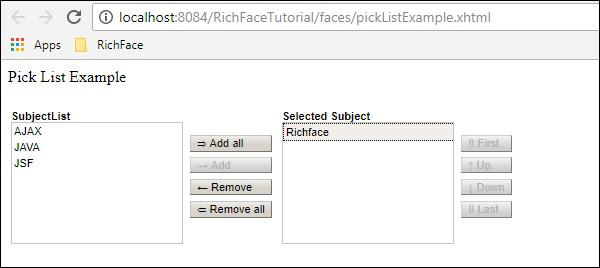
The above piece of code will yield the following output in the browser. The “value” attribute of the pickList tag is nothing but the “getSubjectList()” of the bean class. “itemValue” is the abbreviation of the object class and the corresponding “itemLabel” is the instance value name. In this example, our pickList tag automatically creates two separate lists named “sourceCaption” and “targetCaption”. Attribute orderable is used to maintain the selection order in the target List.

<rich:orderingList>
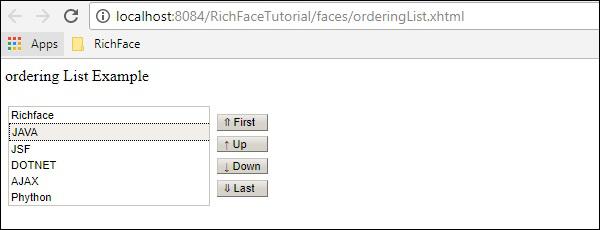
This tag is used to render a list as a whole. <orderingList> will automatically provide some button like function to propagate through the list and it helps order a selected item. In the following example, we will create one orderingList using the following code for “OrderingListExample.xhtml”.
<?xml version = "1.0" encoding = "UTF-8"?>
<!DOCTYPE html>
<html xmlns = "http://www.w3.org/1999/xhtml"
   xmlns:h = "http://java.sun.com/jsf/html"
   xmlns:f = "http://java.sun.com/jsf/core"
   xmlns:ui = "http://java.sun.com/jsf/facelets"
   xmlns:a4j = "http://richfaces.org/a4j"
   xmlns:rich = "http://richfaces.org/rich">

   <h:head>
      <title>OrderingList Example</title>
   </h:head>

   <h:body>
      <h:form>
         <h:outputText value = "ordering List Example"/><br/><br/>
         <rich:orderingList value = "#{managedBean.subjectList}"
            itemValue = "#{subject}"
            itemLabel = "#{subject.subjectName}" >
         </rich:orderingList>
      </h:form>
   </h:body>

</html>
We need not to change our bean class as we are populating the same list again using different tag for different representation. Like the previous example, even here the value attributes hold the entire list coming from “getSubjectList()”. “itemValue” and “itemLabel” holds the value of the object class and corresponding instance variable respectively.
The above piece of code will produce the following output in the browser.

<rich:ListShuttle>
ListShuttle tag is available in RichFaces 3. It helps propagate through one list and puts the same value into another. In RichFaces 4, this tag has been suppressed because the same functionality can be achieved by another new tag named <rich:pickList> as described above. If you are using RichFaces 3.0, then you can use this tag in the following manner.
<rich:listShuttle sourceValue = "#{toolBar.freeItems}"
   targetValue = "#{toolBar.items}" var = "items" listsHeight = "150"
   sourceListWidth = "130" targetListWidth = "130"
   sourceCaptionLabel = "Available Items"
   targetCaptionLabel = "Currently Active Items"
   converter = "listShuttleconverter">

   <rich:column width = "18">
      <h:graphicImage value = "#{items.iconURI}"></h:graphicImage>
   </rich:column>

   <rich:column>
      <h:outputText value = "#{items.label}"></h:outputText>
   </rich:column>

   <a4j:support event = "onlistchanged" reRender = "toolBar" />
   <a4j:support event = "onorderchanged" reRender = "toolBar" />
</rich:listShuttle>
It is very convenient to use pickList rather than using this tag, as the same functionality can be achieved using pickList by writing only two lines of code.


