RichFaces - Environment Setup
In this chapter, you will set up our development environment and configure your system such that you can proceed with RichFaces development.
Technical Requirements
As per the technical requirement you will learn how to configure JDK, Application server, or any IDE of your choice.
System Requirements
You can use any running system, there is no any restriction on memory, RAM and operating system.
JDK Installation
Before proceeding further, you must have JDK configured on your system. Please refer to the official website of oracle to download and install JDK 7 or an above version. You might have to set the environment variable for Java such that it can work properly. To verify your installation in Windows operating system, hit “java –version” in the command prompt and as an output it will show you the Java version installed in your system.
IDE Installation
There are numbers of IDE available on the Internet. You can use any as you choose. For this tutorial, let us use NetBeans 8.2. You can find the download link of different IDE in the following table.
It is always recommended to use a recent software version to drag out maximum facility from it. For this tutorial, we will be using NetBeans IDE 8.2 along with JDK 8.
Server Requirements
As an application server, you will be using Tomcat. In this chapter, you will configure the tomcat server in the system. If you are installing the latest version of NetBeans, then you can directly install Apache Tomcat along with NetBeans IDE. If you are not doing so, please download the latest version of Tomcat from the official website of the TOMCAT. Keep the extracted Tomcat files in your C drive or program files. These files will be used in the next phase.
Client Requirements
RichFaces is a UI component. Thus, like every UI component, the internet browser will act as a client for your application. You can use any modern internet browser such as IE, Safari, Chrome, etc.
Development Requirements
Downloading required jars: Please visit the official website of JBOSS and download the latest stable release of the JBoss jar files. Extract the files. You will need the following jars in order to develop RichFaces Application.
- richfaces-a4j-4.5.17.Final.jar
- richfaces-core-4.5.17.Final.jar
- richfaces-rich-4.5.17.Final.jar
- cssparser-0.9.18.jar
- guava-19.0.jar
- sac-1.3.jar
Creating a Project
In this section, let us create a demo application that will be used later to learn more about RichFaces. Before proceeding further, it is highly recommended that you download and install all required software and jar files mentioned earlier.
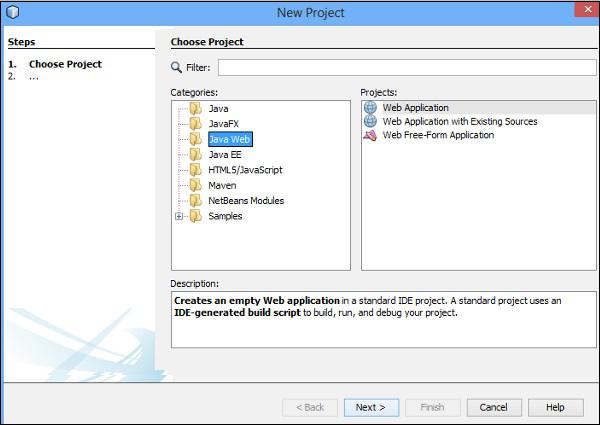
Step 1 − Open NetBeans IDE. Go to File → New Project. You will be redirected to the following screenshot.
Step 2 − Select “Java Web” and “Web Application” in “Categories” and “Projects” tab respectively and hit “Next”.
Step 3 − In the next tab, you have to provide a project name. Here, let us name it as “RichFaceTutorial”. Then, hit “Next”. You will be redirected to the following screenshot. where you will be setting up server details.
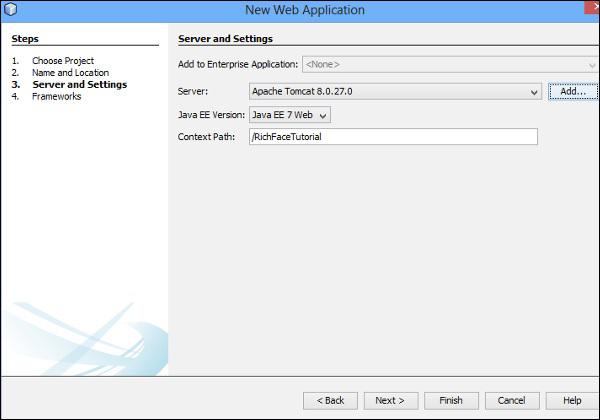
Step 4 − Select “Apache Tomcat” from the dropdown and hit “Add”. Once you hit “Add”, you will be redirected to a separate screen, where you need to configure your server. To configure the server, you will need the server files downloaded in the previous section.
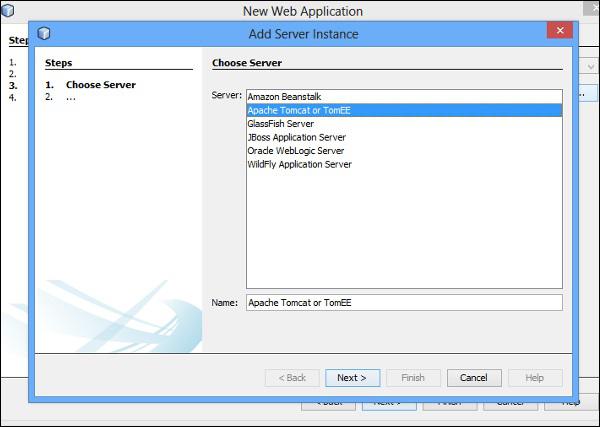
Step 5 − Select “Apache Tomcat or TomEE” from the list as shown in the above screenshot and hit “Next”. You will be redirected to the following screen.
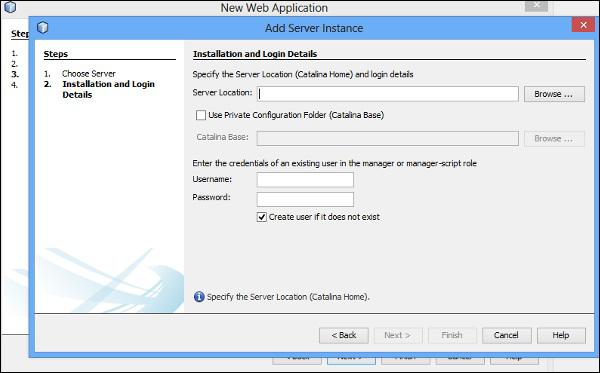
Step 6 − In the Server location, you need to provide the downloaded Tomcat files location. Hit “Browse” and navigate to the required folder path and hit “Finish”. Once your server is added successfully, you will be redirected to the first screen. Hit “Next” and you will get a chance to select the different frameworks to add into the application as shown in the following screenshot.
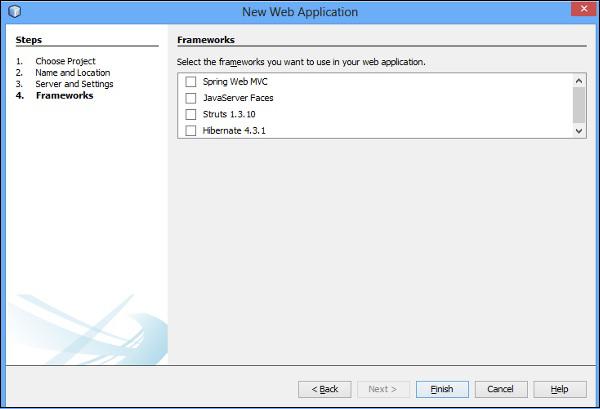
Step 7 − Select “JavaServer Faces” and in “JavaServer Faces Configuration” you have to select “RichFaces” and hit “Finish”.
If you do not get “RichFaces” as an option, you can add the required jars file from the build path. After this step, your application is ready to deploy on the application server. Following is the project directory structure of the application after completing all the above-mentioned steps.
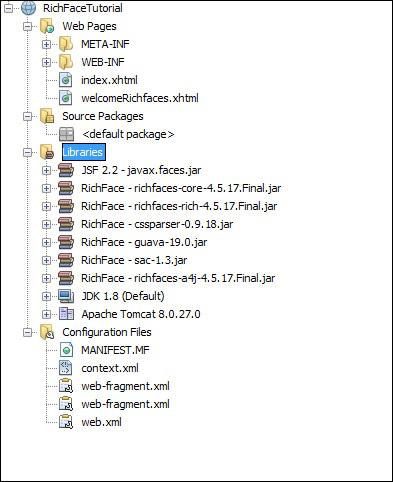
Step 8 − Go ahead and left-click the “index.xhtml ” file and run the file. You will see the following output in the browser.

In real-life application, you might have to generate the required war file and deploy in the application server, as all the pages will be interlinked.
However, for this tutorial we will be running the application page wise as we need to show different features of different tags.


