NHibernate - Data Types Mapping
In this chapter, we will be covering mapping data types. Mapping entities is straightforward, entity classes are always mapped to database tables using <class>, <subclass>, and <joined-subclass> mapping elements. Value types need something more, which is where mapping types are required.
NHibernate is able to map a wide variety of data types. Here is the list of the most common data types which are supported.
| Mapping type |
.NET type |
System.Data.DbType |
| Int16 |
System.Int16 |
DbType.Int16 |
| Int32 |
System.Int32 |
DbType.Int32 |
| Int64 |
System.Int64 |
DbType.Int64 |
| Single |
System.Single |
DbType.Single |
| Double |
System.Double |
DbType.Double |
| Decimal |
System.Decimal |
DbType.Decimal |
| String |
System.String |
DbType.String |
| AnsiString |
System.String |
DbType.AnsiString |
| Byte |
System.Byte |
DbType.Byte |
| Char |
System.Char |
DbType.StringFixedLength—one character |
| AnsiChar |
System.Char |
DbType.AnsiStringFixedLength—one character |
| Boolean |
System.Boolean |
DbType.Boolean |
| Guid |
System.Guid |
DbType.Guid |
| PersistentEnum |
System.Enum(an enumeration) |
DbType for the underlying value |
| TrueFalse |
System.Boolean |
DbType.AnsiStringFixedLength—either 'T' or 'F' |
| YesNo |
System.Boolean |
DbType.AnsiStringFixedLength—either 'Y' or 'N' |
| DateTime |
DateTime |
DbType.DateTime—ignores milliseconds |
| Ticks |
System.DateTime |
DbType.Int64 |
| TimeSpan |
System.TimeSpan |
DbType.Int64 |
| Timestamp |
System.DateTime |
DbType.DateTime—as specific as the database supports |
| Binary |
System.Byte[] |
DbType.Binary |
| BinaryBlob |
System.Byte[] |
DbType.Binary |
| StringClob |
System.String |
DbType.String |
| Serializable |
Any System.Object marked with SerializableAttribute |
DbType.Binary |
| CultureInfo |
System.Globalization.CultureInfo |
DbType.String—five characters for culture |
| Type |
System.Type |
DbType.String holding the Assembly Qualified Name |
The above given table explains in detail the below mentioned pointers.
Everything from simple numeric types to strings, which can be mapped in a variety of ways using varchars, chars etc. as well as string blobs and all the variety of types that databases support.
It is also able to map Booleans, both to fields using zeros and ones, character fields that contain true, false or T and F.
There's a wide variety of ways of defining how that maps to the back end, boolean values in the database.
We can handle the mapping of DateTime, both including and excluding time zone offsets, daylight savings time, etc.
We can also map enumerations; we can map these to strings or to their underlying numeric values.
Let’s have a look into a simple example in which we have the same property names both in the database as well as in the Student class.
Now let’s change the FirstMidName to FirstName in the student class, where we will not change the FirstMidName column, but we will see how to tell NHibernate know to carry out this conversion. Following is the updated student class.
using System;
using System.Collections.Generic;
using System.Linq;
using System.Text;
using System.Threading.Tasks;

namespace NHibernateDemoApp {

   class Student {
      public virtual int ID { get; set; }
      public virtual string LastName { get; set; }
      public virtual string FirstName { get; set; }
   }
}
Here is the implementation of NHibernate mapping file.
<?xml version = "1.0" encoding = "utf-8" ?>
<hibernate-mapping xmlns = "urn:nhibernate-mapping-2.2" assembly = "NHibernateDemoApp"
   namespace = "NHibernateDemoApp">

   <class name = "Student">

      <id name = "ID">
         <generator class = "native"/>
      </id>

      <property name = "LastName"/>
      <property name = "FirstName" column = "FirstMidName" type = "String"/>
   </class>

</hibernate-mapping>
In this example, assume that the FirstName field is a .NET string, and the FirstMidName column is a SQL nvarchar. Now to tell NHibernate how to carry out this conversion, set the name equal to FirstName and column equal to FirstMidName and specify the mapping type equal to String, which is appropriate for this particular conversion.
The following is a Program.cs file implementation.
using HibernatingRhinos.Profiler.Appender.NHibernate;
using NHibernate.Cfg;
using NHibernate.Dialect;
using NHibernate.Driver;

using System;
using System.Linq;
using System.Reflection;

namespace NHibernateDemoApp {

   class Program {

      static void Main(string[] args) {

         NHibernateProfiler.Initialize();
         var cfg = new Configuration();

         String Data Source = asia13797\\sqlexpress;
         String Initial Catalog = NHibernateDemoDB;
         String Integrated Security = True;
         String Connect Timeout = 15;
         String Encrypt = False;
         String TrustServerCertificate = False;
         String ApplicationIntent = ReadWrite;
         String MultiSubnetFailover = False;

         cfg.DataBaseIntegration(x = > { x.ConnectionString = "Data Source +
            Initial Catalog + Integrated Security + Connect Timeout + Encrypt +
            TrustServerCertificate + ApplicationIntent + MultiSubnetFailover";

            x.Driver<SqlClientDriver>();
            x.Dialect<MsSql2008Dialect>();
            x.LogSqlInConsole = true;
         });

         cfg.AddAssembly(Assembly.GetExecutingAssembly());
         var sefact = cfg.BuildSessionFactory();

         using (var session = sefact.OpenSession()) {

            using (var tx = session.BeginTransaction()) {
               var students = session.CreateCriteria<Student>().List<Student>();
               Console.WriteLine("\nFetch the complete list again\n");

               foreach (var student in students) {
                  Console.WriteLine("{0} \t{1} \t{2}", student.ID, student.FirstName,
                     student.LastName);
               }

               tx.Commit();
            }

            Console.ReadLine();
         }
      }
   }
}
Now when you run your application, you will see the following output.
NHibernate: SELECT this_.ID as ID0_0_, this_.LastName as LastName0_0_,
   this_.FirstMidName as FirstMid3_0_0_ FROM Student this_

Fetch the complete list again
3 Allan Bommer
4 Jerry Lewis
As you can see that it has mapped the different property name to column name in the database.
Let’s take a look at another example in which we will add another property in the Student class of enum type. Here is the Student class implementation.
using System;
using System.Collections.Generic;
using System.Linq; using System.Text;
using System.Threading.Tasks;

namespace NHibernateDemoApp {

   class Student {
      public virtual int ID { get; set; }
      public virtual string LastName { get; set; }
      public virtual string FirstName { get; set; }
      public virtual StudentAcademicStanding AcademicStanding { get; set; }
   }

   public enum StudentAcademicStanding {
      Excellent,
      Good,
      Fair,
      Poor,
      Terrible
   }
}
As you can see that enumeration has a variety of different values that it can possibly have such as, Excellent, Good, Fair, Poor and Terrible.
Jumping over to the mapping file, you can see that each of these properties are listed out in the mapping file including the newly added AcademicStanding property.
<?xml version = "1.0" encoding = "utf-8" ?>
<hibernate-mapping xmlns = "urn:nhibernate-mapping-2.2"
   assembly = "NHibernateDemoApp" namespace = "NHibernateDemoApp">

   <class name = "Student">

      <id name = "ID">
         <generator class = "native"/>
      </id>

      <property name = "LastName"/>
      <property name = "FirstName" column = "FirstMidName" type = "String"/>
      <property name = "AcademicStanding"/>
   </class>

</hibernate-mapping>
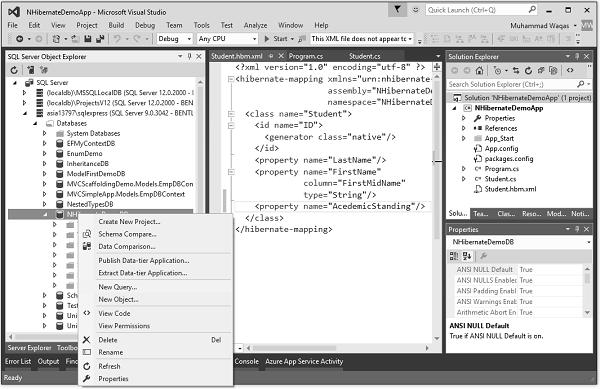
Now we also need to change the database as well, so go to the SQL Server Object Explorer and right-click on the database and select the New Query… option.
It will open the query editor and then specify the below query.
DROP TABLE [dbo].[Student]

CREATE TABLE [dbo].[Student] (
   [ID] INT IDENTITY (1, 1) NOT NULL,
   [LastName] NVARCHAR (MAX) NULL,
   [FirstMidName] NVARCHAR (MAX) NULL,
   [AcademicStanding] NCHAR(10) NULL,
   CONSTRAINT [PK_dbo.Student] PRIMARY KEY CLUSTERED ([ID] ASC)
);
This query will first drop the existing student table and then create a new table.
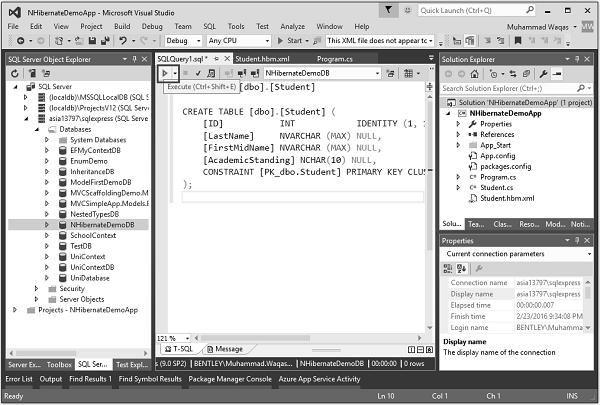
Clcik on the Execute icon as shown above. Once the query is executed succesfully then you see a message.
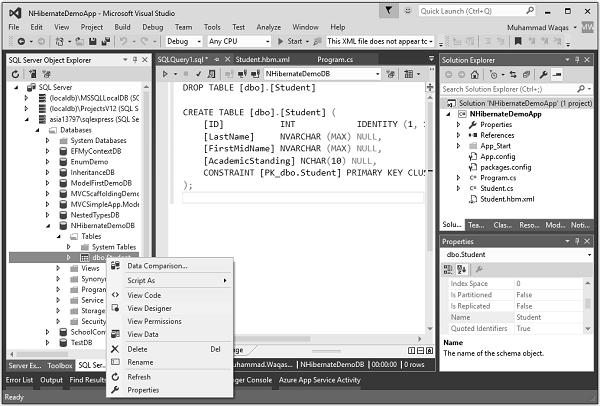
Expand database and Table dropdown, and then right-click on the Student table and select View Designer.
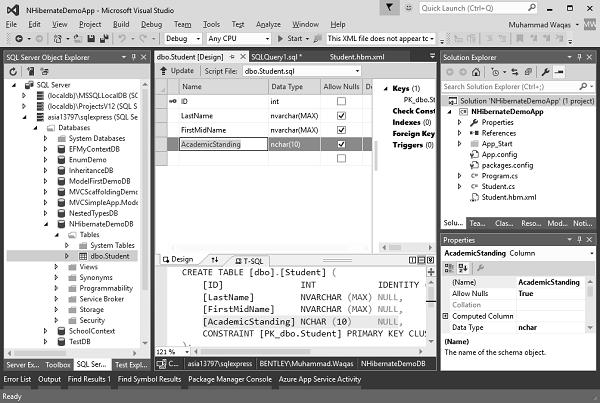
Now, you will see the newly created table, which also has the new property AcademicStanding.
Let’s add two records as shown in the following Program.cs file.
using HibernatingRhinos.Profiler.Appender.NHibernate;
using NHibernate.Cfg;
using NHibernate.Dialect;
using NHibernate.Driver;

using System;
using System.Linq;
using System.Reflection;

namespace NHibernateDemoApp {

   class Program {

      static void Main(string[] args) {

         NHibernateProfiler.Initialize();
         var cfg = new Configuration();

         String Data Source = asia13797\\sqlexpress;
         String Initial Catalog = NHibernateDemoDB;
         String Integrated Security = True;
         String Connect Timeout = 15;
         String Encrypt = False;
         String TrustServerCertificate = False;
         String ApplicationIntent = ReadWrite;
         String MultiSubnetFailover = False;

         cfg.DataBaseIntegration(x = > { x.ConnectionString = "Data Source +
            Initial Catalog + Integrated Security + Connect Timeout + Encrypt +
            TrustServerCertificate + ApplicationIntent + MultiSubnetFailover";

            x.Driver<SqlClientDriver>();
            x.Dialect<MsSql2008Dialect>();
         });

         cfg.AddAssembly(Assembly.GetExecutingAssembly());
         var sefact = cfg.BuildSessionFactory();

         using (var session = sefact.OpenSession()) {
            using (var tx = session.BeginTransaction()) {

               var student1 = new Student {
                  ID = 1,
                  FirstName = "Allan",
                  LastName = "Bommer",
                  AcademicStanding = StudentAcademicStanding.Excellent
               };

               var student2 = new Student {
                  ID = 2,
                  FirstName = "Jerry",
                  LastName = "Lewis",
                  AcademicStanding = StudentAcademicStanding.Good
               };

               session.Save(student1);
               session.Save(student2);
               var students = session.CreateCriteria<Student>().List<Student>();
               Console.WriteLine("\nFetch the complete list again\n");

               foreach (var student in students) {
                  Console.WriteLine("{0} \t{1} \t{2} \t{3}", student.ID,
                     student.FirstName, student.LastName, student.AcademicStanding);
               }

               tx.Commit();
            }

            Console.ReadLine();
         }
      }
   }
}
Now let’s run your application and you will see the following output on your console window.
Fetch the complete list again

1 Allan Bommer Excellent
2 Jerry Lewis Good
Now let’s have look into the database by right clicking on the Student Table.

Select View Data and you will see the two records in the student table as shown in the following screenshot.
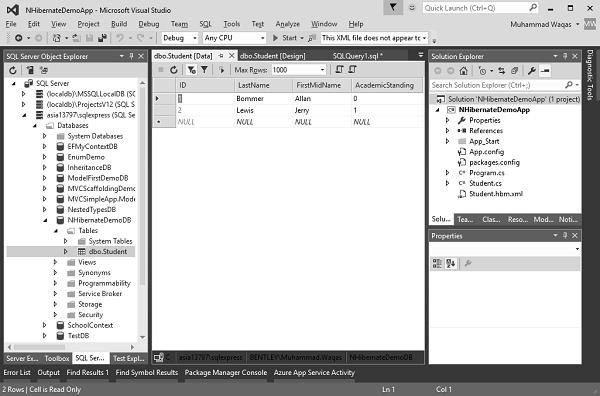
You can see that two records are added and Allan has AcademicStanding 0 and Jerry has AcademicStanding 1. This is because in .Net the first enumeration value by default has 0, which is Excellent if you look at StudentAcademicStanding. Whereas, in Student.cs file Good is the second one, so it has a value of 1.


