JSF - First Application
To create a simple JSF application, we'll use maven-archetype-webapp plugin. In the following example, we'll create a maven-based web application project in C:\JSF folder.
Create Project
Let's open command console, go the C:\ > JSF directory and execute the following mvn command.
C:\JSF>mvn archetype:create
-DgroupId = com.howcodex.test
-DartifactId = helloworld
-DarchetypeArtifactId = maven-archetype-webapp
Maven will start processing and will create the complete java web application project structure.
[INFO] Scanning for projects...
[INFO] Searching repository for plugin with prefix: 'archetype'.
[INFO] -------------------------------------------------------------
[INFO] Building Maven Default Project
[INFO]    task-segment: [archetype:create] (aggregator-style)
[INFO] -------------------------------------------------------------
[INFO] [archetype:create {execution: default-cli}]
[INFO] Defaulting package to group ID: com.howcodex.test
[INFO] artifact org.apache.maven.archetypes:maven-archetype-webapp:
checking for updates from central
[INFO] -------------------------------------------------------------
[INFO] Using following parameters for creating project
from Old (1.x) Archetype: maven-archetype-webapp:RELEASE
[INFO] -------------------------------------------------------------
[INFO] Parameter: groupId, Value: com.howcodex.test
[INFO] Parameter: packageName, Value: com.howcodex.test
[INFO] Parameter: package, Value: com.howcodex.test
[INFO] Parameter: artifactId, Value: helloworld
[INFO] Parameter: basedir, Value: C:\JSF
[INFO] Parameter: version, Value: 1.0-SNAPSHOT
[INFO] project created from Old (1.x) Archetype in dir:
C:\JSF\helloworld
[INFO] -------------------------------------------------------------
[INFO] BUILD SUCCESSFUL
[INFO] -------------------------------------------------------------
[INFO] Total time: 7 seconds
[INFO] Finished at: Mon Nov 05 16:05:04 IST 2012
[INFO] Final Memory: 12M/84M
[INFO] -------------------------------------------------------------
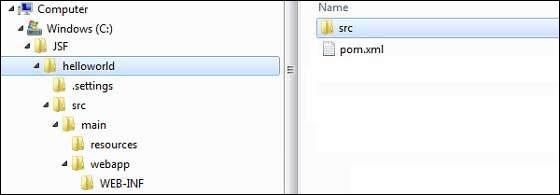
Now go to C:/JSF directory. You'll see a Java web application project created, named helloworld (as specified in artifactId). Maven uses a standard directory layout as shown in the following screenshot.

Using the above example, we can understand the following key concepts.
| S.No |
Folder Structure & Description |
| 1 |
helloworld
Contains src folder and pom.xml |
| 2 |
src/main/wepapp
Contains WEB-INF folder and index.jsp page |
| 3 |
src/main/resources
It contains images/properties files (In the above example, we need to create this structure manually) |
Add JSF Capability to Project
Add the following JSF dependencies.
<dependencies>
   <dependency>
      <groupId>com.sun.faces</groupId>
      <artifactId>jsf-api</artifactId>
      <version>2.1.7</version>
   </dependency>

   <dependency>
      <groupId>com.sun.faces</groupId>
      <artifactId>jsf-impl</artifactId>
      <version>2.1.7</version>
   </dependency>

</dependencies>
Complete POM.xml
<project xmlns = "http://maven.apache.org/POM/4.0.0"
   xmlns:xsi = "http://www.w3.org/2001/XMLSchema-instance"
   xsi:schemaLocation = "http://maven.apache.org/POM/4.0.0
   http://maven.apache.org/maven-v4_0_0.xsd">

   <modelVersion>4.0.0</modelVersion>
   <groupId>com.howcodex.test</groupId>
   <artifactId>helloworld</artifactId>
   <packaging>war</packaging>
   <version>1.0-SNAPSHOT</version>
   <name>helloworld Maven Webapp</name>
   <url>http://maven.apache.org</url>

   <dependencies>
      <dependency>
         <groupId>junit</groupId>
         <artifactId>junit</artifactId>
         <version>3.8.1</version>
         <scope>test</scope>
      </dependency>

      <dependency>
         <groupId>com.sun.faces</groupId>
         <artifactId>jsf-api</artifactId>
         <version>2.1.7</version>
      </dependency>

      <dependency>
         <groupId>com.sun.faces</groupId>
         <artifactId>jsf-impl</artifactId>
         <version>2.1.7</version>
      </dependency>

   </dependencies>

   <build>
      <finalName>helloworld</finalName>
      <plugins>
         <plugin>
            <groupId>org.apache.maven.plugins</groupId>
            <artifactId>maven-compiler-plugin</artifactId>
            <version>2.3.1</version>

            <configuration>
               <source>1.6</source>
               <target>1.6</target>
            </configuration>
         </plugin>
      </plugins>

   </build>
</project>
Prepare Eclipse Project
Let's open the command console. Go the C:\ > JSF > helloworld directory and execute the following mvn command.
C:\JSF\helloworld>mvn eclipse:eclipse -Dwtpversion = 2.0
Maven will start processing, create the eclipse ready project, and will add wtp capability.
Downloading: http://repo.maven.apache.org/org/apache/maven/plugins/
maven-compiler-plugin/2.3.1/maven-compiler-plugin-2.3.1.pom
5K downloaded  (maven-compiler-plugin-2.3.1.pom)
Downloading: http://repo.maven.apache.org/org/apache/maven/plugins/
maven-compiler-plugin/2.3.1/maven-compiler-plugin-2.3.1.jar
29K downloaded  (maven-compiler-plugin-2.3.1.jar)
[INFO] Searching repository for plugin with prefix: 'eclipse'.
[INFO] ------------------------------------------------------------
[INFO] Building helloworld Maven Webapp
[INFO]    task-segment: [eclipse:eclipse]
[INFO] ------------------------------------------------------------
[INFO] Preparing eclipse:eclipse
[INFO] No goals needed for project - skipping
[INFO] [eclipse:eclipse {execution: default-cli}]
[INFO] Adding support for WTP version 2.0.
[INFO] Using Eclipse Workspace: null
[INFO] Adding default classpath container: org.eclipse.jdt.
launching.JRE_CONTAINER
Downloading: http://repo.maven.apache.org/
com/sun/faces/jsf-api/2.1.7/jsf-api-2.1.7.pom
12K downloaded  (jsf-api-2.1.7.pom)
Downloading: http://repo.maven.apache.org/
com/sun/faces/jsf-impl/2.1.7/jsf-impl-2.1.7.pom
10K downloaded  (jsf-impl-2.1.7.pom)
Downloading: http://repo.maven.apache.org/
com/sun/faces/jsf-api/2.1.7/jsf-api-2.1.7.jar
619K downloaded  (jsf-api-2.1.7.jar)
Downloading: http://repo.maven.apache.org/
com/sun/faces/jsf-impl/2.1.7/jsf-impl-2.1.7.jar
1916K downloaded  (jsf-impl-2.1.7.jar)
[INFO] Wrote settings to C:\JSF\helloworld\.settings\
org.eclipse.jdt.core.prefs
[INFO] Wrote Eclipse project for "helloworld" to C:\JSF\helloworld.
[INFO]
[INFO] -----------------------------------------------------------
[INFO] BUILD SUCCESSFUL
[INFO] -----------------------------------------------------------
[INFO] Total time: 6 minutes 7 seconds
[INFO] Finished at: Mon Nov 05 16:16:25 IST 2012
[INFO] Final Memory: 10M/89M
[INFO] -----------------------------------------------------------
Import Project in Eclipse
Following are the steps −
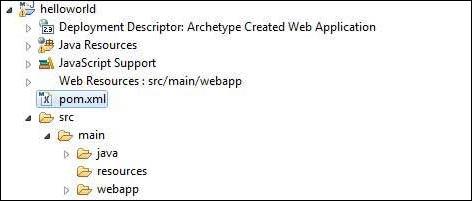
Import project in eclipse using Import wizard.
Go to File → Import... → Existing project into workspace.
Select root directory to helloworld.
Keep Copy projects into workspace to be checked.
Click Finish button.
Eclipse will import and copy the project in its workspace C:\ → Projects → Data → WorkSpace.

Configure Faces Servlet in web.xml
Locate web.xml in webapp → WEB-INF folder and update it as shown below.
<?xml version = "1.0" encoding = "UTF-8"?>
<web-app xmlns:xsi = "http://www.w3.org/2001/XMLSchema-instance"
   xmlns = "http://java.sun.com/xml/ns/javaee"
   xmlns:web = "http://java.sun.com/xml/ns/javaee/web-app_2_5.xsd"
   xsi:schemaLocation = "http://java.sun.com/xml/ns/javaee
   http://java.sun.com/xml/ns/javaee/web-app_2_5.xsd"
   id = "WebApp_ID" version="2.5">

   <welcome-file-list>
      <welcome-file>faces/home.xhtml</welcome-file>
   </welcome-file-list>

   <!--
      FacesServlet is main servlet responsible to handle all request.
      It acts as central controller.
      This servlet initializes the JSF components before the JSP is displayed.
   -->

   <servlet>
      <servlet-name>Faces Servlet</servlet-name>
      <servlet-class>javax.faces.webapp.FacesServlet</servlet-class>
      <load-on-startup>1</load-on-startup>
   </servlet>

   <servlet-mapping>
      <servlet-name>Faces Servlet</servlet-name>
      <url-pattern>/faces/*</url-pattern>
   </servlet-mapping>

   <servlet-mapping>
      <servlet-name>Faces Servlet</servlet-name>
      <url-pattern>*.jsf</url-pattern>
   </servlet-mapping>

   <servlet-mapping>
      <servlet-name>Faces Servlet</servlet-name>
      <url-pattern>*.faces</url-pattern>
   </servlet-mapping>

   <servlet-mapping>
      <servlet-name>Faces Servlet</servlet-name>
      <url-pattern>*.xhtml</url-pattern>
   </servlet-mapping>

</web-app>
Create a Managed Bean
Create a package structure under src → main → java as com → howcodex → test. Create HelloWorld.java class in this package. Update the code of HelloWorld.java as shown below.
package com.howcodex.test;

import javax.faces.bean.ManagedBean;

@ManagedBean(name = "helloWorld", eager = true)
public class HelloWorld {

   public HelloWorld() {
      System.out.println("HelloWorld started!");
   }

   public String getMessage() {
      return "Hello World!";
   }
}
Create a JSF page
Create a page home.xhtml under webapp folder. Update the code of home.xhtml as shown below.
<!DOCTYPE html PUBLIC "-//W3C//DTD XHTML 1.0 Transitional//EN"
   "http://www.w3.org/TR/xhtml1/DTD/xhtml1-transitional.dtd">

<html xmlns = "http://www.w3.org/1999/xhtml">
   <head>
      <title>JSF Tutorial!</title>
   </head>

   <body>
      #{helloWorld.getMessage()}
   </body>
</html>
Build the Project
Following are the steps.
Select helloworld project in eclipse
Use Run As wizard
Select Run As → Maven package
Maven will start building the project and will create helloworld.war under C:\ → Projects → Data → WorkSpace → helloworld → target folder.
[INFO] Scanning for projects...
[INFO] -----------------------------------------------------
[INFO] Building helloworld Maven Webapp
[INFO]
[INFO] Id: com.howcodex.test:helloworld:war:1.0-SNAPSHOT
[INFO] task-segment: [package]
[INFO] -----------------------------------------------------
[INFO] [resources:resources]
[INFO] Using default encoding to copy filtered resources.
[INFO] [compiler:compile]
[INFO] Nothing to compile - all classes are up to date
[INFO] [resources:testResources]
[INFO] Using default encoding to copy filtered resources.
[INFO] [compiler:testCompile]
[INFO] No sources to compile
[INFO] [surefire:test]
[INFO] Surefire report directory:
C:\Projects\Data\WorkSpace\helloworld\target\surefire-reports

-------------------------------------------------------
 T E S T S
-------------------------------------------------------
There are no tests to run.

Results :

Tests run: 0, Failures: 0, Errors: 0, Skipped: 0

[INFO] [war:war]
[INFO] Packaging webapp
[INFO] Assembling webapp[helloworld] in
[C:\Projects\Data\WorkSpace\helloworld\target\helloworld]
[INFO] Processing war project
[INFO] Webapp assembled in[150 msecs]
[INFO] Building war:
C:\Projects\Data\WorkSpace\helloworld\target\helloworld.war
[INFO] ------------------------------------------------
[INFO] BUILD SUCCESSFUL
[INFO] ------------------------------------------------
[INFO] Total time: 3 seconds
[INFO] Finished at: Mon Nov 05 16:34:46 IST 2012
[INFO] Final Memory: 2M/15M
[INFO] ------------------------------------------------
Deploy WAR file
Following are the steps.
Stop the tomcat server.
Copy the helloworld.war file to tomcat installation directory → webapps folder.
Start the tomcat server.
Look inside webapps directory, there should be a folder helloworld got created.
Now helloworld.war is successfully deployed in Tomcat Webserver root.
Run Application
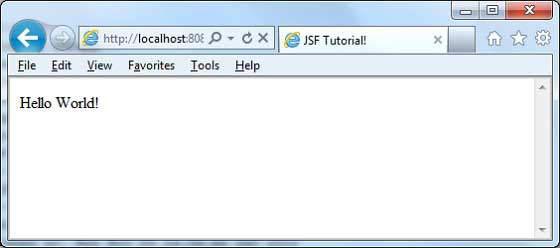
Enter a url in web browser: http://localhost:8080/helloworld/home.jsf to launch the application.
Server name (localhost) and port (8080) may vary as per your tomcat configuration.


