ASP.NET WP - Programming Concepts
In this chapter, we will cover programming concepts with ASP.NET Web Pages using the Razor Syntax. ASP.NET is Microsoft's technology for running dynamic web pages on web servers.
The main aim of this chapter is to make you will familiar with programming syntax which you will use for ASP.NET Web Pages.
You will also learn about Razor syntax and code that is written in the C# programming language.
We have already seen this syntax in the previous chapters, but in this chapter, we will explain the syntax in detail.
What is Razor
The Razor Syntax is an ASP.NET programming syntax used to create dynamic web pages with the C# or Visual Basic .NET programming languages. This Razor Syntax was in development since June 2010 and was released for Microsoft Visual Studio 2010 in January 2011.
Razor is a markup syntax for adding server-based code to web pages.
Razor has the power of traditional ASP.NET markup, but is easier to learn, and easier to use.
Razor is a server side markup syntax much like ASP and PHP.
Razor supports C# and Visual Basic programming languages.
Basic Razor Syntax
The Razor Syntax is based on ASP.NET and designed for creating web applications. It has the power of traditional ASP.NET markup, but is easier to use, and easier to learn.
Razor code blocks are enclosed in @{...}
Inline expressions (variables and functions) start with @
Code statements end with semicolon (;)
Variables are declared with the var keyword
Strings are enclosed with quotation marks
C# code is case sensitive
C# files have the extension .cshtml
Let’s have a look at the following example −
<!-- Single statement blocks -->
@{
   var total = 7;
}
@{
   var myMessage = "Hello World";
}

<!-- Inline expressions -->
<p>The value of your account is: @total </p>
<p>The value of myMessage is: @myMessage</p>

<!-- Multi-statement block -->
@{
   var greeting = "Welcome to our site!";
   var weekDay = DateTime.Now.DayOfWeek;
   var greetingMessage = greeting + " Today is: " + weekDay;
}

<p>The greeting is: @greetingMessage</p>

<!DOCTYPE html>
<html lang = "en">

   <head>
      <meta charset = "utf-8" />
      <title>Welcome to ASP.NET Web Pages Tutorials</title>
   </head>

   <body>
      <h1>Hello World, ASP.NET Web Page</h1>
      <p>Hello World!</p>
   </body>

</html>
As you can see in the above example that inside a code block each complete code statement must end with a semicolon. Inline expressions do not end with a semicolon.
Let’s run your application and specify the following url http://localhost:46023/firstpage in the browser and you will see the following output.

Variables to Store Data
You can store values in a variable, including strings, numbers, and dates, etc. You create a new variable using the var keyword. You can insert variable values directly in a page using @. Let’s have a look at another simple example in which we will store the data in another variable.
<!-- Storing a string -->
@{
   var welcomeMessage = "Welcome to ASP.NET Web Pages!";
}
<p>@welcomeMessage</p>

<!-- Storing a date -->
@{
   var year = DateTime.Now.Year;
}
<!-- Displaying a variable -->
<p>Current year is : @year!</p>
Let’s run your application and specify the following url http://localhost:46023/firstpage in the browser and you will see the following output.

Decisions Making
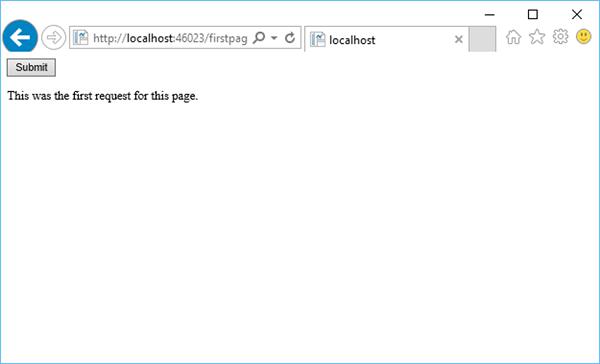
A key feature of dynamic web pages is that you can determine what to do based on conditions. The most common way to do this is with the If and Else statements. Let’s have a look into the Decisions Making code shown in the following program.
@{
   var result = "";

   if(IsPost){
      result = "This page was posted using the Submit button.";
   } else{
      result = "This was the first request for this page.";
   }
}

<!DOCTYPE html>
<html>

   <head>
      <title></title>
   </head>

   <body>
      <form method = "POST" action = "" >
         <input type = "Submit" name = "Submit" value = "Submit"/>
         <p>@result</p>
      </form>
   </body>

</html>
Let’s run your application and specify the following url − http://localhost:46023/firstpage in the browser and you will see the following output.

Now let’s click on Submit and you will see that it also updates the message as shown in the following screenshot.

Let’s have a look into another example in which we have to create a simple add functionality that lets users enter two numbers, then it adds them and displays the result.
@{
   var total = 0;
   var totalMessage = "";

   if (IsPost){
      // Retrieve the numbers that the user entered.
      var num1 = Request["text1"];
      var num2 = Request["text2"];

      // Convert the entered strings into integers numbers and add.
      total = num1.AsInt() + num2.AsInt();
      totalMessage = "Total = " + total;
   }
}

<!DOCTYPE html>
<html lang = "en">

   <head>
      <title>My Title</title>
      <meta charset = "utf-8" />
      <style type = "text/css">
         body {
            background-color: #d6c4c4;
            font-family: Verdana, Arial;
            margin: 50px;
         }
         form {
            padding: 10px;
            border-style: dashed;
            width: 250px;
         }
      </style>

   </head>
   <body>
      <p>Enter two whole numbers and then click <strong>Add</strong>.</p>

      <form action = "" method = "post">
         <p>
            <label for = "text1">First Number:</label>
            <input type = "text" name = "text1" />
         </p>
         <p>
            <label for = "text2">Second Number:</label>
            <input type = "text" name = "text2" />
         </p>
         <p><input type = "submit" value = "Add" /></p>
      </form>

      <p>@totalMessage</p>

   </body>
</html>
Let’s run the application and specify the following url − http://localhost:46023/firstpage in the browser and you will see the following output.

Now enter two numbers in the mentioned fields as shown in the following screenshot.

Click Add and you will see the sum of these two numbers as shown in the following screenshot.


