In this chapter, we will discuss how to add header and footer in Word 2010. Headers and footers are parts of a document that contain special information such as page numbers and the total number of pages, the document title, company logo, any photo, etc. The header appears at the top of every page, and the footer appears at the bottom of every page.
The following steps will help you understand how to add header and footer in a Word document.
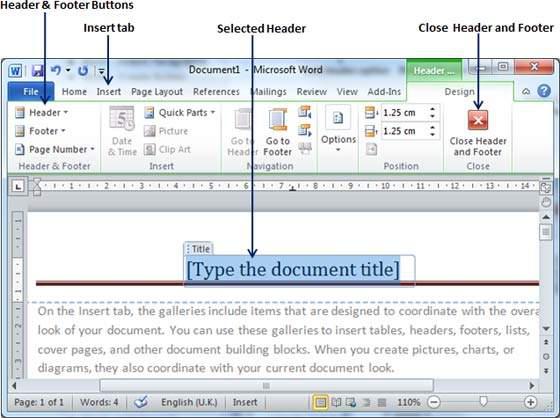
Step 1 − Click the Insert tab, and click either the Header button or the Footer button that which needs to be added first. Assume you are going to add Header; when you click the Header button it will display a list of built-in Headers from where you can choose any of the headers by simply clicking on it.
Step 2 − Once you select any of the headers, it will be applied to the document in editable mode and the text in your document will appear dimmed, Header and Footer buttons appear on the Ribbon and a Close Header and Footer button will also appear at the top-right corner.
Step 3 − Finally, you can type your information whatever you want to have in your document header and once you are done, click Close Header and Footer to come out of the header insertion mode. You will see the final result as follows.
You can follow a similar procedure to add footer in your document.
The following steps will help you understand how to edit the existing header or footer of your document.
Step 1 − Click the Insert tab, and click either the Header button or Footer button or whatever you want to edit. Assume you are going to edit the Header, so when you click the Header button it will display a list of options including the Edit Header option.
Step 2 − Click on the Edit Header option and Word will display the editable header as shown in the following screenshot.
Step 3 − Now you can edit your document header and once you are done, click Close Header and Footer to come out of the edit header mode.
You can follow a similar procedure to edit the footer in your document.