Unity - Quick Guide
Unity - Introduction
Unity is a cross-platform game engine initially released by Unity Technologies, in 2005. The focus of Unity lies in the development of both 2D and 3D games and interactive content. Unity now supports over 20 different target platforms for deploying, while its most popular platforms are the PC, Android and iOS systems.
Unity features a complete toolkit for designing and building games, including interfaces for graphics, audio, and level-building tools, requiring minimal use of external programs to work on projects.
In this series, we will be −
- Learning how to use the various fundamentals of Unity
- Understanding how everything works in the engine
- Understanding the basic concepts of game design
- Creating and building actual sample games
- Learning how to deploy your projects to the market
Let us now get started.
Unity - Installation and Setting Up
To create content with Unity, the main requirement is to download the Unity engine and development environment. Along with the core engine, you may also download optional modules for deploying to various different platforms, as well as tools for integrating Unity scripting into Visual Studio.

To install Unity, head to thisOnce there, click on −
On the next page, click on the Try Now button below Personal. This is the free version of Unity, which contains all the core features. As we begin this series, it is better to learn how to use the engine before considering a purchase to Plus or Pro.
On the next page, scroll down and click to confirm that you or your company does not earn more than 100,000 USD in annual revenue. If you do, you are not allowed to try Unity Free, although you may sign up for a free 30-day trial of the Pro version.

Next, click on your desired platform for installing Unity. In this series, we will be dealing with the Windows version of the engine. It is also possible to install Unity on Ubuntu and some additional Linux systems see here for more information
It is also highly advised that you install the latest version of Visual Studio, which provides many useful tools over the standard MonoDevelop IDE that ship with Unity.
Once the installer is downloaded, go through it until you reach a menu for selecting what components you wish to install with Unity.
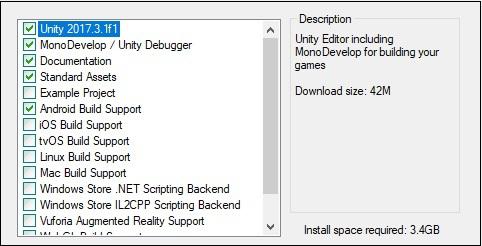
Here, select the components that you will need. For this series, we want to install the components you see in the image. This selection includes the engine itself, the documentation for the engine, an IDE; build tools for Android and a collection of assets that you can add in your project later on.
Click next, follow through the instructions and options, and let Unity download and install itself on your computer.
Open up Unity, and in the next lesson we will create our first project.
Creating your First Project
Unity is equally suited for both 2D and 3D games. All games made in Unity start out as Projects from the Startup Screen.
Open your newly installed copy of Unity; a screen will appear as shown below −

Your existing projects will show up in the blurred region as in the above image.

On the top-right corner of the window, you will see the New icon as shown above. Upon clicking the icon, you will come across the Project Setup screen.

Here, you can give your project a name, set the location to where it is saved, set the type of project and add existing assets.
For now, let us name our first project “Hello World!” and set it to 2D mode.
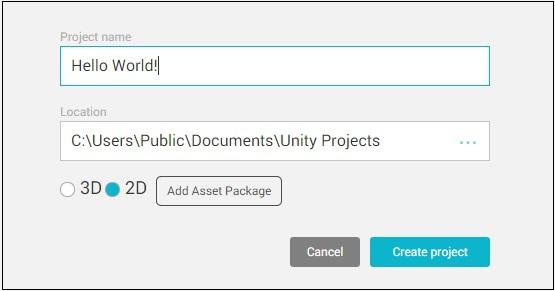
Click Create Project and let Unity set up your project’s core files. This may take time depending on your computer speed, pre-added assets and type of Project.
Knowing the Engine
Once your new project is created and Unity opens, the following screen appears −

Let us have a quick run-through of what is visible in this window. For the time being, we are concerned with four main regions −

This window is where we will build our Scenes. Scenes are levels in which everything in your game takes place. If you click on the small Game tab, you can see a Preview window of how the game looks like to the player. For now, it should be a simple, blue background.

This region is the Inspector. It is empty for now, because we do not have any objects in our scene. We will see how the Inspector is used later on.

This window is the Scene Hierarchy. It is where all the objects in your currently open scene are listed, along with their parent-child hierarchy. We will add objects to this list shortly.

Finally, this region is the Project Assets window. All assets in your current project are stored and kept here. All externally imported assets such as textures, fonts and sound files are also kept here before they are used in a scene.
In the next lesson, we will discuss the workflow and working of a game in Unity.
How Unity Works?
In Unity, all gameplay takes place in scenes. Scenes are levels in which all aspects of your game such as game levels, the title screen, menus and cut scenes take place.
By default, a new Scene in Unity will have a Camera object in the scene called the Main Camera. It is possible to add multiple cameras to the scene, but we will only deal with the main camera for now.
The main camera renders everything that it sees or “captures” in a specific region called the viewport. Everything that comes into this region becomes visible for the player.
You can see this viewport as a grey rectangle by placing your mouse inside the scene view and scrolling down to zoom out the scene view. (You can also do so by holding Alt and dragging Right-click).
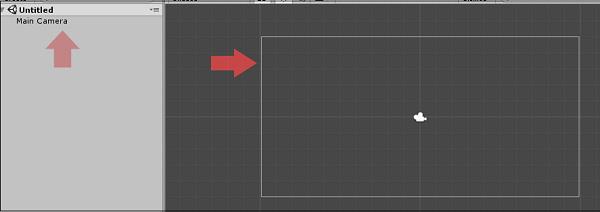
A scene itself is made out of objects, called GameObjects. GameObjects can be anything from the player’s model to the GUI on the screen, from buttons and enemies to invisible “managers” like sources of sound.
GameObjects have a set of components attached to them, which describe how they behave in the scene, as well as how they react to others in the scene.
In fact, we can explore that right now. Click on the Main Camera in the Scene Hierarchy and look at the Inspector. It will not be empty now; instead, it will have a series of “modules” in it.

The most important component for any GameObject is its Transform component. Any object that exists in a scene will have a transform, which defines its position, rotation and scale with respect to the game world, or its parent if any.
The additional components can be attached to an object by clicking on Add Component and selecting the desired component. In our subsequent lessons, we will also be attaching Scripts to GameObjects so that we can give them programmed behaviour.
Let us now consider a few examples of components −
Renderer − Responsible for rendering and making objects visible.
Collider − Define the physical collision boundaries for objects.
Rigidbody − Gives an object real-time physics properties such as weight and gravity.
Audio Source − Gives object properties to play and store sound.
Audio Listener − The component that actually “hears” audio and outputs it to the player’s speakers. By default, one exists in the main camera.
Animator − Gives an object access to the animation system.
Light − Makes the object behave as a light source, with a variety of different effects.
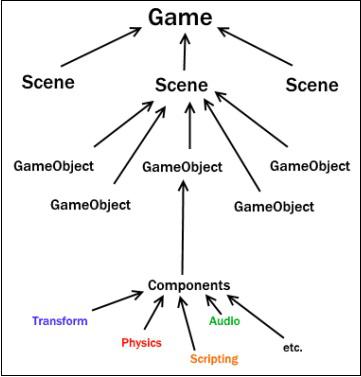
In this chart, we can see how Unity composes itself through GameObjects into scenes.
In the next lesson, we will create our first GameObject and dive into scripting.
Unity - Creating Sprites
Sprites are simple 2D objects that have graphical images (called textures) on them. Unity uses sprites by default when the engine is in 2D mode. When viewed in 3D space, sprites will appear to be paper-thin, because they have no Z-width.

Sprites always face the camera at a perpendicular angle unless rotated in 3D space.
Whenever Unity makes a new sprite, it uses a texture. This texture is then applied on a fresh GameObject, and a Sprite Renderer component is attached to it. This makes our gameObject visible with our texture, as well as gives it properties related to how it looks on-screen.

To create a sprite in Unity, we must supply the engine with a texture.
Let us create our texture first. Get a standard image file such as a PNG or JPG that you want to use, save it, and then drag the image into the Assets region of Unity.

Next, drag the image from the Assets into the Scene Hierarchy. You will notice that as soon as you let go of the mouse button, a new GameObject with your texture’s name shows up in the list. You will also see the image now in the middle of the screen in the Scene View.

Let us consider the following points while creating a sprite −
By dragging from an external source into Unity, we are adding an Asset.
This Asset is an image, so it becomes a texture.
By dragging this texture into the scene hierarchy, we are creating a new GameObject with the same name as our texture, with a Sprite Renderer attached.
This sprite renderer uses that texture to draw the image in the game.
We have now created a sprite in our scene.
In the next lesson, we will look at some modifiers for the sprites we have.
Unity - Modifying Sprites
The sprite we have just imported can also be manipulated in various ways to change how it looks.
If you look at the top left corner of the engine’s interface, you will find a toolbar as shown below −

Let us discuss the functions of these buttons.


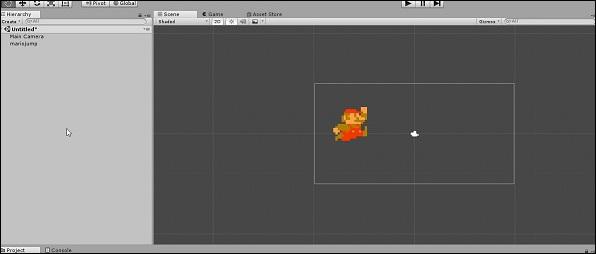


These tools prove worthy as the complexity of the project increases.
Unity - Transforms and Object Parenting
When we just got started, we discussed how a gameObject’s transform is arguably its most important component. Let us discuss the component in detail in this chapter. Additionally, we will also learn about the concept of Object Parenting.
Transforms have three visible properties − the position, the rotation, and the scale. Each of these have three values for the three axes. 2D games usually do not focus on the Z-axis when it comes to positioning. The most common use of the Z-axis in 2D games is in the creation of parallax.
The rotation properties define the amount of rotation (in degrees) an object is rotated about that axis with respect to the game world or the parent object.
The scale of an object defines how large it is when compared to its original or native size. For example, let us take a square of dimensions 2x2. If this square is scaled against the X-axis by 3 and the Y-axis by 2, we will have a square of size 6x4.

In our subsequent section, we will discuss what Object Parenting is.
What is Object Parenting?
In Unity, objects follow a Hierarchy system. Using this system, GameObjects can become “parents" of other GameObjects.
When a GameObject has a parent, it will perform all its transform changes with respect to another GameObject instead of the game world.
For example, an object with no parent placed at (10, 0, and 0) will be at a distance of 10 units from the game world’s centre.

However, a gameObject with a parent placed at (10, 0, 0) will consider the parent’s current position to be the centre.

GameObjects can be parented simply by dragging and dropping them onto the desired parent. A “child” object is depicted in the object list with a small indentation along with an arrow next to the parent object.

Parenting GameObjects has a number of uses. For example, all the different parts of a tank could be seperate GameObjects, parented under a single GameObject named “tank”. That way, when this “tank” parent GameObject moves, all the parts move along with it because their positioning is updated constantly according to their parent.

In our subsequent lesson, we will discuss the internal assets. We will also learn how to create and manage the assets in our project.
Unity - Internal Assets
Alongside the external assets that you import from other programs such as audio files, images, 3D models, etc., Unity also offers the creation of Internal assets. These assets that are created within Unity itself, and as such do not need any external program to create or modify.
A few important examples of internal assets are as shown below −
Scenes − These act as “levels”.
Animations − These contain data for a gameObject’s animations.
Materials − These define how lighting affects the appearance of an object.
Scripts − The code which will be written for the gameObjects.
Prefabs − These act as “blueprints” for GameObjects so they can be generated at runtime.
A few other important assets are Placeholder, Sprites and Models. These are used when you need quick placeholders so they may be replaced with proper graphics and models later.
To create an internal asset, right-click in the Assets folder and go to Create.

In this example, we will create a Triangle and a Square.
Scroll over the Sprites selection and click on Triangle.

Repeat the process for Square, and you should have two new graphic assets.

As we move along, we will explore more of these internal assets, since they are crucial to building a proper game.
Unity - Saving and Loading Scenes
At the end of the day, when you are done with a fair amount of work, you want to save your progress. In Unity, hitting Ctrl + S will not directly save your project.
Everything in Unity happens in scenes. So does saving and loading; you must save your current work as a scene (.unity extension) in your assets.
Let us try it out. If we hit Ctrl + S and give our scene a name, we will be presented with a new asset in our Assets region. This is the scene file.
Now, let us try and create a new scene. To do so, right click in the Assets and go Create → Scene. Give your new scene a name and hit enter.
In the Editor mode (when the game is not playing), scenes can be loaded into the editor by double-clicking them. Loading a scene with unsaved changes on your current one will prompt you to save or discard your changes.
Your First Script
Importing images and having them stay still in your game is not really going to get you anywhere. It would make a nice picture frame, perhaps, but not a game.
Scripting is imperative to making games in Unity. Scripting is the process of writing blocks of code that are attached like components to GameObjects in the scene. Scripting is one of the most powerful tools at your disposal, and it can make or break a good game.
Scripting in Unity is done through either C# or Unity’s implementation of JavaScript, known as UnityScript (however, with the 2018 cycle, UnityScript is now beginning it’s deprecation phase, so it’s advised not to use it). For the purpose of this series, we will use C#.
To create a new script, right-click in your Assets and go to Create → C# Script. You can also use the Assets tab in the top bar of the engine.

When you create a new script, a new asset should show up. For the time being, leave the name as it is, and double-click it. Your default IDE should open up along with the script. Let us have a look at what it actually is.
using System.Collections;
using System.Collections.Generic;
using UnityEngine;
public class NewBehaviourScript : MonoBehaviour {
   // Use this for initialization
   void Start() {
   }
   // Update is called once per frame
   void Update() {

   }
}
You will see your script name as a class deriving from MonoBehaviour. What is MonoBehaviour? It is a vast library of classes and methods. It helps all the scripts in Unity derive from one way or the other. The more you write scripts in Unity the more you will realize how useful MonoBehaviour actually is.
As we proceed, we have two private scripts that do not have any return types, namely the Start and Update methods. The Start method runs once for the first frame that the gameObject this is used on is active in the scene.
The Update method runs every frame of the game after the Start method. Normally, games in Unity run at 60 FPS or frames per second, which means that the Update method is called 60 times per second while the object is active.
Unity scripting allows you to take advantage of the entirety of the MonoBehaviour class, as well as core C# features such as generic collections, lambda expressions and XML parsing, to name a few. In the next lesson, we will write our first code!
Unity - Basic Movement Scripting
In this lesson, we will write code that makes a gameObject move up, down, left and right based on the user’s input. This should help us understand the workflow of Unity scripting more easily.
Remember that every GameObject has at least one component − Transform. What is special is that the Transform of a gameObject also shows up as variables in the scripting side of Unity so we can modify it via code. This is not restricted to the Transform either; all components in Unity have properties, which are accessible through variables in scripting.
Let us start with our movement script. Create a new script, and name it “Movement”.
Now, open the script and you should see the same stuff you saw in the last lesson.
Let us create a public float variable named speed. Making a variable public in Unity has a great advantage −
public class Movement : MonoBehaviour {
   public float speed;
}
If we save this script without touching the other methods, it should compile in Unity.
(You can see when it is compiling by the  icon in the bottom right corner.)
Next, drag and drop the script from the Assets onto the GameObject. If you do it correctly, this is what you should see in the GameObject’s properties −

Since the speed value is adjustable and need not be changed in code all the time, we can use update() method instead of start().
Let us now consider the objectives for the Update method −
Check for the user input.
If there is a user input, read the directions of input.
Change the position values of the object’s transform based on its speed and direction. To do so, we will add the following code −
void Update() {
   float h = Input.GetAxisRaw(“Horizontal”);
   float v = Input.GetAxisRaw(“Vertical”);

   gameObject.transform.position = new Vector2 (transform.position.x + (h * speed),
      transform.position.y + (v * speed));
Let us now discuss the code in breif.
First of all, we make a floating point variable named h (for horizontal), and its value is given by the Input.GetAxisRaw method. This method returns -1, 0 or 1 depending on which key the player has pressed on the up/down/left/right arrows.
The Input class is responsible for getting input from the user in the form of key presses, mouse input, controller input, and so on. The GetAxisRaw method is slightly harder to understand, so we’ll get back to that later.
Next, we are updating the position of our gameObject to a new position defined by creating a new Vector2. The Vector2 takes 2 parameters, which are its x and y values respectively. For the x value, we provide the sum of the object’s current position and its speed, effectively adding some amount every frame the key is pressed to its position.
Save this script and head back to Unity. Unity will automatically update all scripts once it compiles successfully, so you don’t have to reattach the script again and again.
Now that you are done, change the value of the speed in the GameObject’s properties to say 0.8. This is important because a higher value will make the player move too fast.

Now, click Play and see your first small game in action!

Try pressing the arrow keys and moving around. To stop the game, simply press Play again. You can even adjust the speed in real-time so you do not have to stop and start it all the time.
In the next lesson, we will learn about rigidbodies and collisions.
Unity - Understanding Collisions
Collisions in Unity are separated from the actual Sprite itself, attached as separate components and are calculated on their own. Let us now learn the cause behind this.
Everything in your game is a GameObject. Even the individual tiles that make up your
level are GameObjects by themselves.
When we consider every component as a GameObject, we realize that there could be thousands of GameObjects in a scene, interacting with each other in some way. You can imagine that if Unity added collisions to every single GameObject, it would be impractical for the engine to calculate collisions for every single one of them.
We will go ahead and add a simple “wall” that our player character can collide against. To do so, create another sprite and scale it up using the Rect tool. We will also give it a red color through the Color property in the Sprite Renderer component.

Now, go to Add Component in the Inspector, and type in “Box Collider 2D”. Click the first component that shows up, and a new component should appear.

You will see a bright green line on the perimeter of your GameObject. This is the collision boundary. It is what defines the actual shape of the collidable objects.
Repeat the same with our movable GameObject as well.
Of course, collisions in Unity are not limited to simply boxes. They can range in a variety of shapes and sizes, and are not necessarily replicas of the object’s parameters.

They can also take on polygonal shapes.

It is not uncommon to see developers and designers use approximate shapes in their collision boundaries to simplify their colliders and avoid unnecessary calculations for the engine. We will learn how to create different shapes and sizes with our colliders soon.
Now that we have our collision boundaries in place, hit play and see it in action.
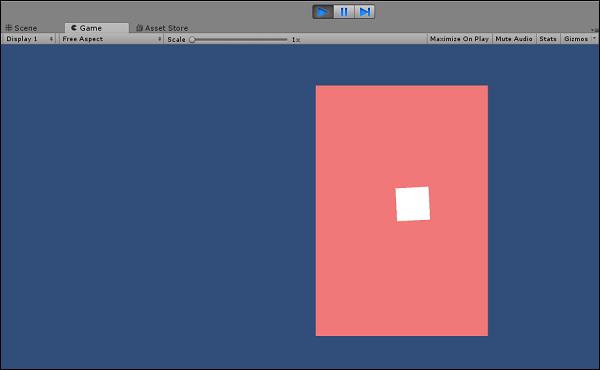
You will notice that our movable object is not behaving normal. We will discuss the behaviour of the object in our subsequent chapter.
Unity - Rigidbodies and Physics
The main issue with the collisions in the last chapter was with the code. We will now modify the values of the GameObject’s position directly. We are simply adding a value to the position, if the player is pressing a key. We need a way to make the player move in such a way that it reacts properly to boundaries and other GameObjects.
To do so, we need to understand what rigidbodies are. Rigidbodies are components that allow a GameObject to react to real-time physics. This includes reactions to forces and gravity, mass, drag and momentum.
You can attach a Rigidbody to your GameObject by simply clicking on Add Component and typing in Rigidbody2D in the search field.

Clicking on Rigidbody2D will attach the component to your GameObject. Now that it is attached, you will notice that many new fields have opened up.

With the default settings, the GameObject will fall vertically down due to gravity. To avoid this, set the Gravity Scale to 0.
Now, playing the game will not show any visible difference, because the GameObject does not have anything to do with its physics component yet.
To solve our problem, let us open our code again, and rewrite it.
public class Movement : MonoBehaviour {
   public float speed;
   public Rigidbody2D body;
   // Update is called once per frame
   void Update() {
      float h = Input.GetAxisRaw(“Horizontal”);
      float v = Input.GetAxisRaw(“Vertical”);
      body.velocity = new Vector2(h * speed, v * speed);
   }
}
We can see that we create a reference to a Rigidbody2D in the declarations, and our update code works on that reference instead of the Object’s transform. This means that the Rigidbody has now been given the responsibility of moving.
You may expect the body reference to throw NullReferenceException, since we have not assigned anything to it. If you compile and run the game as is, you will get the following error on the bottom left of the editor

To fix this, let us consider the component created by the script. Remember that public properties create their own fields in Unity, as we did with the speed variable.

Adjust the speed to a higher value, around 5, and play the game.
Your collisions will now work correctly!
Unity - Custom Collision Boundaries
In this chapter, let us learn about custom collision boundaries. We will also learn how to adjust the size and shape of our colliders.
Let us start with our Box Collider. The Box Collider (2D) has 4 adjustable sides, and is shaped like a rectangle. In the Collider’s component, click on this box −
.jpg)
You will see 4 “handles” show up on the collider. You can drag these handles around to adjust their sizes.

For simple shapes, Unity detects the best possible fit for the collider’s shape as well, provided you pick the right one. For example, picking the circle collider on a circle sprite will match it to its radius.

For more complex shapes, Unity will try to create the simplest yet most elaborate collider shape. For that, you need to use the Polygon Collider 2D.

Try to click on the Edit Collider button and experiment on adjusting the colliders.
Understanding Prefabs and Instantiation
Instantiating and destroying objects is considered very important during gameplay. Instantiating simply means bringing into existence. Items appear or “spawn” in the game, enemies die, GUI elements vanish and scenes are loaded all the time in-game. Knowing how to properly get rid of unneeded objects and how to bring in those you do then becomes even more essential.
Let us first understand what prefabs are. Prefabs are considered important to understand how Instantiation works in Unity.
Prefabs are like blueprints of a GameObject. Prefabs are, in a way, a copy of a GameObject that can be duplicated and put into a scene, even if it did not exist when the scene was being made; in other words, prefabs can be used to dynamically generate GameObjects.
To create a prefab, you simply have to drag the desired GameObject from your scene hierarchy into the project Assets.

Now, to instantiate a GameObject, we call the Instantiate() method in our script. This method, defined in MonoBehaviour, takes in a GameObject as a parameter, so it knows which GameObject to create/duplicate. It also has various overrides for changing the newly instantiated object’s transform, as well as parenting.
Let us try instantiating a new hexagon whenever the Space key is pressed.
Create a new script called Instantiator and open it up. In the Update method, type in the code given below.
Here, we are using the GetKeyDown method of the Input class to check if the player pressed a specific button during the last frame. Since we want it to keep checking, we put it in Update, which runs 60 times per second. The GetKeyDown method returns true if the key specified by the KeyCode enum (which lists all possible keys on a standard keyboard) is pressed in that frame.
public class Instantiator : MonoBehaviour {
   public GameObject Hexagon;
   // Update is called once per frame
   void Update () {
      if (Input.GetKeyDown(KeyCode.Space)) {
         Instantiate(Hexagon);
      }
   }
}
The public GameObject declaration at the top creates a slot similar to the one we made for the Rigidbody2D in our previous lessons. This slot only accepts prefabs (in editor time) and gameObjects (in runtime), however.
Save the script, and let it compile. Once it is done, create a new, empty GameObject by going to your object hierarchy right-click menu, and selecting Create Empty.
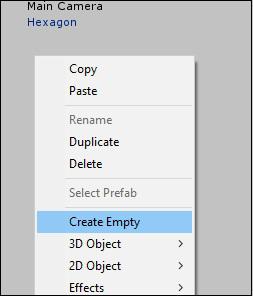
Name this Object something recognizable such as Instatiator Object and attach our newly created script to it. In the slot that shows up for the GameObject, drag in the prefab we created.

If we run the game now, pressing the Spacebar will create a new Hexagon object identical to the one we used to create the prefab. You can see each hexagon being created in the object hierarchy. The reason you cannot see them show up in the game is because for the time being, they are all being created exactly one over the other.

In our next lesson, we will understand the concept of object destruction.
Unity - GameObject Destruction
The destruction of GameObjects is as important as the instantiation. In this chapter, we will learn how to destroy the GameObjects.
Fortunately, destroying GameObjects is as easy as it is creating them. You simply need a reference to the object to be destroyed, and call the Destroy() method with this reference as a parameter.
Now, let us try to make 5 hexagons which will destroy themselves when an assigned key is pressed.
Let us make a new script called HexagonDestroyer and open it in Visual Studio. We will start by making a public KeyCode variable. A KeyCode is used to specify a key on a standard keyboard, and the Input class in its methods uses it. By making this variable public, as we did with Rigidbody and Prefabs previously, we can make it accessible through the editor. When the variable is made public, we need not hardcode values such as “KeyCode.A” into the code. The code can be made flexible with as many objects as we want.
public class HexagonDestroyer : MonoBehaviour {

   public KeyCode keyToDestroy;

   // Update is called once per frame
   void Update () {

      if (Input.GetKeyDown(keyToDestroy)) {
         Destroy (gameObject);
      }
   }
}
Observe how we used the variable named “gameObject” (small g, capital O) in the method. This new gameObject variable (of type GameObject) is used to refer to the gameObject this script is attached to. If you attach this script on multiple objects, they will all react the same way whenever this variable is involved.
Do not get confused between the two, however.
GameObject with a capital G and O is the class that encompasses all GameObjects and provides standard methods like Instantiate, Destroy and methods to fetch components.
gameObject with a small g and capital O is the specific instance of a GameObject, used to refer to the gameObject this script is currently attached to.
Let us now compile our code, and head back to Unity.
Now, we will create a new hexagon sprite, and attach our script to it. Next, right-click the gameObject in the hierarchy and select Duplicate. A new sprite is created in the hierarchy; you should use the Move tool to reposition it. Repeat the steps to create similar hexagons.


Click on each of the hexagons and look at their script components. You can now set the individual keys so that a GameObject destroys itself when that key is pressed. For example, let us create 5 hexagons, and set them to destroy when the A, S, D, F and G keys are pressed.
You can set the same key on multiple hexagons, and they will all destroy themselves simultaneously when the key is pressed; this is an example of the use of the gameObject reference, which you can use to refer to individual objects using the script without having to set them individually.
The same key can be set on multiple hexagons, and they will all destroy themselves simultaneously when the key is pressed; this is an example of the use of the gameObject reference, which you can use to refer to individual objects using the script without having to set them individually.
It is important to understand that destroying a GameObject does not mean an object will shatter or explode. Destroying an object will simply (and immediately) cease its existence as far as the game (and its code) is concerned. The links to this object and its references are now broken, and trying to access or use either of them will usually result in errors and crashes.
Unity - Coroutines
Coroutines are the most helpful tools when making games in Unity. Let us consider the line of code shown below to understand what coroutines is all about.
IEnumerator MyCoroutineMethod() {
   // Your code here…

   yield return null;
}
Generally, if you call a function in Unity (or C#, really), the function will run from start to finish. This is what you would consider “normal” behaviour as far as your code is concerned. However, sometimes we want to deliberately slow down a function or make it wait for longer than the split second duration that it runs. A coroutine is capable of exactly that: a coroutine is a function that is capable of waiting and timing its process, as well as pausing it entirely.
Let us consider an example to understand how a coroutine works. Say we want to make a square that changes its color between red and blue in 1-second intervals.
To begin with, we create a sprite. Next, create a new script, and name it ColorChanger. In this script, we get a reference to the Sprite Renderer of the sprite. However, we will use a different way of getting the component. Instead of dragging and dropping the component into a slot like we have done so far, we will ask the code to detect the component itself.
This is done through the GetComponent method, which returns the first matching component it detects. Since we only use one Sprite Renderer per object, we can use this method to automatically detect and get a reference to our renderer each time.
Remember that the renderer is responsible for making the sprite actually visible on-screen. The renderer has a color property that affects the global color of the sprite; this is the value that is to be modified. Making the Color values public will let us pick them through the editor in your operating system’s default color picking program.
private SpriteRenderer sr;

public Color color1;
public Color color2;

void Start () {
   sr = GetComponent<SpriteRenderer>();
   StartCoroutine(ChangeColor());
}

IEnumerator ChangeColor() {

   while (true) {

      if (sr.color == color1)
         sr.color = color2;

      else
         sr.color = color1;

      yield return new WaitForSeconds(3);
   }
}
Now, we will trap our coroutine function in a while loop.
To create a coroutine in C#, we simply create a method that returns IEnumerator. It also needs a yield return statement. The yield return statement is special; it is what actually tells Unity to pause the script and continue on the next frame.
There are a number of ways that can be used to yield return; one of which is to create an instance of the WaitForSeconds class. This makes the coroutine wait for a certain amount of real-world seconds before continuing.
Let us compile our code and head on back to Unity. We will simply pick our alternating colors, and hit play. Our object should now switch between the two colors in 3 second intervals. You can make the interval a public variable and adjust the frequency of the color changes as well.
Coroutines are extensively used for timed methods, like the one we just did. The variety of WaitForX methods have their own uses. Coroutines are also used to run “on the side” processes that run on their own while the game runs simultaneously. This is useful, for example, to load off-screen parts of a large level while the player starts at one point.

Unity - The Console
The Console is where we will be reading the Developer outputs. These outputs can be used to quickly test bits of code without having to give added functionality for testing.
There are three types of messages that appear in the default console. These messages can be related to most of the compiler standards −
Errors
Errors are issues or exceptions that will prevent the code from running at all.
Warnings
Warnings are issues that will not stop your code from running, but may pose issues during runtime.
Messages
Messages are outputs that convey something to the user; they do not usually highlight issues.
We can even have the Console output our own messages, warnings and errors. To do so, we will use the Debug class. The Debug class is a part of MonoBehaviour, which gives us methods to write messages to the Console, quite similar to how you would create normal output messages in your starter programs.
You can find the Console in the labelled tab above the Assets region.

The outputs of the console are more useful to the programmer, not the end user or player.
Let us try writing a simple message to the Console. This will notify us when the Space key was pressed. For this, we will use the Log method, which takes in an Object as a parameter, which we will use a string in.
You can start with a fresh script or modify an existing one.
void Update() {
   if (Input.GetKeyDown(KeyCode.Space))
      Debug.Log(“Space key was pressed!”);
}
Saving, compiling and running this code (by attaching it to a GameObject, of course), try to hit the spacebar.
Note − Observe that the message shows up at the bottom of the editor.

If you click on the Console tab, you will find your message printed out.
Similarly, you can also output warnings by using the LogWarning method and errors with the LogError method. These will prove to be useful for testing small bits of code without actually having to implement them, as you will see later on.
Unity - Introduction to Audio
There is a reason games put emphasis on audio; it is quite crucial to add aesthetic value to the game. From the very first Pong, one can hear beeps and boops from the ball hitting the paddles alternatingly. It was a really simple short square wave sample at the time, but what more could you want from the grandfather of all video games?
In real life, many things affect the way you perceive sound; the speed of the object, what type of scenario it is in, and what direction it is coming from.
There are a number of factors that can create unnecessary load on our engine. Instead, we try to create an idea of how our sound would work in our game, and build around that. This becomes especially prominent in 3D games, where there are 3 axes to deal with.
In Unity, we have dedicated components for audio perception and playback. These components work together to create a believable sound system that feels natural to the game.
Unity provides us with an array of useful tools and effects like reverb, the Doppler effect, real-time mixing and effects, etc. We will learn about these in our subsequent chapters.
The Audio Components
In this section, we will learn about the 3 primary components related to audio in Unity.
AudioSource
The AudioSource component is the primary component that you will attach to a GameObject to make it play sound. It will play back an AudioClip when triggered through the mixer, through code or by default, when it awakes.
An AudioClip is simply a sound file that is loaded into an AudioSource. It can be any standard audio file, such as .mp3, .wav and so on. An AudioClip is a component within itself as well.

AudioListener
An AudioListener is the component that listens to all audio playing in the scene, and transfers it to the computer’s speakers. It acts like the ears of the game. All audio you hear is in perspective of the positioning of this AudioListener. Only one AudioListener should be in a scene for it to function properly. By default, the main camera has the Listener attached to it. The Listener doesn’t have any exposed properties that the designer would want to care about.

Audio Filters
The output of an AudioSource or intake of an AudioListener can be modified with the help of Audio Filters. These are specific components that can change the reverb, chorus, filtering, and so on. Each specific filter comes as its own component with exposed values to tweak how it sounds.

Playing a Sound
Let us try making a button that plays a sound when it is clicked. To get started, we will Create a Circle sprite, and make it red.

Now, let us attach an Audio Source to this sprite.
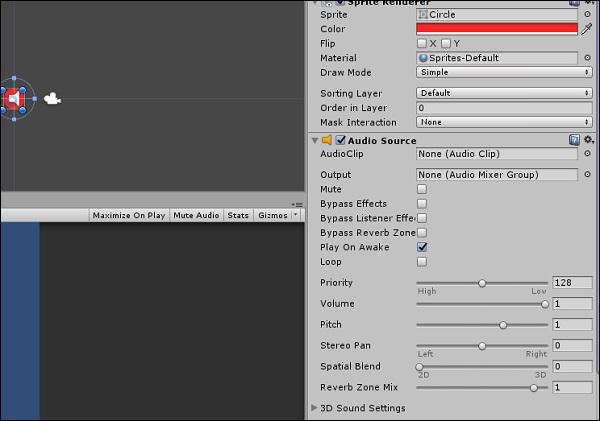
For the object to play a sound, we have to give it one. Let us use this sound effect for our purpose.
http://www.orangefreesounds.com/ding-sfx/
Download the sound effect, and drag it into the Assets.

When Unity imports this asset as a sound file, it automatically is converted into an AudioClip. Therefore, you can drag this sound clip from the Assets directly onto the Audio Clip slot in our sprite’s Audio Source.

After you drag the sound clip from the Assets directly onto the Audio Clip slot in our sprite’s Audio Source, remember to unselect “Play on Awake” in the Audio Source properties; not doing so will make the sound play the moment the game starts.

Now, let us jump into our code. Create a new script called “BellSound” and open it up.

Since our Audio Source is controlled through code, we want to first get a reference to it. We will use the GetComponent method like before.
public class BellSound : MonoBehaviour {
   AudioSource mySource;
   // Use this for initialization
   void Start () {
      mySource = GetComponent<AudioSource>();
}
Now, let us set up the method to detect the object being clicked. MonoBehaviour gives us just the method we need for it, named OnMouseDown. The method is called whenever the mouse clicks in the range of a collider of that gameObject.
Since we have not attached a collider to our button yet, let us do so now.
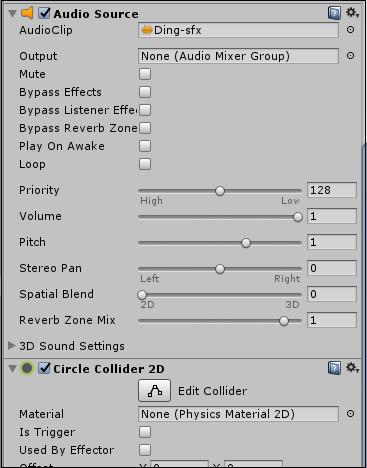
We will not need a Rigidbody for this one; neither do we need to access this collider by code. It just has to be there for the method to work.
Let us test the method and see if it is working. Write the following code in your script, and attach it to the button.
void OnMouseDown() {
   Debug.Log(“Clicked!”);
}
Once you save the script and attach it, play the game. Clicking on the button should spawn a message in the Console.

You are now one step away from playing the sound. All you have to do now is call the Play method in the Audio Source instance.
void OnMouseDown() {
   mySource.Play();
}
Save your script, and run it in the game. Click on the button, and you should hear the sound play!
Note − Consider making a button that goes up in pitch every time you click on it. Use mySource.pitch and a counter and see if you can figure it out.)
Unity - Starting with UI
In this section, we will learn about the design process for User Interface or UI elements in Unity. This includes the base setup, as well as an overview of the common elements that ship with Unity.
The workflow for designing UI in Unity follows a slightly different path than the one we have been going through so far. For starters, UI elements are not standard GameObjects and cannot be used as such. UI elements are designed differently; a menu button which looks correct in a 4:3 resolution may look stretched or distorted in a 16:9 resolution if not set up right.
UI elements in Unity are not placed directly onto the scene. They are always placed as children of a special GameObject called the Canvas. The Canvas is like a “drawing sheet” for UI on the scene, where all UI elements will render. Creating a UI element from the Create context menu without an existing Canvas will automatically generate one.

Let us now look at the Canvas GameObject to know about the additional new components −

The Rect Transform at the top appears to have many new properties that a standard GameObject’s Transform does not have.
This is because while a normal GameObject’s Transform describes an imaginary point in 3D space, a RectTransform defines an imaginary rectangle. This means we need additional properties for defining exactly where the rectangle is, how big it is and how it is oriented.
We can see some standard properties of a rectangle like the Height and Width, as well as two new properties called Anchors. Anchors are points that other entities can “lock” onto in the Canvas. This means that if a UI element (say, a button) is anchored to the Canvas on the right, resizing the Canvas will ensure that the Button is always on the relative right of the Canvas.
By default, you will not be able to modify the shape of the canvas area, and it will be a comparatively gigantic rectangle around your scene.

Next is the Canvas Component. This is the master component that holds a couple of universal options as to how the UI is drawn.

The first option we see is the Render Mode. This property defines the method that is used to draw the Canvas onto the game’s view.
We have three options in the dropdown list. Let us learn about the options in our subsequent sections.
Screen Space - Overlay
This mode is the most standard for menus, HUDs and so on. It renders UI on top of everything else in the scene, exactly how it is arranged and without exception. It also scales the UI nicely when the screen or game window size changes. This is the default Render Mode in the Canvas.
Screen Space - Camera
Screen Space - Camera creates an imaginary projection plane, a set distance from the camera, and projects all UI onto it. This means that the appearance of the UI in the scene depends heavily on the settings used by the camera; this includes perspective, field of view, and so on.

World Space
In World Space mode, UI elements behave as if they were normal GameObjects placed into the world. They are similar to sprites, however, so they are typically used as part of the game world instead of for the player, like in-game monitors and displays. Because of this nature, you can directly modify the values of the Canvas RectTransform in this mode.
The Canvas Scaler is a set of options that lets you adjust the scale and appearance of the UI elements in a more definitive way; it allows you to define how UI elements resize themselves when the size of the screen changes. For example, UI elements can remain the same size regardless of as well as in ratio to the screen size, or they can scale according to a Reference Resolution.
The Graphics Raycaster deals primarily with raycasting (link to Unity Documentation for Raycasting) the UI elements and ensuring user-initiated events like clicks and drags work correctly.
Unity - The Button
In this chapter, we will earn how to insert UI elements into our scene and go about working with them.
Let us start off with a Button. To insert a button, right click in the Scene Hierarchy and go to Create → UI → Button. If you do not have an existing Canvas and an EventSystem, Unity will automatically create one for you, and place the button inside the Canvas as well.

Remember that in Overlay rendering mode, which is the default mode, the size of the Canvas is independent of the size of the camera. You can test this by clicking on the Game tab.

If you play the scene, you will notice the button already has some standard functionality such as detecting when the mouse is hovering over it, and changing color when pressed.
A Button requires functionality to be actually useful in the UI. This functionality can be added through its properties.
Let us create a new script, and call it ButtonBehaviour.
public class ButtonBehaviour : MonoBehaviour {
   int n;
   public void OnButtonPress(){
      n++;
      Debug.Log("Button clicked " + n + " times.");
   }
}
We have made a simple method that logs how many times we have hit the button.
Note − This method has to be public; it will not be noticed by the Button’s functionality otherwise.
Let us create an empty GameObject and attach this script to it. We do this because a button will not do anything on its own; it only calls the specified method in its scripting.

Now, go into the Button’s properties, and find the OnClick() property.
_property.jpg)
Hit the + icon on the bottom tab, and a new entry should show up in the list.

This entry defines what object the button press acts on, and what function of that object’s script is called. Because of the event system used in the button press, you can trigger multiple functions simply by adding them to the list.
Drag and drop the empty GameObject, which contains the ButtonManager script we created, onto the None (Object) slot.
_slot.jpg)
Navigate the No Function dropdown list, and look for our OnButtonPress method. (Remember that it can be named anything you want, OnButtonPress is simply a standardized naming convention.) You should find it in the ButtonBehaviour section.
If you play the game now, you can test the button and surely enough, the console prints out how many times you have pressed the button.
Unity - Text Element
Unity’s inbuilt text UI is a great starting point for learners to get into designing UI, even if it tends to be overshadowed by more powerful and efficient community-built assets.
For our purpose, the vanilla Text element is more than sufficient to get started.
Text being a distinct UI element of its own is primarily due to the dynamism of that element. For example, printing the player’s current score to the screen requires the numeric value of the score to be converted to a string, generally through the .toString() method, before it is displayed.
To insert a Text UI element, go to the Scene Heirarchy, Create → UI → Text.

A new Text element should show up in your Canvas region. If we have a look at its properties, we will see some very useful options.

What is most significant of all, however, is the Text field. You can type out what you want the text box to say in that field, but we want to go a step further than that.
To change the font of the text, you must first import the font file from your computer into Unity, as an Asset. A font does not need to be actively attached to anything in the scene, and it can be directly referenced from the Assets.
The Text element can be accessed through scripting as well; this is where the importance of dynamic UI comes in.
Instead of the console, outputting how many times the button has been pressed, as in the previous chapter; let us actually print it out on the game screen. To do so, we will open up our ButtonBehaviour script from the previous lesson, and make a few changes to it.
using UnityEngine;
using UnityEngine.UI;
public class ButtonBehaviour : MonoBehaviour {
   int n;
   public Text myText;
   public void OnButtonPress(){
      n++;
      myText.text = "Button clicked " + n + " times.";
   }
}
The first change we did was to add a new namespace reference. This reference is used to work with Unity’s UI components, and so we add the using UnityEngine.UI line.
Next, we create a public Text variable, where we can drag and drop our Text UI element onto.
Finally, we access the actual text this UI element contains using myText.text.

If we save our script, we will now see a new slot for the Text UI element in our ButtonManager. Simply drag and drop the gameObject containing that Text element onto the slot, and hit the Play button.

Unity - The Slider
In this chapter, we will learn about the last UI element in this series. The Slider is commonly used where a certain value should be set between a maximum and minimum value pair. One of the most common usage of this is for audio volume, or screen brightness.
To create a slider, go to Create → UI → Slider. A new Slider element should show up on your scene.

If you go to the properties of this Slider, you will notice a ist of options to customize it.

Let us try to make a volume slider out of this slider. For this, open the ButtonBehaviour script (you can rename the ButtonManager GameObject as it is certainly doing more than just managing a button now) and add a reference to the Slider. We will also change the code around a bit again.
public class ButtonBehaviour : MonoBehaviour {
   int n;
   public Text myText;
   public Slider mySlider;
   void Update() {
      myText.text = "Current Volume: " + mySlider.value;
   }
}
Understand how we are using the Update method to constantly update the value of myText.text.
In the slider properties, let us check the “Whole Numbers” box, and set the maximum value to 100.
We will set the color of the text through its properties for a more visible color.
Let us follow the same procedure of dragging the Slider GameObject onto the new slot, and hit play.

It is highly recommended you explore and experiment with the other UI controls as well, to see which ones work in which way.
In our subsequent section, we will learn about lighting, materials and shaders.
Unity - Materials and Shaders
In this chapter, we will learn about materials and shaders in brief. To understand better, we will create a new 3D Project instead of our current 2D one. This will help us see the various changes.
Once you have created the new project, go to the Hierarchy and right-click, and go 3D Object → Cube. This will create a new cube in the middle of the scene. You can look around the cube by holding right-click and dragging the mouse in the Scene View. You can also zoom in and out using the scroll wheel.
Now, click on the cube, and have a look at its properties.

The bottom-most property appears to have a Default material and a Standard shader.
What is a material?
In Unity (and in many 3D modelling aspects), a Material is a file that contains information about the lighting of an object with that material. Notice how a gray sphere denotes the material, with some light coming in from the top.
Now, do not get confused with the name; a Material has nothing to do with mass, collisions, or even physics in general. A material is used to define how lighting affects an object with that material.
Let us try to create our own material. Right-click in the Assets region, go to Create → Material and give it a name, such as “My Material”.

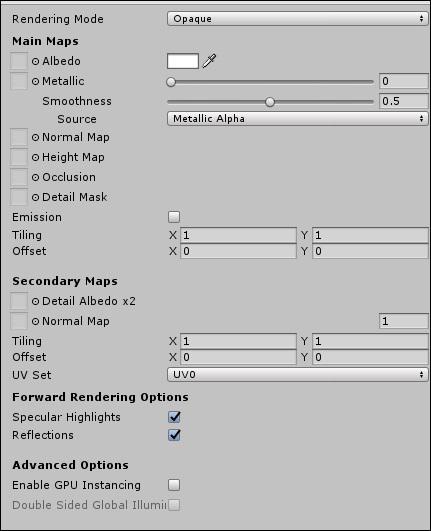
These properties are not like anything we have studied so far. That is because these are properties that are programmed in the shader, not the material.
Materials are what make your objects visible in the first place. In fact, even in 2D, we use a special material that does not require lighting as well. Of course, Unity generates and applies it to everything for us, so we do not even notice it is there.
What is a shader?
A shader is a program that defines how every single pixel is drawn on-screen. Shaders are not programmed in C# or even in an OOPS language at all. They are programmed in a C-like language called GLSL, which can give direct instructions to the GPU for fast processing.
Unity - The Particle System
Particle Systems help in generating a large number of particles with small lifespans in an efficient manner. These systems undergo a separate rendering process; they can instantiate particles even when there are hundreds or thousands of objects.
Now, particles are an ambiguous term in the Particle System; a particle is any individual texture, material instance or entity that is generated by the particle system. These are not necessarily dots floating around in space (although they can be!), and they can be used for a ton of different scenarios.

A GameObject manages a Particle System with the Particle System component attached; particle systems do not require any Assets to set up, although they may require different materials depending on the effect you want.
To create a particle system, either add the component Particle System through the Add Component setting, or go to the Hierarchy, and select Create → Effects → Particle System. This will generate a new GameObject with the particle system attached.

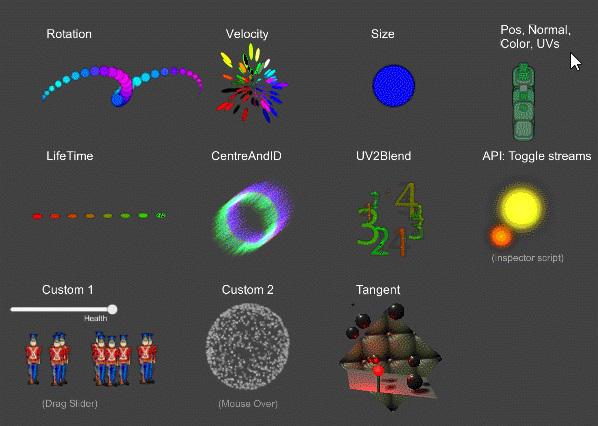
If you look at the properties of the Particle System, you will see that comprises many modules. By default, only three modules are active; the Emission, Shape and the Renderer. Other modules can be activated by clicking on the small circle next to their name.


To the right of some values, you may notice a small black arrow. This allows you to gain more control over the values of each individual particle. For example, you can set the Start Size to Random between Two Constants to tell the Particle System to render different sized, random particles like a water hose.

Unity - Using the Asset Store
The Asset Store is one of Unity’s greatest strengths in the game engine market; it comprises a large number of assets, tools, scripts and even entire readymade projects for you to download.
To use the Asset Store, you need to have a valid Unity ID. If you do not have one, you can create one at the Unity website.
Once you create a Unity ID, click on the Asset Store tab in the same row as the Scene View.

Once you login, you should be able to see your username on the top right.
In this example, we will be importing the Survival Shooter Tutorial project. To do so, we will search for it in the tab, and click on the asset published by Unity.

We will hit Download, and let it complete. Once it finishes, the Download button will change to Import; click on it again to import your new Asset to the currently open project.
(Note − in this particular case, we are importing a full project; in case Unity warns you about this, create a new project or overwrite the existing one if you want. Either way is fine.)
A new window will pop up, listing all the contents of the new Asset you just imported. Depending on what you downloaded, this could be a single file, or a bunch of files, or entire tree with hierarchies of folders and files. By default, Unity will import all asset components when you hit Import, which is what we want. Now, let us click on Import for Unity do its job.
Attempting to download assets without paying for them is illegal, and always has the possibility of viruses, bugs or lack of updates.


 icon in the bottom right corner.)


.jpg)


_property.jpg)

_slot.jpg)


