Talend - Quick Guide
Talend - Introduction
Talend is a software integration platform which provides solutions for Data integration, Data quality, Data management, Data Preparation and Big Data. The demand for ETL professionals with knowledge on Talend is high. Also, it is the only ETL tool with all the plugins to integrate with Big Data ecosystem easily.
According to Gartner, Talend falls in Leaders magic quadrant for Data Integration tools.
Talend offers various commercial products as listed below −
- Talend Data Quality
- Talend Data Integration
- Talend Data Preparation
- Talend Cloud
- Talend Big Data
- Talend MDM (Master Data Management) Platform
- Talend Data Services Platform
- Talend Metadata Manager
- Talend Data Fabric
Talend also offers Open Studio, which is an open source free tool used widely for Data Integration and Big Data.
Talend - System Requirements
The following are the system requirements to download and work on Talend Open Studio −
Recommended Operating system
- Microsoft Windows 10
- Ubuntu 16.04 LTS
- Apple macOS 10.13/High Sierra
Memory Requirement
- Memory - Minimum 4 GB, Recommended 8 GB
- Storage Space - 30 GB
Besides, you also need an up and running Hadoop cluster (preferably Cloudera.
Note − Java 8 must be available with environment variables already set.
Talend - Installation
To download Talend Open Studio for Big Data and Data Integration, please follow the steps given below −
Step 1 − Go to the page: https://www.talend.com/products/big-data/big-data-open-studio/ and click the download button. You can see that TOS_BD_xxxxxxx.zip file starts downloading.
Step 2 − After the download finishes, extract the contents of the zip file, it will create a folder with all the Talend files in it.
Step 3 − Open the Talend folder and double click the executable file: TOS_BD-win-x86_64.exe. Accept the User License Agreement.

Step 4 − Create a new project and click Finish.

Step 5 − Click Allow Access in case you get Windows Security Alert.

Step 6 − Now, Talend Open Studio welcome page will open.

Step 7 − Click Finish to install the Required third-party libraries.

Step 8 − Accept the terms and click on Finish.

Step 9 − Click Yes.

Now your Talend Open Studio is ready with necessary libraries.
Talend Open Studio
Talend Open Studio is a free open source ETL tool for Data Integration and Big Data. It is an Eclipse based developer tool and job designer. You just need to Drag and Drop components and connect them to create and run ETL or ETL Jobs. The tool will create the Java code for the job automatically and you need not write a single line of code.
There are multiple options to connect with Data Sources such as RDBMS, Excel, SaaS Big Data ecosystem, as well as apps and technologies like SAP, CRM, Dropbox and many more.
Some important benefits which Talend Open Studio offers are as below −
Provides all features needed for data integration and synchronization with 900 components, built-in connectors, converting jobs to Java code automatically and much more.
The tool is completely free, hence there are big cost savings.
In last 12 years, multiple giant organizations have adopted TOS for Data integration, which shows very high trust factor in this tool.
The Talend community for Data Integration is very active.
Talend keeps on adding features to these tools and the documentations are well structured and very easy to follow.
Talend - Data Integration
Most organizations get data from multiple places and are store it separately. Now if the organization has to do decision making, it has to take data from different sources, put it in a unified view and then analyze it to get a result. This process is called as Data Integration.
Benefits
Data Integration offers many benefits as described below −
Improves collaboration between different teams in the organization trying to access organization data.
Saves time and eases data analysis, as the data is integrated effectively.
Automated data integration process synchronizes the data and eases real time and periodic reporting, which otherwise is time consuming if done manually.
Data which is integrated from several sources matures and improves over time, which eventually helps in better data quality.
Working with Projects
In this section, let us understand how to work on Talend projects −
Creating a Project
Double click on TOS Big Data executable file, the window shown below will open.
Select Create a new project option, mention the name of the project and click on Create.

Select the project your created and click Finish.

Importing a Project
Double click on TOS Big Data executable file, you can see the window as shown below. Select Import a demo project option and click Select.

You can choose from the options shown below. Here we are choosing Data Integration Demos. Now, click Finish.

Now, give the Project name and description. Click Finish.

You can see your imported project under existing projects list.

Now, let us understand how to import an existing Talend project.
Select Import an existing project option and click on Select.

Give Project Name and select the “Select root directory” option.

Browse your existing Talend project home directory and click Finish.

Your existing Talend project will get imported.
Opening a Project
Select a project from existing project and click Finish. This will open that Talend project.

Deleting a Project
To delete a project, click Manage Connections.

Click Delete Existing Project(s)

Select the project you want to delete and click Ok.

Click OK again.
Exporting a Project
Click Export project option.

Select the project you want to export and give a path to where it should be exported. Click on Finish.

Talend - Model Basics
Business Model is a graphical representation of a data integration project. It is a non-technical representation of the workflow of the business.
Why you need a Business Model?
A business model is built to show the higher management what you are doing, and it also makes your team understand what you are trying to accomplish. Designing a Business Model is considered as one the best practices which organizations adopt at the beginning of their data integration project. Besides, helping in reducing costs, it finds and resolves the bottlenecks in your project. The model can be modified during and after the implementation of the project, if required.
Creating Business Model in Talend Open Studio
Talend open studio provides multiple shapes and connectors to create and design a business model. Each module in a business model can have a documentation attached to itself.
Talend Open Studio offers the following shapes and connector options for creating a business model −
Decision − This shape is used for putting if condition in the model.
Action − This shape is used to show any transformation, translation or formatting.
Terminal − This shape shows the output terminal type.
Data − This shape is used show data type.
Document − This shape is used for inserting a document object which can be used for input/output of the data processed.
Input − This shape is used for inserting input object using which user can pass the data manually.
List − This shape contains the extracted data and it can be defined to hold only certain kind of data in the list.
Database − This shape is used for holding the input / output data.
Actor − This shape symbolizes the individuals involved in decision making and technical processes
Ellipse − Inserts an Ellipse shape.
Gear − This shape shows the manual programs that has to be replaced by Talend jobs.
Talend - Components for Data Integration
All the operations in Talend are performed by connectors and components. Talend offers 800+ connectors and components to perform several operations. These components are present in palette, and there are 21 main categories to which components belong. You can choose the connectors and just drag and drop it in the designer pane, it will create java code automatically which will get compiled when you save the Talend code.
Main categories which contains components are shown below −

The following is the list of widely used connectors and components for data integration in Talend Open Studio −
tMysqlConnection − Connects to MySQL database defined in the component.
tMysqlInput − Runs database query to read a database and extract fields (tables, views etc.) depending on the query.
tMysqlOutput − Used to write, update, modify data in a MySQL database.
tFileInputDelimited − Reads a delimited file row by row and divides them into separate fields and passes it to the next component.
tFileInputExcel − Reads an excel file row by row and divides them into separate fields and passes it to the next component.
tFileList − Gets all the files and directories from a given file mask pattern.
tFileArchive − Compresses a set of files or folders in to zip, gzip or tar.gz archive file.
tRowGenerator − Provides an editor where you can write functions or choose expressions to generate your sample data.
tMsgBox − Returns a dialog box with the message specified and an OK button.
tLogRow − Monitors the data getting processed. It displays data/output in the run console.
tPreJob − Defines the sub jobs that will run before your actual job starts.
tMap − Acts as a plugin in Talend studio. It takes data from one or more sources, transforms it, and then sends the transformed data to one or more destinations.
tJoin − Joins 2 tables by performing inner and outer joins between the main flow and the lookup flow.
tJava − Enables you to use personalized java code in the Talend program.
tRunJob − Manages complex job systems by running one Talend job after another.
Talend - Job Design
This is the technical implementation/graphical representation of the business model. In this design, one or more components are connected with each other to run a data integration process. Thus, when you drag and drop components in the design pane and connect then with connectors, a job design converts everything to code and creates a complete runnable program which forms the data flow.
Creating a Job
In the repository window, right click the Job Design and click Create Job.

Provide the name, purpose and description of the job and click Finish.

You can see your job has been created under Job Design.

Now, let us use this job to add components, connect and configure them. Here, we will take an excel file as an input and produce an excel file as an output with same data.
Adding Components to a Job
There are several components in the palette to choose. There is a search option also, in which you can enter the name of the component to select it.

Since, here we are taking an excel file as an input, we will drag and drop tFileInputExcel component from the palette to the Designer window.

Now if you click anywhere on the designer window, a search box will appear. Find tLogRow and select it to bring it in the designer window.

Finally, select tFileOutputExcel component from the palette and drag drop it in designer window.

Now, the adding of the components is done.

Connecting the Components
After adding components, you must connect them. Right click the first component tFileInputExcel and draw a Main line to tLogRow as shown below.

Similarly, right click tLogRow and draw a Main line on tFileOutputExcel. Now, your components are connected.


Configuring the components
After adding and connecting the components in the job, you need to configure them. For this, double click the first component tFileInputExcel to configure it. Give the path of your input file in File name/stream as shown below.
If your 1st row in the excel is having the column names, put 1 in the Header option.

Click Edit schema and add the columns and its type according to your input excel file. Click Ok after adding the schema.

Click Yes.

In tLogRow component, click on sync columns and select the mode in which you want to generate the rows from your input. Here we have selected Basic mode with “,” as field separator.

Finally, in tFileOutputExcel component, give the path of file name where you want to store

your output excel file with the sheet name. Click on sync columns.
Executing the Job
Once you are done with adding, connecting and configuring your components, you are ready to execute your Talend job. Click Run button to begin the execution.


You will see the output in the basic mode with “,” separator.

You can also see that your output is saved as an excel at the output path you mentioned.

Talend - Metadata
Metadata basically means data about data. It tells about what, when, why, who, where, which, and how of data. In Talend, metadata has the entire information about the data which is present in Talend studio. The metadata option is present inside the Repository pane of Talend Open Studio.
Various sources like DB Connections, different kind of files, LDAP, Azure, Salesforce, Web Services FTP, Hadoop Cluster and many more options are present under Talend Metadata.
The main use of metadata in Talend Open Studio is that you can use these data sources in several jobs just by a simple drag and drop from the Metadata in repository panel.

Talend - Context Variables
Context variables are the variables which can have different values in different environments. You can create a context group which can hold multiple context variables. You need not add each context variable one by one to a job, you can simply add the context group to the job.
These variables are used to make the code production ready. Its means by using context variables, you can move the code in development, test or production environments, it will run in all the environments.
In any job, you can go to Contexts tab as shown below and add context variables.

Talend - Managing Jobs
In this chapter, let us look into managing jobs and the corresponding functionalities included in Talend.
Activating/Deactivating a Component
Activating/Deactivating a Component is very simple. You just need to select the component, right click on it, and choose the deactivate or activate that component option.

Importing/Exporting Items and Building Jobs
To export item from the job, right click on the job in the Job Designs and click Export items.


Enter the path where you want to export the item and click Finish.

To import item from the job, right click on the job in the Job Designs and click on Import items.

Browse the root directory from where you want to import the items.
Select all the checkboxes and click Finish.

Talend - Handling Job Execution
In this chapter, let us understand handling a job execution in Talend.
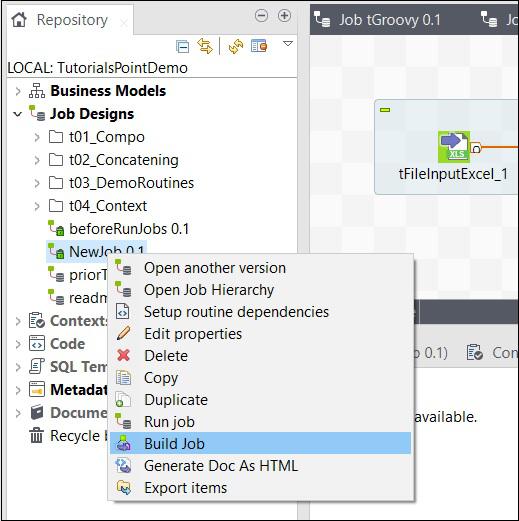
To build a job, right click the job and select Build Job option.
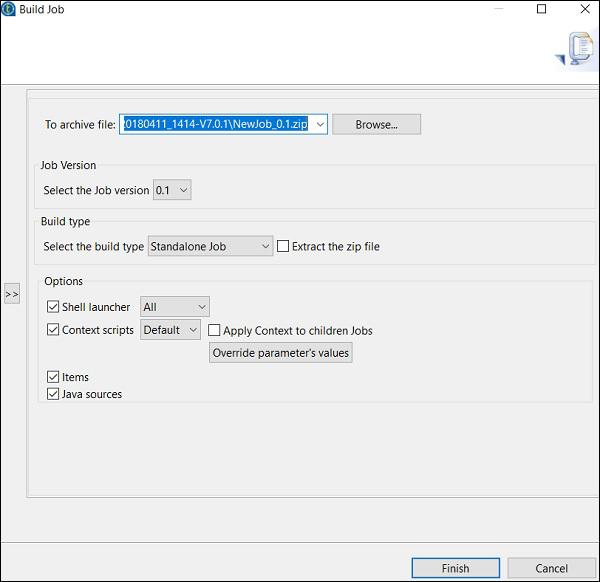
Mention the path where you want to archive the job, select job version and build type, then click Finish.
How to Run Job in Normal Mode
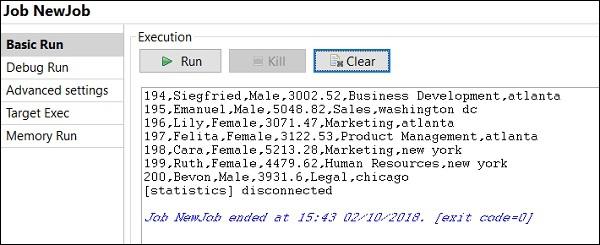
To run a job in a normal node, you need to select “Basic Run” and click the Run button for the execution to begin.
How to Run Job in Debug Mode
To run job in a debug mode, add breakpoint to the components you want to debug.
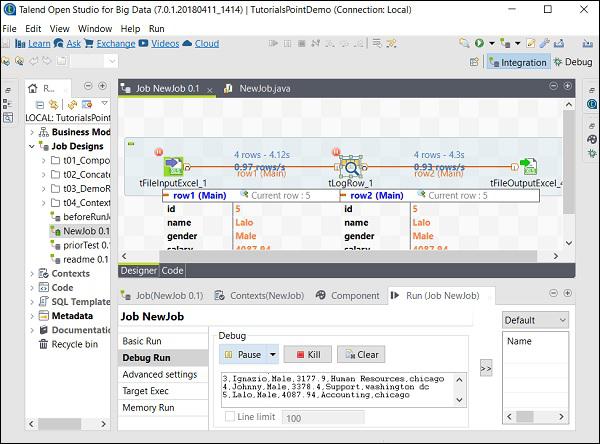
Then, select and right click on the component, click Add Breakpoint option. Observe that here we have added breakpoints to tFileInputExcel and tLogRow components. Then, go to Debug Run, and click Java Debug button.
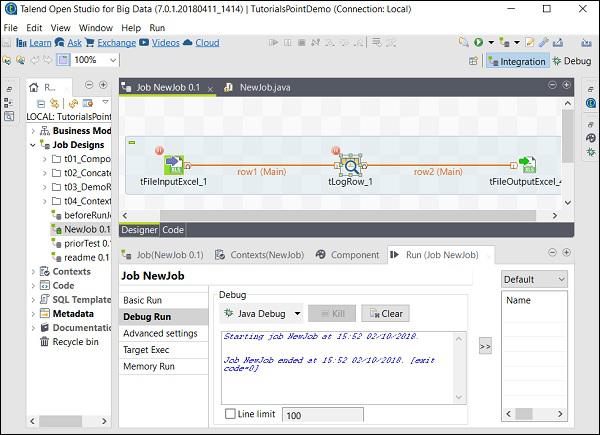
You can observe from the following screenshot that the job will now execute in debug mode and according to the breakpoints that we have mentioned.
Advanced Settings
In Advanced setting, you can select from Statistics, Exec Time, Save Job before Execution, Clear before Run and JVM settings. Each of this option has the functionality as explained here −
Statistics − It displays the performance rate of the processing;
Exec Time − The time taken to execute the job.
Save Job before Execution − Automatically saves the job before the execution begins.
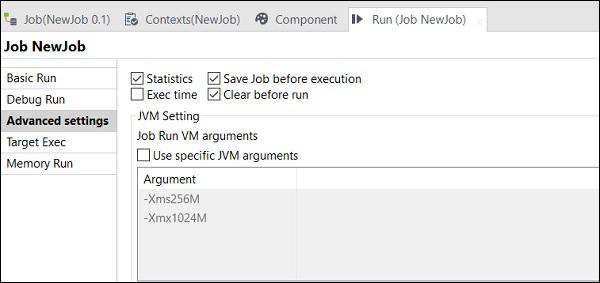
Clear before Run − Removes everything from the output console.
JVM Settings − Helps us to configure own Java arguments.
Talend - Big Data
The tag line for Open Studio with Big data is “Simplify ETL and ELT with the leading free open source ETL tool for big data.” In this chapter, let us look into the usage of Talend as a tool for processing data on big data environment.
Introduction
Talend Open Studio – Big Data is a free and open source tool for processing your data very easily on a big data environment. You have plenty of big data components available in Talend Open Studio , that lets you create and run Hadoop jobs just by simple drag and drop of few Hadoop components.
Besides, we do not need to write big lines of MapReduce codes; Talend Open Studio Big data helps you do this with the components present in it. It automatically generates MapReduce code for you, you just need to drag and drop the components and configure few parameters.
It also gives you the option to connect with several Big Data distributions like Cloudera, HortonWorks, MapR, Amazon EMR and even Apache.
Talend Components for Big Data
The list of categories with components to run a job on Big Data environment included under Big Data, is shown below −

The list of Big Data connectors and components in Talend Open Studio is shown below −
tHDFSConnection − Used for connecting to HDFS (Hadoop Distributed File System).
tHDFSInput − Reads the data from given hdfs path, puts it into talend schema and then passes it to the next component in the job.
tHDFSList − Retrieves all the files and folders in the given hdfs path.
tHDFSPut − Copies file/folder from local file system (user-defined) to hdfs at the given path.
tHDFSGet − Copies file/folder from hdfs to local file system (user-defined) at the given path.
tHDFSDelete − Deletes the file from HDFS
tHDFSExist − Checks whether a file is present on HDFS or not.
tHDFSOutput − Writes data flows on HDFS.
tCassandraConnection − Opens the connection to Cassandra server.
tCassandraRow − Runs CQL (Cassandra query language) queries on the specified database.
tHBaseConnection − Opens the connection to HBase Database.
tHBaseInput − reads data from HBase database.
tHiveConnection − Opens the connection to Hive database.
tHiveCreateTable − Creates a table inside a hive database.
tHiveInput − Reads data from hive database.
tHiveLoad − Writes data to hive table or a specified directory.
tHiveRow − runs HiveQL queries on the specified database.
tPigLoad − Loads input data to output stream.
tPigMap − Used for transforming and routing the data in a pig process.
tPigJoin − Performs join operation of 2 files based on join keys.
tPigCoGroup − Groups and aggregates the data coming from multiple inputs.
tPigSort − Sorts the given data based on one or more defined sort keys.
tPigStoreResult − Stores the result from pig operation at a defined storage space.
tPigFilterRow − Filters the specified columns in order to split the data based on the given condition.
tPigDistinct − Removes the duplicate tuples from the relation.
tSqoopImport − Transfers data from relational database like MySQL, Oracle DB to HDFS.
tSqoopExport − Transfers data from HDFS to relational database like MySQL, Oracle DB
Talend - Hadoop Distributed File System
In this chapter, let us learn in detail about how Talend works with Hadoop distributed file system.
Settings and Pre-requisites
Before we proceed into Talend with HDFS, we should learn about settings and pre-requisites that should be met for this purpose.
Here we are running Cloudera quickstart 5.10 VM on virtual box. A Host-Only Network must be used in this VM.
Host-Only Network IP: 192.168.56.101

You must have the same host running on cloudera manager also.

Now on your windows system, go to c:\Windows\System32\Drivers\etc\hosts and edit this file using Notepad as shown below.

Similarly, on your cloudera quickstart VM, edit your /etc/hosts file as shown below.
sudo gedit /etc/hosts

Setting Up Hadoop Connection
In the repository panel, go to Metadata. Right click Hadoop Cluster and create a new cluster. Give the name, purpose and description for this Hadoop cluster connection.
Click Next.

Select the distribution as cloudera and choose the version which you are using. Select the retrieve configuration option and click Next.

Enter the manager credentials (URI with port, username, password) as shown below and click Connect. If the details are correct, you will get Cloudera QuickStart under discovered clusters.

Click Fetch. This will fetch all the connections and configurations for HDFS, YARN, HBASE, HIVE.
Select All and click Finish.

Note that all the connection parameters will be auto-filled. Mention cloudera in the username and click Finish.

With this, you have successfully connected to a Hadoop Cluster.

Connecting to HDFS
In this job, we will list all the directories and files which are present on HDFS.
Firstly, we will create a job and then add HDFS components to it. Right click on the Job Design and create a new job – hadoopjob.
Now add 2 components from the palette – tHDFSConnection and tHDFSList. Right click tHDFSConnection and connect these 2 components using ‘OnSubJobOk’ trigger.
Now, configure both the talend hdfs components.

In tHDFSConnection, choose Repository as the Property Type and select the Hadoop cloudera cluster which you created earlier. It will auto-fill all the necessary details required for this component.

In tHDFSList, select “Use an existing connection” and in the component list choose the tHDFSConnection which you configured.
Give the home path of HDFS in HDFS Directory option and click the browse button on the right.

If you have established the connection properly with the above-mentioned configurations, you will see a window as shown below. It will list all the directories and files present on HDFS home.

You can verify this by checking your HDFS on cloudera.

Reading file from HDFS
In this section, let us understand how to read a file from HDFS in Talend. You can create a new job for this purpose, however here we are using the existing one.
Drag and Drop 3 components – tHDFSConnection, tHDFSInput and tLogRow from the palette to designer window.
Right click tHDFSConnection and connect tHDFSInput component using ‘OnSubJobOk’ trigger.
Right click tHDFSInput and drag a main link to tLogRow.

Note that tHDFSConnection will have the similar configuration as earlier. In tHDFSInput, select “Use an existing connection” and from the component list, choose tHDFSConnection.
In the File Name, give the HDFS path of the file you want to read. Here we are reading a simple text file, so our File Type is Text File. Similarly, depending on your input, fill the row separator, field separator and header details as mentioned below. Finally, click the Edit schema button.

Since our file is just having plain text, we are adding just one column of type String. Now, click Ok.
Note − When your input is having multiple columns of different types, you need to mention the schema here accordingly.

In tLogRow component, click Sync columns in edit schema.
Select the mode in which you want your output to be printed.

Finally, click Run to execute the job.
Once you were successful in reading a HDFS file, you can see the following output.

Writing File to HDFS
Let’s see how to write a file from HDFS in Talend. Drag and Drop 3 components – tHDFSConnection, tFileInputDelimited and tHDFSOutput from the palette to designer window.
Right click on tHDFSConnection and connect tFileInputDelimited component using ‘OnSubJobOk’ trigger.
Right click on tFileInputDelimited and drag a main link to tHDFSOutput.

Note that tHDFSConnection will have the similar configuration as earlier.
Now, in tFileInputDelimited, give the path of input file in File name/Stream option. Here we are using a csv file as an input, hence the field separator is “,”.
Select the header, footer, limit according to your input file. Note that here our header is 1 because the 1 row contains the column names and limit is 3 because we are writing only first 3 rows to HDFS.
Now, click edit schema.

Now, as per our input file, define the schema. Our input file has 3 columns as mentioned below.

In tHDFSOutput component, click sync columns. Then, select tHDFSConnection in Use an existing connection. Also, in File name, give a HDFS path where you want to write your file.
Note that file type will be text file, Action will be “create”, Row separator will be “\n” and field separator is “;”

Finally, click Run to execute your job. Once the job has executed successfully, check if your file is there on HDFS.

Run the following hdfs command with the output path you had mentioned in your job.
hdfs dfs -cat /input/talendwrite
You will see the following output if you are successful in writing on HDFS.

Talend - Map Reduce
In the previous chapter, we have seen how to Talend works with Big Data. In this chapter, let us understand how to use map Reduce with Talend.
Creating a Talend MapReduce Job
Let us learn how to run a MapReduce job on Talend. Here we will run a MapReduce word count example.
For this purpose, right click Job Design and create a new job – MapreduceJob. Mention the details of the job and click Finish.

Adding Components to MapReduce Job
To add components to a MapReduce job, drag and drop five components of Talend – tHDFSInput, tNormalize, tAggregateRow, tMap, tOutput from the pallet to designer window. Right click on tHDFSInput and create main link to tNormalize.
Right click tNormalize and create main link to tAggregateRow. Then, right click on tAggregateRow and create main link to tMap. Now, right click on tMap and create main link to tHDFSOutput.

Configuring Components and Transformations
In tHDFSInput, select the distribution cloudera and its version. Note that Namenode URI should be “hdfs://quickstart.cloudera:8020” and username should be “cloudera”. In the file name option, give the path of your input file to the MapReduce job. Ensure that this input file is present on HDFS.
Now, select file type, row separator, files separator and header according to your input file.

Click edit schema and add the field “line” as string type.

In tNomalize, the column to normalize will be line and Item separator will be whitespace -> “ “. Now, click edit schema. tNormalize will have line column and tAggregateRow will have 2 columns word and wordcount as shown below.


In tAggregateRow, put word as output column in Group by option. In operations, put wordcount as output column, function as count and Input column position as line.

Now double click tMap component to enter the map editor and map the input with required output. In this example, word is mapped with word and wordcount is mapped with wordcount. In the expression column, click on […] to enter the expression builder.
Now, select StringHandling from category list and UPCASE function. Edit the expression to “StringHandling.UPCASE(row3.word)” and click Ok. Keep row3.wordcount in expression column corresponding to wordcount as shown below.

In tHDFSOutput, connect to the Hadoop cluster we created from property type as repository. Observe that fields will get auto-populated. In File name, give the output path where you want to store the output. Keep the Action, row separator and field separator as shown below.

Executing the MapReduce Job
Once your configuration is successfully completed, click Run and execute your MapReduce job.

Go to your HDFS path and check the output. Note that all the words will be in uppercase with their wordcount.

Talend - Working with Pig
In this chapter, let us learn how to work with a Pig job in Talend.
Creating a Talend Pig Job
In this section, let us learn how to run a Pig job on Talend. Here, we will process NYSE data to find out average stock volume of IBM.
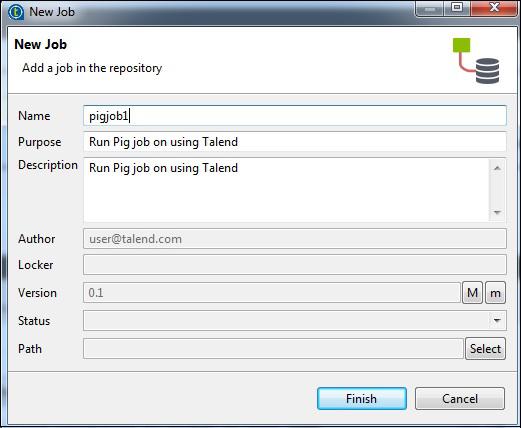
For this, right click Job Design and create a new job – pigjob. Mention the details of the job and click Finish.
Adding Components to Pig Job
To add components to Pig job, drag and drop four Talend components: tPigLoad, tPigFilterRow, tPigAggregate, tPigStoreResult, from the pallet to designer window.
Then, right click tPigLoad and create Pig Combine line to tPigFilterRow. Next, right click tPigFilterRow and create Pig Combine line to tPigAggregate. Right click tPigAggregate and create Pig combine line to tPigStoreResult.

Configuring Components and Transformations
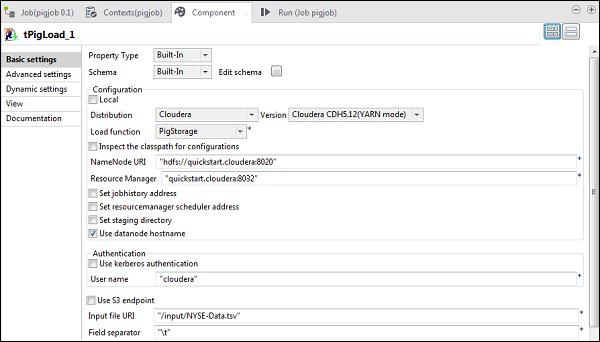
In tPigLoad, mention the distribution as cloudera and the version of cloudera. Note that Namenode URI should be “hdfs://quickstart.cloudera:8020” and Resource Manager should be “quickstart.cloudera:8020”. Also, the username should be “cloudera”.
In the Input file URI, give the path of your NYSE input file to the pig job. Note that this input file should be present on HDFS.
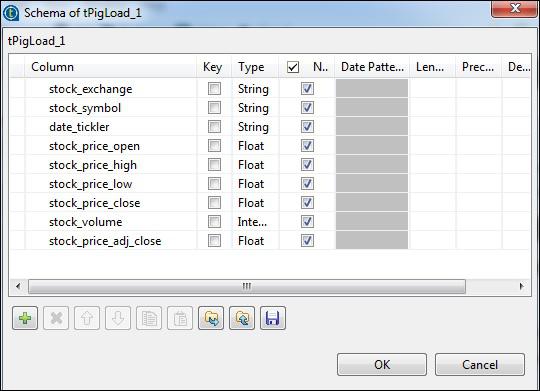
Click edit schema, add the columns and its type as shown below.
In tPigFilterRow, select the “Use advanced filter” option and put “stock_symbol = = ‘IBM’” in the Filter option.

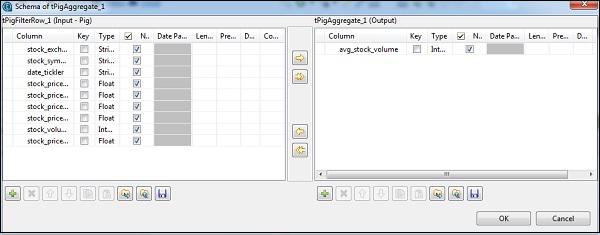
In tAggregateRow, click edit schema and add avg_stock_volume column in output as shown below.
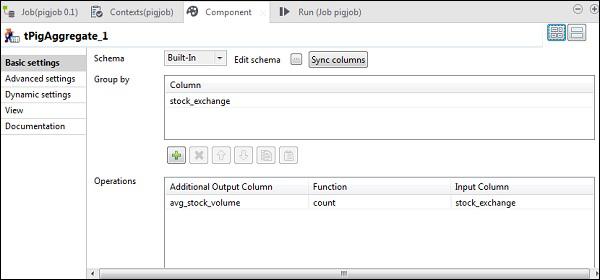
Now, put stock_exchange column in Group by option. Add avg_stock_volume column in Operations field with count Function and stock_exchange as Input Column.
In tPigStoreResult, give the output path in Result Folder URI where you want to store the result of Pig job. Select store function as PigStorage and field separator (not mandatory) as “\t”.

Executing the Pig Job
Now click on Run to execute your Pig job. (Ignore the warnings)
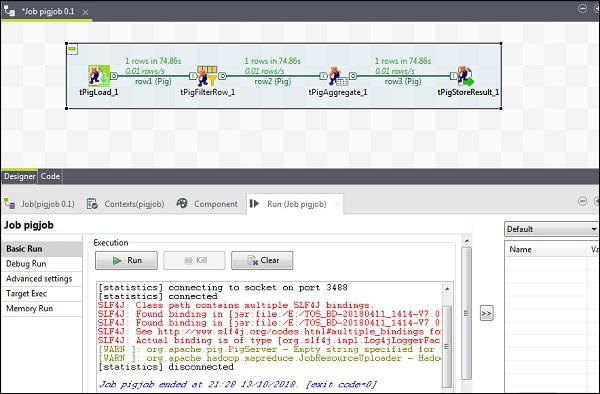
Once the job finishes, go and the check your output at the HDFS path you mentioned for storing the pig job result. The average stock volume of IBM is 500.

Talend - Hive
In this chapter, let us understand how to work with Hive job on Talend.
Creating a Talend Hive Job
As an example, we will load NYSE data to a hive table and run a basic hive query. Right click on Job Design and create a new job – hivejob. Mention the details of the job and click on Finish.

Adding Components to Hive Job
To ass components to a Hive job, drag and drop five talend components − tHiveConnection, tHiveCreateTable, tHiveLoad, tHiveInput and tLogRow from the pallet to designer window. Then, right click tHiveConnection and create OnSubjobOk trigger to tHiveCreateTable. Now, right click tHiveCreateTable and create OnSubjobOk trigger to tHiveLoad. Right click tHiveLoad and create iterate trigger on tHiveInput. Finally, right click tHiveInput and create a main line to tLogRow.

Configuring Components and Transformations
In tHiveConnection, select distribution as cloudera and its version you are using. Note that connection mode will be standalone and Hive Service will be Hive 2. Also check if the following parameters are set accordingly −
- Host: “quickstart.cloudera”
- Port: “10000”
- Database: “default”
- Username: “hive”
Note that password will be auto-filled, you need not edit it. Also other Hadoop properties will be preset and set by default.

In tHiveCreateTable, select Use an existing connection and put tHiveConnection in Component list. Give the Table Name which you want to create in default database. Keep the other parameters as shown below.

In tHiveLoad, select “Use an existing connection” and put tHiveConnection in component list. Select LOAD in Load action. In File Path, give the HDFS path of your NYSE input file. Mention the table in Table Name, in which you want to load the input. Keep the other parameters as shown below.

In tHiveInput, select Use an existing connection and put tHiveConnection in Component list. Click edit schema, add the columns and its type as shown in schema snapshot below. Now give the table name which you created in tHiveCreateTable.
Put your query in query option which you want to run on the Hive table. Here we are printing all the columns of first 10 rows in the test hive table.


In tLogRow, click sync columns and select Table mode for showing the output.

Executing the Hive Job
Click on Run to begin the execution. If all the connection and the parameters were set correctly, you will see the output of your query as shown below.


