SharePoint - Apps
In this chapter, we will be covering SharePoint Apps. The app model is a new development deployment and hosting model for extensions to SharePoint. As a developer in SharePoint 2013, we have the option of using the solutions model, either farm or sandbox solutions, or using the app model.
Microsoft documentation and guidance suggests that you favor the app model over the solutions model and that might be very valid guidance. However, you have to consider that the app model, which is a significant addition to SharePoint 2013, while the solutions model has been around since SharePoint 2007.
Therefore, the knowledge base for development with the solutions model is significantly better than the current state of the knowledge base for developing apps.
Apps have not been around long enough for people to share their real world experiences using it. I think it is very important that you learn the app model and its strengths and weaknesses.
App Characteristics
App characteristics are given below −
The first and probably the most important, from the developer viewpoint, is that all the codes in an app are executed outside of the SharePoint server. This means that the code is either JavaScript running in the users’ browser or it is the code that is running on some external server.
Since all the code is running outside of SharePoint, communication with SharePoint is done via web services, which means you are using the Client Object Model or the REST API.
There are no circumstances where you can use the Server Object Model in a SharePoint app.
Once you are finished building your app, you are either going to put it in the public app store or local app catalog. This requires a review process and there are some rules, which you need to follow to make your app eligible to go in the public app store.
The other option is to put your app in a local app catalog, which is just a site collection, within your web application, that has been configured by central administration to be the app catalog.
Once your app has been deployed to the store of the catalog, users with site collection owner permission can install it in SharePoint sites.
App Types
There are different types of apps that you can build, which are as follows −
SharePoint-Hosted App
The first is the SharePoint-Hosted App. As the name suggests, this kind of app is hosted in your SharePoint farm.
Important features are −
It is hosted in a child site of the site where it is installed and this child site behaves for the most part, like other sites.
It can contain lists, libraries, pages, content types, and so on.
The basics of building a SharePoint-Hosted App are similar to the basics of building a SharePoint Solution.
We have a feature.
We can add elements to that feature and those elements are defined using CAML.
For many of the elements we have designers in Visual Studio.
We can add site pages.
We can add server controls to those site pages.
We cannot add code behind to those site pages, but we can add JavaScript code.
Now once you get beyond the basics, things start to get less and less similar.
Cloud-Hosted Apps
The other two types of apps, Provider-Hosted and Auto-Hosted, are categorized together as Cloud-Hosted Apps. Important features are −
These apps live in a site external to SharePoint.
The big difference between Provider-Hosted and Auto-Hosted is who is going to create and manage this external site −
In a Provider-Hosted App, that is you or your organization.
In an Auto-Hosted App, that is Microsoft.
Building a Cloud-Hosted App is the same as building any other website.
If you are a .NET developer, you are probably using MVC or Web Forms. However, you are not limited to those technologies. You can build a Cloud-Hosted App with whatever web technology you want. When you are finished building your app, in the Provider-Hosted scenario, you will deploy the app up to your site the way you would do for any other website.
In the Auto-Hosted scenario, you use Visual Studio to create an app package. It is an app equivalent to a solution package and then you can upload that to SharePoint Online and a site. If necessary, a database will be provisioned for you to host your app.
Auto-Hosted Apps can only be used with SharePoint Online, they are not supported with an on-premises farm.
Here is the same example, which we already covered in App Model chapter.
Let us look at a simple example of SharePoint-hosted application by opening Visual Studio and select File → New → Project menu option.
Step 1 − Open Visual Studio and select the File → New → Project menu.

Step 2 − In the left pane select Templates → Visual C# → Office/SharePoint and then in the middle pane select App for SharePoint.
Enter the Name in the Name field, Click OK and you will see the following dialog box.

In the New App for SharePoint, we need to add the SharePoint site URL that we want to debug and then select the SharePoint-hosted model as the way you want to host your app for SharePoint.
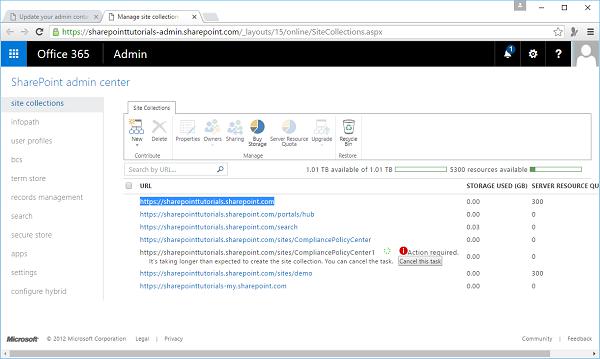
Step 3 − Go to the SharePoint admin center and copy the SharePoint URL.

Step 4 − Paste the URL in the New App for SharePoint dialog box as shown below.

Step 5 − Click Next and it will open the Connect to SharePoint dialog box where we need to login.

Step 6 − Enter your credentials and click the Sign in button. Once you are successfully logged in to the SharePoint site, you will see the following dialog box −

Step 7 − Click Finish. Once the project is created, click the AppMenifest.xml file in the Solution Explorer.

Step 8 − Click the Permissions tab. A Scope dropdown list will open.

Step 9 − In the Scope dropdown list, select Web, which is the scope of permissions that you are configuring. In the Permission drop-down list, select Read, which is the type of permission you are configuring.

Step 10 − Open the Default.aspx file and replace it with the following code.
<%-- The following 4 lines are ASP.NET directives needed when
   using SharePoint components --%>

<%@ Page Inherits = "Microsoft.SharePoint.WebPartPages.WebPartPage,
   Microsoft.SharePoint, Version = 15.0.0.0, Culture = neutral,
   PublicKeyToken = 71e9bce111e9429c" MasterPageFile = "~masterurl/default.master"
   Language = "C#" %>

<%@ Register TagPrefix = "Utilities" Namespace = "Microsoft.SharePoint.Utilities"
   Assembly = "Microsoft.SharePoint, Version = 15.0.0.0, Culture = neutral,
   PublicKeyToken = 71e9bce111e9429c" %>

<%@ Register TagPrefix = "WebPartPages"
   Namespace = "Microsoft.SharePoint.WebPartPages" Assembly = "Microsoft.SharePoint,
   Version = 15.0.0.0, Culture = neutral, PublicKeyToken = 71e9bce111e9429c" %>

<%@ Register TagPrefix = "SharePoint"
   Namespace = "Microsoft.SharePoint.WebControls" Assembly = "Microsoft.SharePoint,
   Version = 15.0.0.0, Culture = neutral, PublicKeyToken = 71e9bce111e9429c" %>

<%-- The markup and script in the following Content element
   will be placed in the <head> of the page --%>

<asp:Content ID = "Content1" ContentPlaceHolderID = "PlaceHolderAdditionalPageHead"
   runat = "server">
   <script type = "text/javascript" src = "../Scripts/jquery- 1.6.2.min.js"></script>
   <link rel = "Stylesheet" type = "text/css" href = "../Content/App.css" />
   <script type = "text/javascript" src = "../Scripts/App.js"></script>
</asp:Content>

<asp:Content ID = "Content2" ContentPlaceHolderID = "PlaceHolderMain"
   runat = "server">
   <script type = "text/javascript">
      function hello() {
         var currentTime = new Date();
         $get("timeDiv").innerHTML = currentTime.toDateString();
      }
   </script>
   <div id = "timeDiv"></div>
   <input type = "button" value = "Push me!" onclick = "hello();" />
</asp:Content>
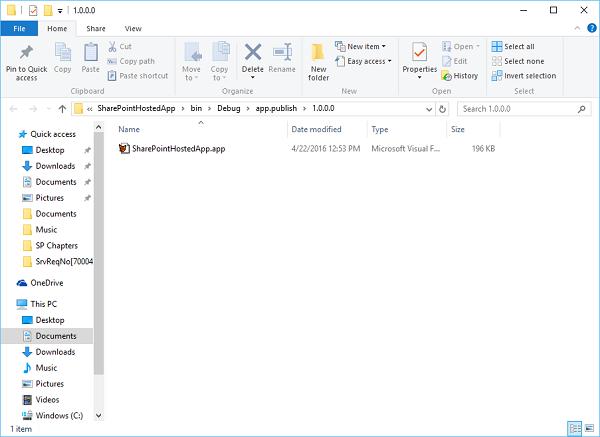
Step 11 − Go to the Solution explorer, right-click the project and select Publish. Click the Package the app button. This builds your SharePoint-hosted app and prepares it for you for deployment to your SharePoint site.

You will see the following folder, which contains the *.app file.

Step 12 − Navigate to your SharePoint online site.

Step 13 − Click Apps for SharePoint in the left pane. A new page will open.

Step 14 − Drag your files here to upload.

Once the file is uploaded, you will see the following page −

Step 15 − Click the option - Site Contents in the left pane. Click the add an app icon as shown in the following screen shot −

A new page will open.
Step 16 − Select Your Apps → From Your Organization in the left pane and you will see that the app is available for installation. Click the app.

Step 17 − When you click the app, a dialog box opens as shown in the following screen shot. Click Trust it.

Step 18 − You will see that the app is installed. Once the installation is complete, you can click the app.

You will see the following page, which contains one button −

When you click the Push me button, it will display the current date.

Autohosted
Let us have a look at a simple example of Autohosted by creating a new project.
Step 1 − Select App for SharePoint 2013 and click OK.

Step 2 − Select Autohosted.

Step 3 − Select ASP.NET MVC Web Application and click Finish.

Once the project is created, publish your app. The rest of the steps are the same as given for the SharePoint-hosted option.


