Selenium - Webdriver
WebDriver is a tool for automating testing web applications. It is popularly known as Selenium 2.0. WebDriver uses a different underlying framework, while Selenium RC uses JavaScript Selenium-Core embedded within the browser which has got some limitations. WebDriver interacts directly with the browser without any intermediary, unlike Selenium RC that depends on a server. It is used in the following context −
Multi-browser testing including improved functionality for browsers which is not well-supported by Selenium RC (Selenium 1.0).
Handling multiple frames, multiple browser windows, popups, and alerts.
Complex page navigation.
Advanced user navigation such as drag-and-drop.
AJAX-based UI elements.
Architecture
WebDriver is best explained with a simple architecture diagram as shown below.

Selenium RC Vs WebDriver
| Selenium RC |
Selenium WebDriver |
| The architecture of Selenium RC is complicated, as the server needs to be up and running before starting a test. |
WebDriver's architecture is simpler than Selenium RC, as it controls the browser from the OS level. |
| Selenium server acts as a middleman between the browser and Selenese commands. |
WebDriver interacts directly with the browser and uses the browser's engine to control it. |
| Selenium RC script execution is slower, since it uses a Javascript to interact with RC. |
WebDriver is faster, as it interacts directly with the browser. |
| Selenium RC cannot support headless execution as it needs a real browser to work with. |
WebDriver can support the headless execution. |
| It's a simple and small API. |
Complex and a bit large API as compared to RC. |
| Less object-oriented API. |
Purely object oriented API. |
| Cannot test mobile Applications. |
Can test iPhone/Android applications. |
Scripting using WebDriver
Let us understand how to work with WebDriver. For demonstration, we would use https://www.calculator.net/. We will perform a "Percent Calculator" which is located under "Math Calculator". We have already downloaded the required WebDriver JAR's. Refer the chapter "Environmental Setup" for details.
Step 1 − Launch "Eclipse" from the Extracted Eclipse folder.

Step 2 − Select the Workspace by clicking the 'Browse' button.

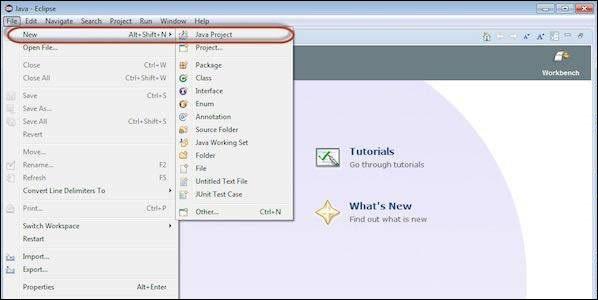
Step 3 − Now create a 'New Project' from 'File' menu.
Step 4 − Enter the Project Name and Click 'Next'.

Step 5 − Go to Libraries Tab and select all the JAR's that we have downloaded. Add reference to all the JAR's of Selenium WebDriver Library folder and also selenium-java-2.42.2.jar and selenium-java-2.42.2-srcs.jar.

Step 6 − The Package is created as shown below.

Step 7 − Now right-click on the package and select 'New' >> 'Class' to create a 'class'.

Step 8 − Now name the class and make it the main function.

Step 9 − The class outline is shown as below.

Step 10 − Now it is time to code. The following script is easier to understand, as it has comments embedded in it to explain the steps clearly. Please take a look at the chapter "Locators" to understand how to capture object properties.
import java.util.concurrent.TimeUnit;

import org.openqa.selenium.*;
import org.openqa.selenium.firefox.FirefoxDriver;

public class webdriverdemo {
   public static void main(String[] args) {

      WebDriver driver = new FirefoxDriver();
      //Puts an Implicit wait, Will wait for 10 seconds before throwing exception
      driver.manage().timeouts().implicitlyWait(10, TimeUnit.SECONDS);

      //Launch website
      driver.navigate().to("http://www.calculator.net/");

      //Maximize the browser
      driver.manage().window().maximize();

      // Click on Math Calculators
      driver.findElement(By.xpath(".//*[@id = 'menu']/div[3]/a")).click();

      // Click on Percent Calculators
      driver.findElement(By.xpath(".//*[@id = 'menu']/div[4]/div[3]/a")).click();

      // Enter value 10 in the first number of the percent Calculator
      driver.findElement(By.id("cpar1")).sendKeys("10");

      // Enter value 50 in the second number of the percent Calculator
      driver.findElement(By.id("cpar2")).sendKeys("50");

      // Click Calculate Button
      driver.findElement(By.xpath(".//*[@id = 'content']/table/tbody/tr[2]/td/input[2]")).click();


      // Get the Result Text based on its xpath
      String result =
         driver.findElement(By.xpath(".//*[@id = 'content']/p[2]/font/b")).getText();


      // Print a Log In message to the screen
      System.out.println(" The Result is " + result);

      //Close the Browser.
      driver.close();
   }
}
Step 11 − The output of the above script would be printed in Console.

Most Used Commands
The following table lists some of the most frequently used commands in WebDriver along with their syntax.
| Sr.No. |
Command & Description |
| 1 |
driver.get("URL")
To navigate to an application. |
| 2 |
element.sendKeys("inputtext")
Enter some text into an input box. |
| 3 |
element.clear()
Clear the contents from the input box. |
| 4 |
select.deselectAll()
Deselect all OPTIONs from the first SELECT on the page. |
| 5 |
select.selectByVisibleText("some text")
Select the OPTION with the input specified by the user. |
| 6 |
driver.switchTo().window("windowName")
Move the focus from one window to another. |
| 7 |
driver.switchTo().frame("frameName")
Swing from frame to frame. |
| 8 |
driver.switchTo().alert()
Helps in handling alerts. |
| 9 |
driver.navigate().to("URL")
Navigate to the URL. |
| 10 |
driver.navigate().forward()
To navigate forward. |
| 11 |
driver.navigate().back()
To navigate back. |
| 12 |
driver.close()
Closes the current browser associated with the driver. |
| 13 |
driver.quit()
Quits the driver and closes all the associated window of that driver. |
| 14 |
driver.refresh()
Refreshes the current page. |