Redux - Quick Guide
Redux - Overview
Redux is a predictable state container for JavaScript apps. As the application grows, it becomes difficult to keep it organized and maintain data flow. Redux solves this problem by managing application’s state with a single global object called Store. Redux fundamental principles help in maintaining consistency throughout your application, which makes debugging and testing easier.
More importantly, it gives you live code editing combined with a time-travelling debugger. It is flexible to go with any view layer such as React, Angular, Vue, etc.
Principles of Redux
Predictability of Redux is determined by three most important principles as given below −
Single Source of Truth
The state of your whole application is stored in an object tree within a single store. As whole application state is stored in a single tree, it makes debugging easy, and development faster.
State is Read-only
The only way to change the state is to emit an action, an object describing what happened. This means nobody can directly change the state of your application.
Changes are made with pure functions
To specify how the state tree is transformed by actions, you write pure reducers. A reducer is a central place where state modification takes place. Reducer is a function which takes state and action as arguments, and returns a newly updated state.
Redux - Installation
Before installing Redux, we have to install Nodejs and NPM. Below are the instructions that will help you install it. You can skip these steps if you already have Nodejs and NPM installed in your device.
Visit https://nodejs.org/ and install the package file.
Run the installer, follow the instructions and accept the license agreement.
Restart your device to run it.
You can check successful installation by opening the command prompt and type node -v. This will show you the latest version of Node in your system.
To check if npm is installed successfully, you can type npm –v which returns you the latest npm version.
To install redux, you can follow the below steps −
Run the following command in your command prompt to install Redux.
npm install --save redux
To use Redux with react application, you need to install an additional dependency as follows −
npm install --save react-redux
To install developer tools for Redux, you need to install the following as dependency −
Run the below command in your command prompt to install Redux dev-tools.
npm install --save-dev redux-devtools
If you do not want to install Redux dev tools and integrate it into your project, you can install Redux DevTools Extension for Chrome and Firefox.
Redux - Core Concepts
Let us assume our application’s state is described by a plain object called initialState which is as follows −
const initialState = {
   isLoading: false,
   items: [],
   hasError: false
};
Every piece of code in your application cannot change this state. To change the state, you need to dispatch an action.
What is an action?
An action is a plain object that describes the intention to cause change with a type property. It must have a type property which tells what type of action is being performed. The command for action is as follows −
return {
   type: 'ITEMS_REQUEST', //action type
   isLoading: true //payload information
}
Actions and states are held together by a function called Reducer. An action is dispatched with an intention to cause change. This change is performed by the reducer. Reducer is the only way to change states in Redux, making it more predictable, centralised and debuggable. A reducer function that handles the ‘ITEMS_REQUEST’ action is as follows −
const reducer = (state = initialState, action) => { //es6 arrow function
   switch (action.type) {
      case 'ITEMS_REQUEST':
         return Object.assign({}, state, {
            isLoading: action.isLoading
         })
      default:
         return state;
   }
}
Redux has a single store which holds the application state. If you want to split your code on the basis of data handling logic, you should start splitting your reducers instead of stores in Redux.
We will discuss how we can split reducers and combine it with store later in this tutorial.
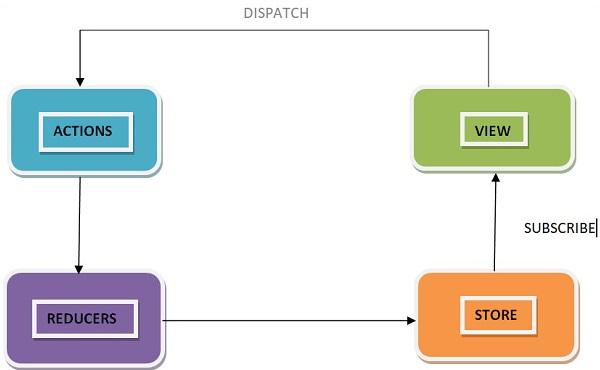
Redux components are as follows −
Redux - Data Flow
Redux follows the unidirectional data flow. It means that your application data will follow in one-way binding data flow. As the application grows & becomes complex, it is hard to reproduce issues and add new features if you have no control over the state of your application.
Redux reduces the complexity of the code, by enforcing the restriction on how and when state update can happen. This way, managing updated states is easy. We already know about the restrictions as the three principles of Redux. Following diagram will help you understand Redux data flow better −
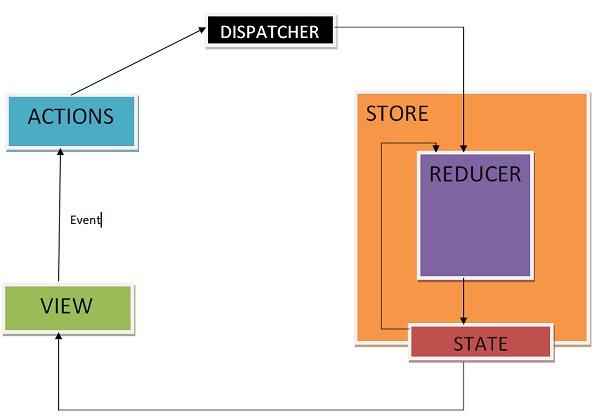
An action is dispatched when a user interacts with the application.
The root reducer function is called with the current state and the dispatched action. The root reducer may divide the task among smaller reducer functions, which ultimately returns a new state.
The store notifies the view by executing their callback functions.
The view can retrieve updated state and re-render again.
Redux - Store
A store is an immutable object tree in Redux. A store is a state container which holds the application’s state. Redux can have only a single store in your application. Whenever a store is created in Redux, you need to specify the reducer.
Let us see how we can create a store using the createStore method from Redux. One need to import the createStore package from the Redux library that supports the store creation process as shown below −
import { createStore } from 'redux';
import reducer from './reducers/reducer'
const store = createStore(reducer);
A createStore function can have three arguments. The following is the syntax −
createStore(reducer, [preloadedState], [enhancer])
A reducer is a function that returns the next state of app. A preloadedState is an optional argument and is the initial state of your app. An enhancer is also an optional argument. It will help you enhance store with third-party capabilities.
A store has three important methods as given below −
getState
It helps you retrieve the current state of your Redux store.
The syntax for getState is as follows −
store.getState()
dispatch
It allows you to dispatch an action to change a state in your application.
The syntax for dispatch is as follows −
store.dispatch({type:'ITEMS_REQUEST'})
subscribe
It helps you register a callback that Redux store will call when an action has been dispatched. As soon as the Redux state has been updated, the view will re-render automatically.
The syntax for dispatch is as follows −
store.subscribe(()=>{ console.log(store.getState());})
Note that subscribe function returns a function for unsubscribing the listener. To unsubscribe the listener, we can use the below code −
const unsubscribe = store.subscribe(()=>{console.log(store.getState());});
unsubscribe();
Redux - Actions
Actions are the only source of information for the store as per Redux official documentation. It carries a payload of information from your application to store.
As discussed earlier, actions are plain JavaScript object that must have a type attribute to indicate the type of action performed. It tells us what had happened. Types should be defined as string constants in your application as given below −
const ITEMS_REQUEST = 'ITEMS_REQUEST';
Apart from this type attribute, the structure of an action object is totally up to the developer. It is recommended to keep your action object as light as possible and pass only the necessary information.
To cause any change in the store, you need to dispatch an action first by using store.dispatch() function. The action object is as follows −
{ type: GET_ORDER_STATUS , payload: {orderId,userId } }
{ type: GET_WISHLIST_ITEMS, payload: userId }
Actions Creators
Action creators are the functions that encapsulate the process of creation of an action object. These functions simply return a plain Js object which is an action. It promotes writing clean code and helps to achieve reusability.
Let us learn about action creator which lets you dispatch an action, ‘ITEMS_REQUEST’ that requests for the product items list data from the server. Meanwhile, the isLoading state is made true in the reducer in ‘ITEMS_REQUEST’ action type to indicate that items are loading, and data is still not received from the server.
Initially, the isLoading state was false in the initialState object assuming nothing is loading. When data is received at browser, isLoading state will be returned as false in ‘ITEMS_REQUEST_SUCCESS’ action type in the corresponding reducer. This state can be used as a prop in react components to display loader/message on your page while the request for data is on. The action creator is as follows −
const ITEMS_REQUEST = ‘ITEMS_REQUEST’ ;
const ITEMS_REQUEST_SUCCESS = ‘ITEMS_REQUEST_SUCCESS’ ;
export function itemsRequest(bool,startIndex,endIndex) {
   let payload = {
      isLoading: bool,
      startIndex,
      endIndex
   }
   return {
      type: ITEMS_REQUEST,
      payload
   }
}
export function itemsRequestSuccess(bool) {
   return {
      type: ITEMS_REQUEST_SUCCESS,
      isLoading: bool,
   }
}
To invoke a dispatch function, you need to pass action as an argument to dispatch function.
dispatch(itemsRequest(true,1, 20));
dispatch(itemsRequestSuccess(false));
You can dispatch an action by directly using store.dispatch(). However, it is more likely that you access it with react-Redux helper method called connect(). You can also use bindActionCreators() method to bind many action creators with dispatch function.
Redux - Pure Functions
A function is a process which takes inputs called arguments, and produces some output known as return value. A function is called pure if it abides by the following rules −
A function returns the same result for same arguments.
Its evaluation has no side effects, i.e., it does not alter input data.
No mutation of local & global variables.
It does not depend on the external state like a global variable.
Let us take the example of a function which returns two times of the value passed as an input to the function. In general, it is written as, f(x) => x*2. If a function is called with an argument value 2, then the output would be 4, f(2) => 4.
Let us write the definition of the function in JavaScript as shown below −
const double = x => x*2; // es6 arrow function
console.log(double(2));  // 4
Here, double is a pure function.
As per the three principles in Redux, changes must be made by a pure function, i.e., reducer in Redux. Now, a question arises as to why a reducer must be a pure function.
Suppose, you want to dispatch an action whose type is 'ADD_TO_CART_SUCCESS' to add an item to your shopping cart application by clicking add to cart button.
Let us assume the reducer is adding an item to your cart as given below −
const initialState = {
   isAddedToCart: false;
}
const addToCartReducer = (state = initialState, action) => { //es6 arrow function
   switch (action.type) {
      case 'ADD_TO_CART_SUCCESS' :
         state.isAddedToCart = !state.isAddedToCart; //original object altered
         return state;
      default:
         return state;
   }
}
export default addToCartReducer ;
Let us suppose, isAddedToCart is a property on state object that allows you to decide when to disable ‘add to cart’ button for the item by returning a Boolean value ‘true or false’. This prevents user to add same product multiple times. Now, instead of returning a new object, we are mutating isAddedToCart prop on the state like above. Now if we try to add an item to cart, nothing happens. Add to cart button will not get disabled.
The reason for this behaviour is as follows −
Redux compares old and new objects by the memory location of both the objects. It expects a new object from reducer if any change has happened. And it also expects to get the old object back if no change occurs. In this case, it is the same. Due to this reason, Redux assumes that nothing has happened.
So, it is necessary for a reducer to be a pure function in Redux. The following is a way to write it without mutation −
const initialState = {
   isAddedToCart: false;
}
const addToCartReducer = (state = initialState, action) => { //es6 arrow function
   switch (action.type) {
      case 'ADD_TO_CART_SUCCESS' :
         return {
            ...state,
            isAddedToCart: !state.isAddedToCart
         }
      default:
         return state;
   }
}
export default addToCartReducer;
Redux - Reducers
Reducers are a pure function in Redux. Pure functions are predictable. Reducers are the only way to change states in Redux. It is the only place where you can write logic and calculations. Reducer function will accept the previous state of app and action being dispatched, calculate the next state and returns the new object.
The following few things should never be performed inside the reducer −
- Mutation of functions arguments
- API calls & routing logic
- Calling non-pure function e.g. Math.random()
The following is the syntax of a reducer −
(state,action) => newState
Let us continue the example of showing the list of product items on a web page, discussed in the action creators module. Let us see below how to write its reducer.
const initialState = {
   isLoading: false,
   items: []
};
const reducer = (state = initialState, action) => {
   switch (action.type) {
      case 'ITEMS_REQUEST':
         return Object.assign({}, state, {
            isLoading: action.payload.isLoading
         })
      case ‘ITEMS_REQUEST_SUCCESS':
         return Object.assign({}, state, {
            items: state.items.concat(action.items),
            isLoading: action.isLoading
         })
      default:
         return state;
   }
}
export default reducer;
Firstly, if you do not set state to ‘initialState’, Redux calls reducer with the undefined state. In this code example, concat() function of JavaScript is used in ‘ITEMS_REQUEST_SUCCESS', which does not change the existing array; instead returns a new array.
In this way, you can avoid mutation of the state. Never write directly to the state. In 'ITEMS_REQUEST', we have to set the state value from the action received.
It is already discussed that we can write our logic in reducer and can split it on the logical data basis. Let us see how we can split reducers and combine them together as root reducer when dealing with a large application.
Suppose, we want to design a web page where a user can access product order status and see wishlist information. We can separate the logic in different reducers files, and make them work independently. Let us assume that GET_ORDER_STATUS action is dispatched to get the status of order corresponding to some order id and user id.
/reducer/orderStatusReducer.js
import { GET_ORDER_STATUS } from ‘../constants/appConstant’;
export default function (state = {} , action) {
   switch(action.type) {
      case GET_ORDER_STATUS:
         return { ...state, orderStatusData: action.payload.orderStatus };
      default:
         return state;
   }
}
Similarly, assume GET_WISHLIST_ITEMS action is dispatched to get the user’s wishlist information respective of a user.
/reducer/getWishlistDataReducer.js
import { GET_WISHLIST_ITEMS } from ‘../constants/appConstant’;
export default function (state = {}, action) {
   switch(action.type) {
      case GET_WISHLIST_ITEMS:
         return { ...state, wishlistData: action.payload.wishlistData };
      default:
         return state;
   }
}
Now, we can combine both reducers by using Redux combineReducers utility. The combineReducers generate a function which returns an object whose values are different reducer functions. You can import all the reducers in index reducer file and combine them together as an object with their respective names.
/reducer/index.js
import { combineReducers } from ‘redux’;
import OrderStatusReducer from ‘./orderStatusReducer’;
import GetWishlistDataReducer from ‘./getWishlistDataReducer’;

const rootReducer = combineReducers ({
   orderStatusReducer: OrderStatusReducer,
   getWishlistDataReducer: GetWishlistDataReducer
});
export default rootReducer;
Now, you can pass this rootReducer to the createStore method as follows −
const store = createStore(rootReducer);
Redux - Middleware
Redux itself is synchronous, so how the async operations like network request work with Redux? Here middlewares come handy. As discussed earlier, reducers are the place where all the execution logic is written. Reducer has nothing to do with who performs it, how much time it is taking or logging the state of the app before and after the action is dispatched.
In this case, Redux middleware function provides a medium to interact with dispatched action before they reach the reducer. Customized middleware functions can be created by writing high order functions (a function that returns another function), which wraps around some logic. Multiple middlewares can be combined together to add new functionality, and each middleware requires no knowledge of what came before and after. You can imagine middlewares somewhere between action dispatched and reducer.
Commonly, middlewares are used to deal with asynchronous actions in your app. Redux provides with API called applyMiddleware which allows us to use custom middleware as well as Redux middlewares like redux-thunk and redux-promise. It applies middlewares to store. The syntax of using applyMiddleware API is −
applyMiddleware(...middleware)
And this can be applied to store as follows −
import { createStore, applyMiddleware } from 'redux';
import thunk from 'redux-thunk';
import rootReducer from './reducers/index';
const store = createStore(rootReducer, applyMiddleware(thunk));
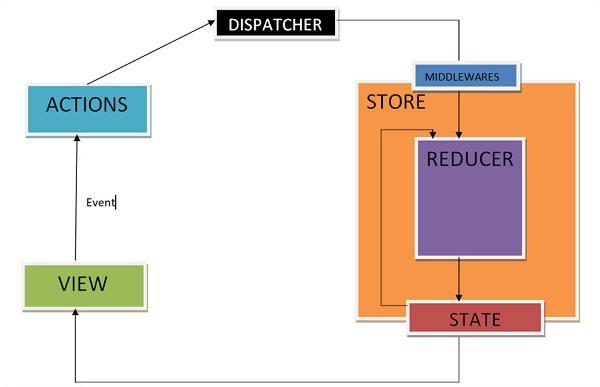
Middlewares will let you write an action dispatcher which returns a function instead of an action object. Example for the same is shown below −
function getUser() {
   return function() {
      return axios.get('/get_user_details');
   };
}
Conditional dispatch can be written inside middleware. Each middleware receives store’s dispatch so that they can dispatch new action, and getState functions as arguments so that they can access the current state and return a function. Any return value from an inner function will be available as the value of dispatch function itself.
The following is the syntax of a middleware −
({ getState, dispatch }) => next => action
The getState function is useful to decide whether new data is to be fetched or cache result should get returned, depending upon the current state.
Let us see an example of a custom middleware logger function. It simply logs the action and new state.
import { createStore, applyMiddleware } from 'redux'
import userLogin from './reducers'

function logger({ getState }) {
   return next => action => {
      console.log(‘action’, action);
      const returnVal = next(action);
      console.log('state when action is dispatched', getState());
      return returnVal;
   }
}
Now apply the logger middleware to the store by writing the following line of code −
const store = createStore(userLogin , initialState=[ ] , applyMiddleware(logger));
Dispatch an action to check the action dispatched and new state using the below code −
store.dispatch({
   type: 'ITEMS_REQUEST',
	isLoading: true
})
Another example of middleware where you can handle when to show or hide the loader is given below. This middleware shows the loader when you are requesting any resource and hides it when resource request has been completed.
import isPromise from 'is-promise';

function loaderHandler({ dispatch }) {
   return next => action => {
      if (isPromise(action)) {
         dispatch({ type: 'SHOW_LOADER' });
         action
            .then(() => dispatch({ type: 'HIDE_LOADER' }))
            .catch(() => dispatch({ type: 'HIDE_LOADER' }));
      }
      return next(action);
   };
}
const store = createStore(
   userLogin , initialState = [ ] ,
   applyMiddleware(loaderHandler)
);
Redux - Devtools
Redux-Devtools provide us debugging platform for Redux apps. It allows us to perform time-travel debugging and live editing. Some of the features in official documentation are as follows −
It lets you inspect every state and action payload.
It lets you go back in time by “cancelling” actions.
If you change the reducer code, each “staged” action will be re-evaluated.
If the reducers throw, we can identify the error and also during which action this happened.
With persistState() store enhancer, you can persist debug sessions across page reloads.
There are two variants of Redux dev-tools as given below −
Redux DevTools − It can be installed as a package and integrated into your application as given below −
https://github.com/reduxjs/redux-devtools/blob/master/docs/Walkthrough.md#manual-integration
Redux DevTools Extension − A browser extension that implements the same developer tools for Redux is as follows −
https://github.com/zalmoxisus/redux-devtools-extension
Now let us check how we can skip actions and go back in time with the help of Redux dev tool. Following screenshots explain about the actions we have dispatched earlier to get the listing of items. Here we can see the actions dispatched in the inspector tab. On the right, you can see the Demo tab which shows you the difference in the state tree.
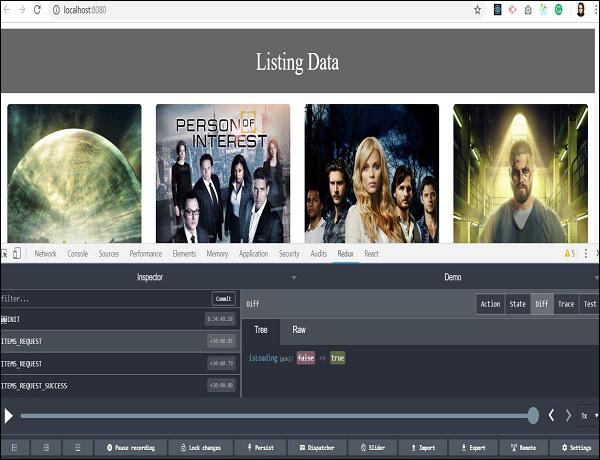
You will get familiar with this tool when you start using it. You can dispatch an action without writing the actual code just from this Redux plugin tool. A Dispatcher option in the last row will help you with this. Let us check the last action where items are fetched successfully.
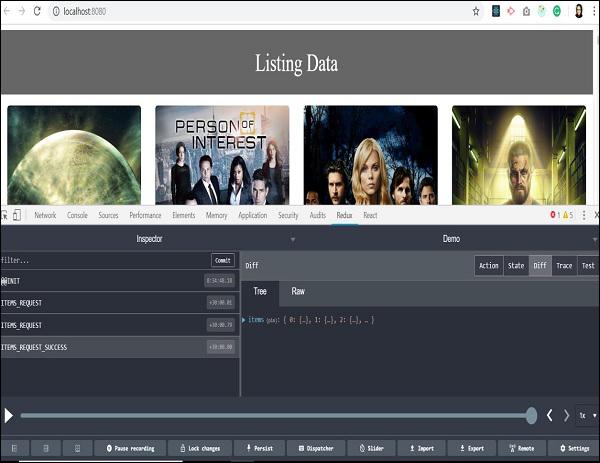
We received an array of objects as a response from the server. All the data is available to display listing on our page. You can also track the store’s state at the same time by clicking on the state tab on the upper right side.
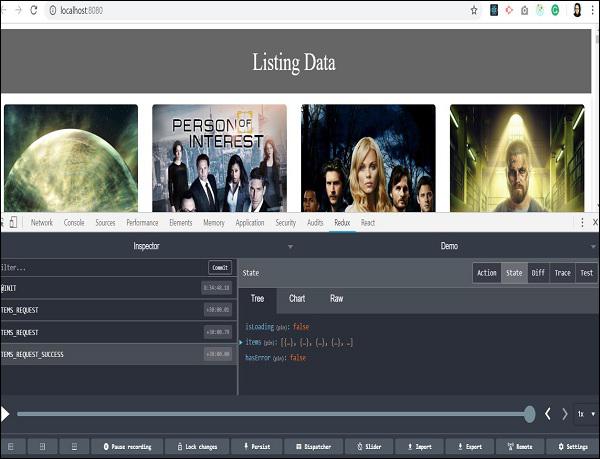
In the previous sections, we have learnt about time travel debugging. Let us now check how to skip one action and go back in time to analyze the state of our app. As you click on any action type, two options: ‘Jump’ and ‘Skip’ will appear.
By clicking on the skip button on a certain action type, you can skip particular action. It acts as if the action never happened. When you click on jump button on certain action type, it will take you to the state when that action occurred and skip all the remaining actions in sequence. This way you will be able to retain the state when a particular action happened. This feature is useful in debugging and finding errors in the application.
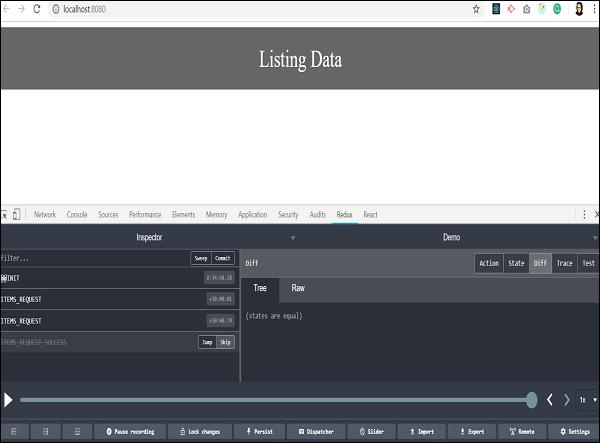
We skipped the last action, and all the listing data from background got vanished. It takes back to the time when data of the items has not arrived, and our app has no data to render on the page. It actually makes coding easy and debugging easier.
Redux - Testing
Testing Redux code is easy as we mostly write functions, and most of them are pure. So we can test it without even mocking them. Here, we are using JEST as a testing engine. It works in the node environment and does not access DOM.
We can install JEST with the code given below −
npm install --save-dev jest
With babel, you need to install babel-jest as follows −
npm install --save-dev babel-jest
And configure it to use babel-preset-env features in the .babelrc file as follows −
{
   "presets": ["@babel/preset-env"]
}
And add the following script in your package.json:
{
   //Some other code
   "scripts": {
      //code
      "test": "jest",
      "test:watch": "npm test -- --watch"
   },
   //code
}
Finally, run npm test or npm run test. Let us check how we can write test cases for action creators and reducers.
Test Cases for Action Creators
Let us assume you have action creator as shown below −
export function itemsRequestSuccess(bool) {
   return {
      type: ITEMS_REQUEST_SUCCESS,
      isLoading: bool,
   }
}
This action creator can be tested as given below −
import * as action from '../actions/actions';
import * as types from '../../constants/ActionTypes';

describe('actions', () => {
   it('should create an action to check if item is loading', () => {
      const isLoading = true,
      const expectedAction = {
         type: types.ITEMS_REQUEST_SUCCESS, isLoading
      }
      expect(actions.itemsRequestSuccess(isLoading)).toEqual(expectedAction)
   })
})
Test Cases for Reducers
We have learnt that reducer should return a new state when action is applied. So reducer is tested on this behaviour.
Consider a reducer as given below −
const initialState = {
   isLoading: false
};
const reducer = (state = initialState, action) => {
   switch (action.type) {
      case 'ITEMS_REQUEST':
         return Object.assign({}, state, {
            isLoading: action.payload.isLoading
         })
      default:
         return state;
   }
}
export default reducer;
To test above reducer, we need to pass state and action to the reducer, and return a new state as shown below −
import reducer from '../../reducer/reducer'
import * as types from '../../constants/ActionTypes'

describe('reducer initial state', () => {
   it('should return the initial state', () => {
      expect(reducer(undefined, {})).toEqual([
         {
            isLoading: false,
         }
      ])
   })
   it('should handle ITEMS_REQUEST', () => {
      expect(
         reducer(
            {
               isLoading: false,
            },
            {
               type: types.ITEMS_REQUEST,
               payload: { isLoading: true }
            }
         )
      ).toEqual({
         isLoading: true
      })
   })
})
If you are not familiar with writing test case, you can check the basics of JEST.
Redux - Integrate React
In the previous chapters, we have learnt what is Redux and how it works. Let us now check the integration of view part with Redux. You can add any view layer to Redux. We will also discuss react library and Redux.
Let us say if various react components need to display the same data in different ways without passing it as a prop to all the components from top-level component to the way down. It would be ideal to store it outside the react components. Because it helps in faster data retrieval as you need not pass data all the way down to different components.
Let us discuss how it is possible with Redux. Redux provides the react-redux package to bind react components with two utilities as given below −
Provider makes the store available to rest of the application. Connect function helps react component to connect to the store, responding to each change occurring in the store’s state.
Let us have a look at the root index.js file which creates store and uses a provider that enables the store to the rest of the app in a react-redux app.
import React from 'react'
import { render } from 'react-dom'
import { Provider } from 'react-redux'
import { createStore, applyMiddleware } from 'redux';
import reducer from './reducers/reducer'
import thunk from 'redux-thunk';
import App from './components/app'
import './index.css';

const store = createStore(
   reducer,
   window.__REDUX_DEVTOOLS_EXTENSION__ && window.__REDUX_DEVTOOLS_EXTENSION__(),
   applyMiddleware(thunk)
)
render(
   <Provider store = {store}>
      <App />
   </Provider>,
   document.getElementById('root')
)
Whenever a change occurs in a react-redux app, mapStateToProps() is called. In this function, we exactly specify which state we need to provide to our react component.
With the help of connect() function explained below, we are connecting these app’s state to react component. Connect() is a high order function which takes component as a parameter. It performs certain operations and returns a new component with correct data which we finally exported.
With the help of mapStateToProps(), we provide these store states as prop to our react component. This code can be wrapped in a container component. The motive is to separate concerns like data fetching, rendering concern and reusability.
import { connect } from 'react-redux'
import Listing from '../components/listing/Listing' //react component
import makeApiCall from '../services/services' //component to make api call

const mapStateToProps = (state) => {
   return {
      items: state.items,
      isLoading: state.isLoading
   };
};
const mapDispatchToProps = (dispatch) => {
   return {
      fetchData: () => dispatch(makeApiCall())
   };
};
export default connect(mapStateToProps, mapDispatchToProps)(Listing);
The definition of a component to make an api call in services.js file is as follows −
import axios from 'axios'
import { itemsLoading, itemsFetchDataSuccess } from '../actions/actions'

export default function makeApiCall() {
   return (dispatch) => {
      dispatch(itemsLoading(true));
      axios.get('http://api.tvmaze.com/shows')
      .then((response) => {
         if (response.status !== 200) {
            throw Error(response.statusText);
         }
         dispatch(itemsLoading(false));
         return response;
      })
      .then((response) => dispatch(itemsFetchDataSuccess(response.data)))
   };
}
mapDispatchToProps() function receives dispatch function as a parameter and returns you callback props as plain object that you pass to your react component.
Here, you can access fetchData as a prop in your react listing component, which dispatches an action to make an API call. mapDispatchToProps() is used to dispatch an action to store. In react-redux, components cannot access the store directly. The only way is to use connect().
Let us understand how the react-redux works through the below diagram −
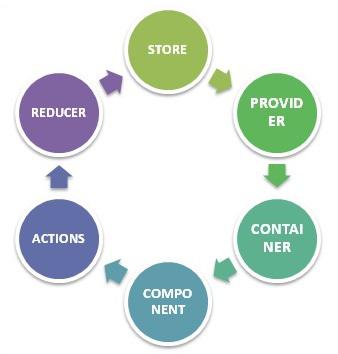
STORE − Stores all your application state as a JavaScript object
PROVIDER − Makes stores available
CONTAINER − Get apps state & provide it as a prop to components
COMPONENT − User interacts through view component
ACTIONS − Causes a change in store, it may or may not change the state of your app
REDUCER − Only way to change app state, accept state and action, and returns updated state.
However, Redux is an independent library and can be used with any UI layer. React-redux is the official Redux, UI binding with the react. Moreover, it encourages a good react Redux app structure. React-redux internally implements performance optimization, so that component re-render occurs only when it is needed.
To sum up, Redux is not designed to write shortest and the fastest code. It is intended to provide a predictable state management container. It helps us understand when a certain state changed, or where the data came from.
Redux - React Example
Here is a small example of react and Redux application. You can also try developing small apps. Sample code for increase or decrease counter is given below −
This is the root file which is responsible for the creation of store and rendering our react app component.
/src/index.js

import React from 'react'
import { render } from 'react-dom'
import { Provider } from 'react-redux'
import { createStore } from 'redux';
import reducer from '../src/reducer/index'
import App from '../src/App'
import './index.css';

const store = createStore(
   reducer,
   window.__REDUX_DEVTOOLS_EXTENSION__ &&
   window.__REDUX_DEVTOOLS_EXTENSION__()
)
render(
   <Provider store = {store}>
      <App />
   </Provider>, document.getElementById('root')
)
This is our root component of react. It is responsible for rendering counter container component as a child.
/src/app.js

import React, { Component } from 'react';
import './App.css';
import Counter from '../src/container/appContainer';

class App extends Component {
   render() {
      return (
         <div className = "App">
            <header className = "App-header">
               <Counter/>
            </header>
         </div>
      );
   }
}
export default App;
The following is the container component which is responsible for providing Redux’s state to react component −
/container/counterContainer.js

import { connect } from 'react-redux'
import Counter from '../component/counter'
import { increment, decrement, reset } from '../actions';

const mapStateToProps = (state) => {
   return {
      counter: state
   };
};
const mapDispatchToProps = (dispatch) => {
   return {
      increment: () => dispatch(increment()),
      decrement: () => dispatch(decrement()),
      reset: () => dispatch(reset())
   };
};
export default connect(mapStateToProps, mapDispatchToProps)(Counter);
Given below is the react component responsible for view part −
/component/counter.js
import React, { Component } from 'react';
class Counter extends Component {
   render() {
      const {counter,increment,decrement,reset} = this.props;
      return (
         <div className = "App">
            <div>{counter}</div>
            <div>
               <button onClick = {increment}>INCREMENT BY 1</button>
            </div>
            <div>
               <button onClick = {decrement}>DECREMENT BY 1</button>
            </div>
            <button onClick = {reset}>RESET</button>
         </div>
      );
   }
}
export default Counter;
The following are the action creators responsible for creating an action −
/actions/index.js
export function increment() {
   return {
      type: 'INCREMENT'
   }
}
export function decrement() {
   return {
      type: 'DECREMENT'
   }
}
export function reset() {
   return { type: 'RESET' }
}
Below, we have shown line of code for reducer file which is responsible for updating the state in Redux.
reducer/index.js
const reducer = (state = 0, action) => {
   switch (action.type) {
      case 'INCREMENT': return state + 1
      case 'DECREMENT': return state - 1
      case 'RESET' : return 0 default: return state
   }
}
export default reducer;
Initially, the app looks as follows −
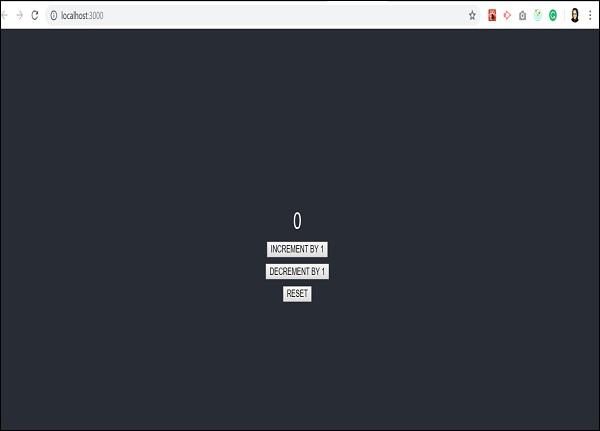
When I click increment two times, the output screen will be as shown below −
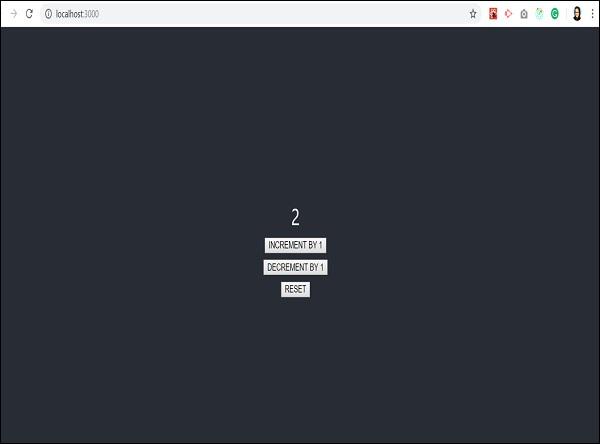
When we decrement it once, it shows the following screen −
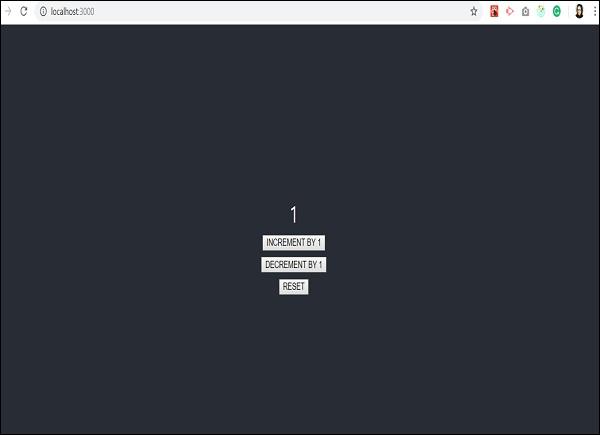
And reset will take the app back to initial state which is counter value 0. This is shown below −
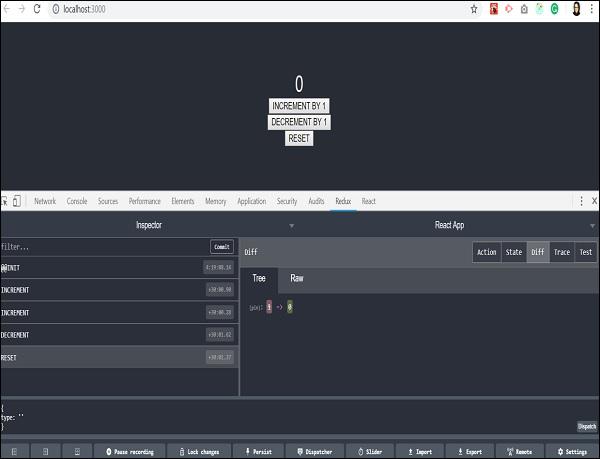
Let us understand what happens with Redux dev tools when the first increment action takes place −
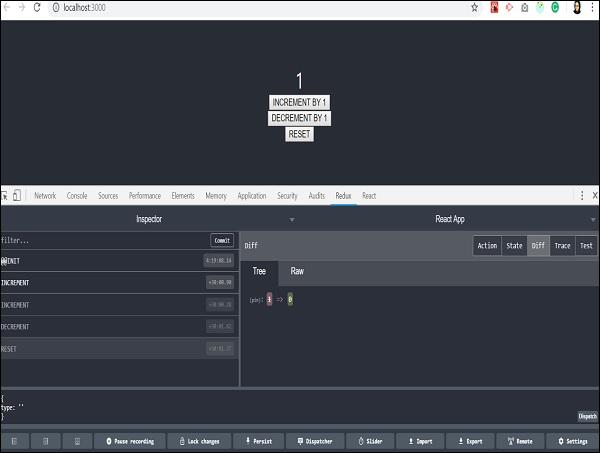
State of the app will be moved to the time when only increment action is dispatched and rest of the actions are skipped.
We encourage to develop a small Todo App as an assignment by yourself and understand the Redux tool better.


