JPA - Installation
This chapter takes you through the process of setting up JPA on Windows and Linux based systems. JPA can be easily installed and integrated with your current Java environment following a few simple steps without any complex setup procedures. User administration is required while installation.
System Requirements
| JDK |
Java SE 2 JDK 1.5 or above |
| Memory |
1 GB RAM (recommended) |
| Disk Space |
No minimum requirement |
| Operating System Version |
Windows XP or above, Linux |
Let us now proceed with the steps to install JPA.
Step1: Verify your Java Installation
First of all, you need to have Java Software Development Kit (SDK) installed on your system. To verify this, execute any of the following two commands depending on the platform you are working on.
If the Java installation has been done properly, then it will display the current version and specification of your Java installation. A sample output is given in the following table.
| Platform |
Command |
Sample Output |
| Windows |
Open command console and type:
\>java –version |
Java version "1.7.0_60"
Java (TM) SE Run Time Environment (build 1.7.0_60-b19)
Java Hotspot (TM) 64-bit Server VM (build 24.60-b09,mixed mode) |
| Linux |
Open command terminal and type:
$java –version |
java version "1.7.0_25"
Open JDK Runtime Environment (rhel-2.3.10.4.el6_4-x86_64)
Open JDK 64-Bit Server VM (build 23.7-b01, mixed mode) |
Step 2: Set your Java Environment
Set the environment variable JAVA_HOME to point to the base directory location where Java is installed on your machine. For example,
| Platform |
Description |
| Windows |
Set JAVA_HOME to C:\ProgramFiles\java\jdk1.7.0_60 |
| Linux |
Export JAVA_HOME=/usr/local/java-current |
Append the full path of Java compiler location to the System Path.
| Platform |
Description |
| Windows |
Append the String "C:\Program Files\Java\jdk1.7.0_60\bin" to the end of the system variable PATH. |
| Linux |
Export PATH=$PATH:$JAVA_HOME/bin/ |
Execute the command java -version from the command prompt as explained above.
Step3: Installing JPA
You can go through the JPA installation by using any of the JPA Provider from this tutorial, E.g. Eclipselink, Hibernate. Let us follow the JPA installation using Eclipselink. For JPA programming we require to follow the specific folder framework therefore it is better to use IDE.
Download Eclipse IDE form following link https://www.eclipse.org/downloads/ Choose the EclipseIDE for JavaEE developer that is Eclipse indigo.
Unzip the Eclipse zip file in C drive. Open Eclipse IDE.

Installing JPA using Eclipselink
Eclipselink is a library therefore we cannot add it directly to Eclipse IDE. For installing JPA using Eclipselink you need to follow the following steps.
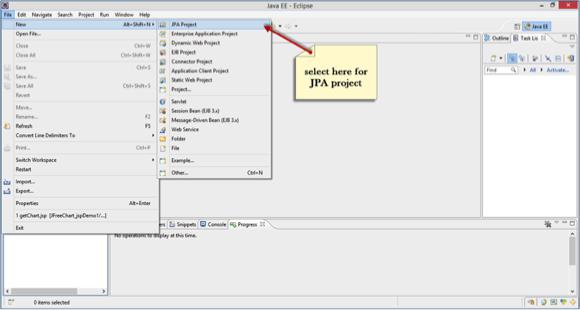
Create a new JPA project by selecting File->New->JPA Project in the Eclipse IDE as follows:
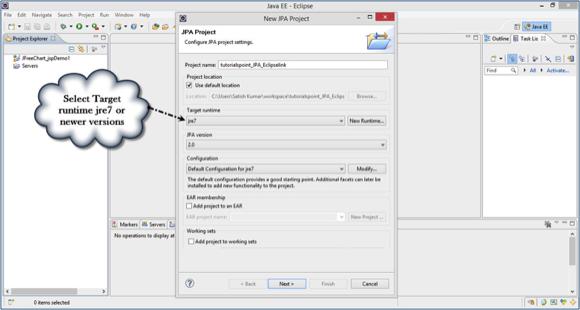
You will get a dialog box named New JPA Project. Enter project name ‘howcodex_JPA_Eclipselink’, check the jre version and click next:
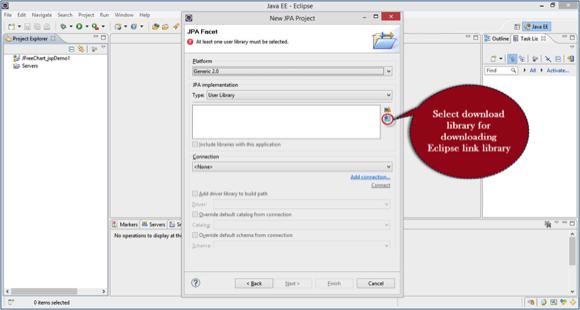
Click on download library (if you do not have the library) in the user library section:
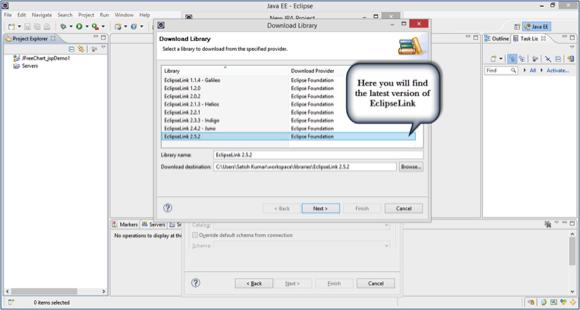
Select the latest version of Eclipselink library in the Download library dialog box and click next as follows:
Accept the terms of license and click finish for download library as follows:

You will find the process of downloading a file as follows:

After downloading, select the downloaded library in the user library section and click finish as follows:
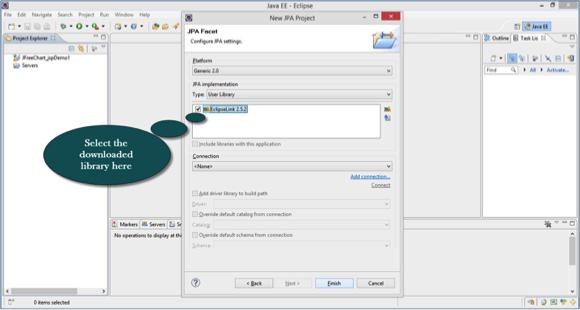
Finally you get the project file in the Package Explorer in Eclipse IDE. Extract all files, you will get the folder and file hierarchy as follows:
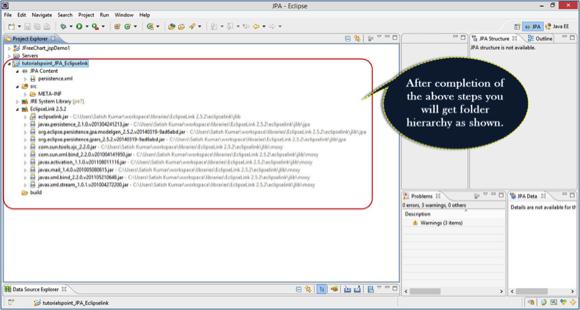
Adding MySQL connector to Project
Any example that we discuss here are mandatory to mingle with database. Let us consider MySQL database for database operations. It requires mysql-connector jar to interact with java program.
Follow the steps to configure database jar to your project.
Go to Project properties -> Java Build Path by right click on it. You will get a dialog box as follows: Click on Add External Jars.
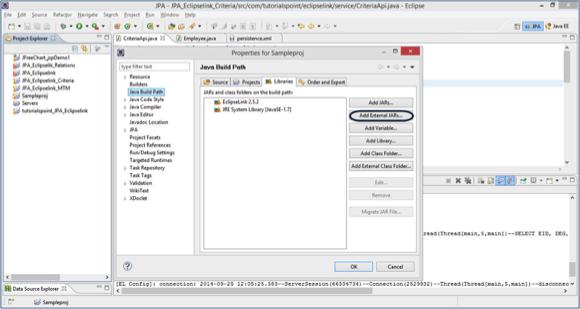
Go to the jar location in your system memory, select and click on open as follows:
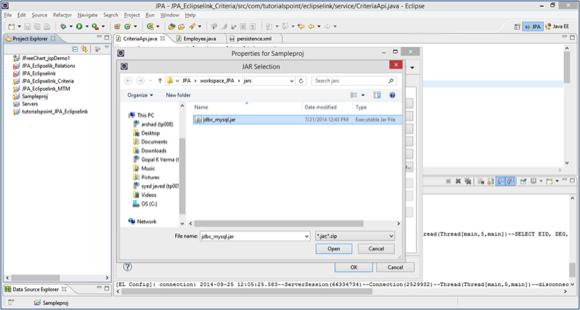
Click ok on properties dialog. You will get the MySQL-connector Jar into your project. Now you are able to do database operations using MySQL.


