Joomla - Create Modules
In this chapter, we will study about Creating Modules in Joomla. Modules are the extensions which are flexible and lightweight and useful for page rendering.
Create Modules
Following are the simple steps to create modules in Joomla.
Step 1 − Create a folder called mod_firstmodule in your Joomla → modules folder.

Step 2 − In the mod_firstmodule folder create a file called as "helper.php". This file contains class name as helper, it helps to display the retrieved data in the module output.
helper.php
<?php
   /**
      * Helper class for Hello World! module
      *
      * @package    Joomla.Tutorials
      * @subpackage Modules
      * @link http://docs.joomla.org/J3.x:Creating_a_simple_module/Developing_a_Basic_Module
      * @license        GNU/GPL, see LICENSE.php
      * mod_helloworld is free software. This version may have been modified pursuant
      * to the GNU General Public License, and as distributed it includes or
      * is derivative of works licensed under the GNU General Public License or
      * other free or open source software licenses.
   */

   class ModHelloWorldHelper {
      /**
         * Retrieves the hello message
         *
         * @param   array  $params An object containing the module parameters
         *
        * @access public
      */

      public static function getHello($params) {
         return 'Hello, World!';
      }
   }

?>
Step 3 − Create a file called as mod_helloworld.php. It is an entry point for the module which performs initialization routines, collects necessary data and displays the module output using template.
mod_helloworld.php
<?php
   /**
      * Hello World! Module Entry Point
      *
      * @package    Joomla.Tutorials
      * @subpackage Modules
      * @license    GNU/GPL, see LICENSE.php
      * @link       http://docs.joomla.org/J3.x:Creating_a_simple_module/Developing_a_Basic_Module
      * mod_helloworld is free software. This version may have been modified pursuant
      * to the GNU General Public License, and as distributed it includes or
      * is derivative of works licensed under the GNU General Public License or
      * other free or open source software licenses.
   */

   // No direct access
   defined('_JEXEC') or die;

   // Include the syndicate functions only once
   require_once dirname(__FILE__) . '/helper.php';

   $hello = modHelloWorldHelper::getHello($params);
   require JModuleHelper::getLayoutPath('mod_helloworld');
?>
Step 4 − Create a mod_helloworld.xml file. This file contains the information about module. This xml file contains information of files that are to be installed in Joomla for the module.
mod_helloworld.xml file
<?xml version = "1.0" encoding = "utf-8"?>

<extension type = "module" version = "3.1.0" client = "site" method="upgrade">

   <name>Hello, World!</name>
   <author>Howcodex</author>
   <version>1.0.0</version>
   <description>A simple Hello World! module.</description>

   <files>
      <filename>mod_helloworld.xml</filename>
      <filename module = "mod_helloworld">mod_helloworld.php</filename>
      <filename>index.html</filename>
      <filename>helper.php</filename>
      <filename>tmpl/default.php</filename>
      <filename>tmpl/index.html</filename>
   </files>

   <config>
   </config>

</extension>
Step 5 − Create a simple html file called index.html. The purpose of writing this file is that, the created directories should not be browsed. When a user browses into these directories, the index.html file gets displayed. You can even keep this file empty.
index.html
<html>
   <body> Welcome to Howcodex!!!!! </body>
</html>
Step 6 − Create a folder called as tmpl. Place default.php file as shown below and index.html (created in step (5)) under tmpl folder. The default.php file is a template that displays the module output.
default.php
<?php
   /**
      * @package Joomla.Site
      * @subpackage mod_firstmodule
      * @copyright Copyright (C) 2005 - 2012 Open Source Matters, Inc. All rights reserved.
      * @license GNU General Public License version 2 or later; see LICENSE.txt
   */
defined('_JEXEC') or die;
>

<p>Hello World!!!!!!</p>
After you have finished creating all these files, compress the complete folder mod_firstmodule.
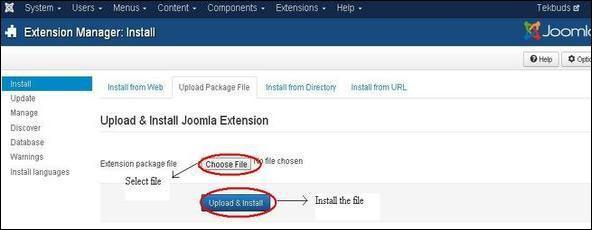
Step 7 − Go to Extension → Extension Manager in Joomla administrator and you will get the following screen. Here you can upload and install your created module files i.e. mod_firstmodule folder. Click on Choose File and select the created module file (compressed one). Click on Upload & Install button to upload the module file.

Step 8 − After upload and installation, go to Module Manager and click on New. There you can view your created module file as shown below.

Step 9 − You can assign this module similar to the other modules and then publish it.


