Making Applications with Swift
In this chapter, we will create two new Applications using Swift.
First Application – "Guess the Number"
In this section, we will create an Application called "Guess the number". To make this application, create a new iOS Single View Application and name it whatever you want.
Click on the main.storyboard and select your main view.
Add a text label → Change the text to “Guess the number”. Change the color, size properties and make it as per your requirement.
Add an Input field, stretch to full view.
Add a button and name it “Guess.
Add one more label, stretch it, and clear the text box.
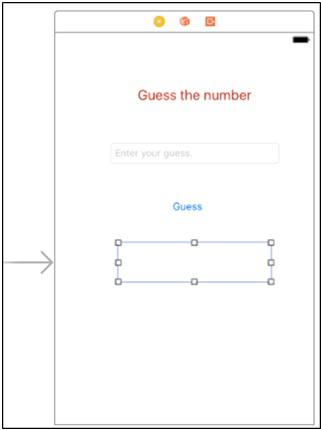
This is how your view should look like after adding all the elements.

Now Switch to assistant editor and Click on drag from your UI element to view controller file, then connect the text field as an outlet and name it userInput. Similarly,
- Connect empty label as outlet and name it as resultLabel.
- Connect Guess button as action and name it as guessButtonPressed.
What is the logic?
The logic is simple, we will generate random numbers between 0-9 and see if that is equal to the number the user entered, or not. If it is equal, we will show "you are right", else we will show "you are wrong!".
Applying the logic
To generate a random number between 0-9, we will use the following command.
let rollIt = String(arc4random_uniform(10))
Then we will use the following logic to check whether it is same as the user input or not.
if userInput.text == rollIt {
   resultLabel.text = "You're right!"
} else {
   resultLabel.text = "Wrong! It was a " + rollIt + "."
}
This is how your final logic in button action function will look like.
@IBAction func guessButtonPressed(_ sender: Any) {
   let rollIt = String(arc4random_uniform(10))
   if userInput.text == rollIt {
      resultLabel.text = "You're right!"
   } else {
      resultLabel.text = "Wrong! It was a " + rollIt + "."
   }
}
Your final application should look like this now.

Let us now run our Application and check its output. The opening screen should look as follows −

Next, feed a number in the input area.

Let’s feed another number and check its output −

We have completed one more Application. Try to run this application, and enter different inputs.
Second Application – "Is It Prime"
In this application, we will be taking an input from the user and we will check whether that number is prime or not −
Layout − Similar to the previous application, we need an input, a button and an output label.
Challenges − Create the UI and connect the elements to code. Also, try if you can create the complete project yourself. If you managed to create it by yourself, then it is great and you are doing excellent with iOS Development.
If you could not manage, do not worry. Look at the following image and try to do the same.

Try to create a view like this, if you are not able to do it yet, please read the previous section where we have developed a Guess Game.
What is the Logic?
Prime numbers are the numbers that cannot be divided by any other number except 1 and the number itself.
Example − 7 is a prime number as any other number except 1 and 7 cannot divide it.
How to Implement?
Try to write a code for checking prime numbers. Then take the user input and see if that is a prime or not. If yes, then show prime; otherwise show not prime in your result label.
Here is the code to check whether a supplied number is "prime" or not −
@IBAction func isItPrimeButtonPressed(_ sender: Any) {
   if let userEnteredString = userInput.text {
      let userEnteredInteger = Int(userEnteredString)
      if let number = userEnteredInteger {
         var isPrime = true
         if number == 1 {
            isPrime = false
         }
         var i = 2
         while i < number {
            if number % i == 0 {
               isPrime = false
            }
            i += 1
         }

         if isPrime {
            resultLabel.text = "yes. \(number) is prime!"
         } else {
            resultLabel.text = "No. \(number) is not prime"
         }
      } else {
         resultLabel.text = "Please enter a positive whole number"
      }
   }
}
This is how your button action should look like. Following is the image of the final code and view −

This is how your running application should look like if you followed the procedure.

Now, let us test our Application by supplying input values −


