Computer Security - Securing OS
In this section we will treat how to secure or harden (harden is another word used for securing OS) a workstation from the practical point of view and what are the steps to follow. We will treat the Windows OS and Mac OS X because most of the computers have this two operating systems, but the logic of securing is same for all the other operating systems like Linux or Android.
Guidelines for Windows OS Security
Following are the list of guidelines for Windows Operating System Security.
Use the licensed versions of Windows OS, not the cracked or pirated ones and activate them in order to take genuine updates.

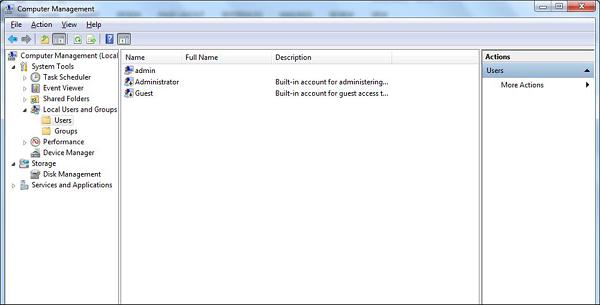
Disable Unused Users − To do this, Right Click on Computer – Manage – Local Users and Groups – Users, then disable those users that are not required. In my case, I disabled the Guest and Administrator users and I created a new non-default like Admin.

Disable unused shares − By default, Windows OS creates shares, please see the following screenshot. You have to disable them and to do this, you follow −
Right Click on My Computer – Manage – Shared Folders – Right Click Stop Sharing.

The next step is to take updates regularly for Windows OS. It is reccomended to do them automatically and periodically. To set this up, go to Control Panel – System and Security – Windows Updates – OK.

Put your Windows System Firewall up, this will block all the unauthorized services that make traffic. To set this up, go to Control Panel – System and Security – Windows Firewall.

Install a licensed antivirus and take updates, in the coming sections we will cover in detail about antiviruses. It is strongly recommended not to download from torrents and install cracked versions.

You should always Configure a password protected Screen Saver. To set this up, please follow this path −
Control Panel – All Control Panel Items – Personalize – Turn Screen Saver on or off – Check “On resume, display logon Screen”.

Disable Autoplay for Removable Media. This blocks the viruses to run automatically from removable devices.
To disable it go to – Start – on Search box type Edit Group Policy –Administrative Templates – Windows Components – Autoplay Policy – Turn off Autoplay – Enable – Ok.

Install only trusted internet explorer browsers like Internet explorer, Chrome or Mozilla Firefox and then update them regularly. Missing the updates can lead to possible hacking.

Enable the BitLocker Drive Encryption to encrypt hard drives, but it is only available in Windows & Ultimate and Upper Versions.
To enable it follow the path: Start – Control Panel – System and Security – BitLocker Drive Encryption.

Set Bios Password − This option differs based on different computer producers and we need to read manufacturer guidelines, this option secures your computer one layer upper in the OS.
Guidelines for Mac OS X Security
Following are the list of guidelines for Mac OS X Security.
Use licensed versions of Mac OS X and never use the cracked or pirated ones. Once installed, activate them in order to take up the genuine updates.

Set password for the root user and create a less privileged user. By default, the root user of the Mac OS X doesn’t have a password, so you have to put one and then create a user with less privilege for daily usage.
To set it up follow: Apple menu – System Preferences – Click Users & Groups

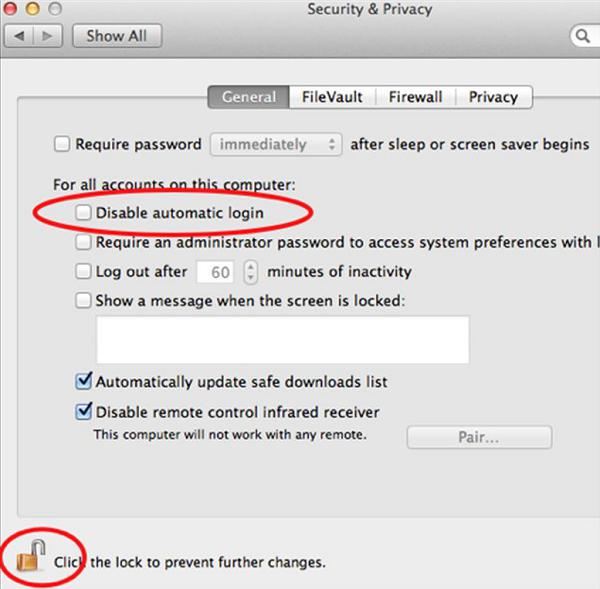
Disable Auto Logon − By default, the Mac OS X is configured to automatically logon the first administrative user that is created. Also it displays all valid usernames in the login windows.
To disable this, you have to: Open System Preferences – Accounts – User – Uncheck the Log in automatically – Click on Login Options (tab) – Set “Display Login Windows as” = Name and Password.

Update Mac OS X − In order to secure our systems, we need to take our updates and patches of Mac OS X.
To do so we follow this path: Click on System Preferences –Software Update – Change the default “weekly” to “daily” – Quit System Preferences.
You better do it weekly because it will not overload your networks, in case you have a large network.

Put your Mac OS X system firewall up. The go to System Preferences – Sharing –Firewall – Click on Start.

Configure Screen saver password protected: To set this up, follow this path – System Preferences – Screen Effect – Activation – Set “Time until screen effect starts” = 5 Minutes – Set “Password to use when waking the screen effect” = use my user –account password. It is recommended to be less than 5 minutes.

Put Open Firmware password − Double click the application icon to open it. Click on the "Change" button to modify the security settings. If you are enabling the security features, enter a password into the – Password and Verify boxes. Click OK. Enter your System Administrator Account.

Encrypt folders − Mac OS X has FileVault, which encrypts information in your home folder. You can see the FileVault in the following screenshot.
Click Apple Menu – System Preferences – Security & Privacy – FileVault – Click the lock Icon to unlock it, then enter an administrator name and password.
Then you will have to Turn On FileVault.

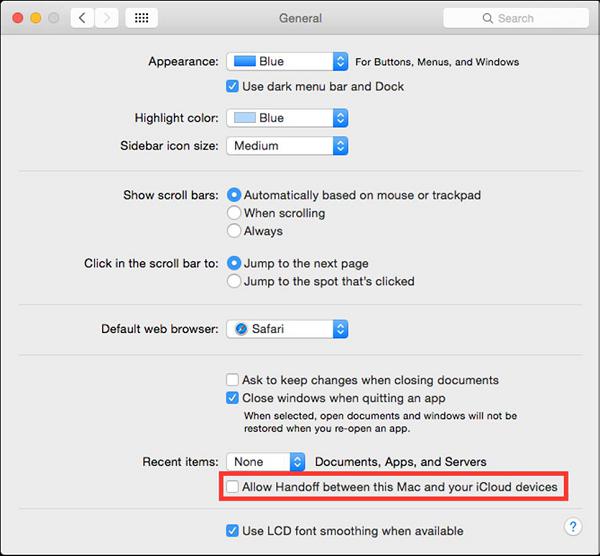
Disable Handoff − Handoff is a feature to keep your work in sync, but it needs to send some data to Apple to work. It is suggested to disable it.
To do so: Click System Preferences – General – Uncheck “Allow Handoff between this Mac and your iCloud devices”.

Allow only signed Apps − To reduce the surface of attack, it is suggested not to run untrusted code not signed with a proper key.
To allow only apps signed by an authorized developer, you should follow the path – System Preferences – Security & Privacy –General – Set “Allow apps download from” to “Mac App Store and identified developers”.


